background image

English

         12

Instrument calibration

The calibration process improves the overall response of the presets by tailoring them to the specific response 

of your instrument. By default this button’s LED is red to indicate no user calibration has been performed yet, 

and the factory calibration is loaded. This factory calibration has been created to make virtually every instrument 

sound natural and balanced. You can use the factory calibration (TONE button RED) on steel strings guitars 

of any kind, nylon strings guitars of any kind, acoustic basses, ukuleles and so on. The sound will always be 

balanced and natural thanks to the proprietary digital processing system iRig Acoustic Stage performs. If you 

are playing Steel stringed guitars and would like to make the iRig Acoustic Stage processing specifically tailored 

for your instrument, you should perform the Instrument Calibration process.
(see notes below).
In the table below are listed the typical situations when it is useful to perform the instrument calibration:

Instrument TYPE

CALIBRATION

Steel strings - Dreadnought

Optional, will improve every instrument even if Factory 

Calibration already sounds great. 

Steel strings - Jumbo, Parlor, “001”, and other styles 

different from Dreadnought

Optional, can be effective, but, depending on the 

instrument, can also “flatten out” some peculiar 

aspect of the guitar tone. Since results depends on 

the instrument, it should be experimented with.

Nylon strings - any type

Normally not useful. Factory Calibration sounds great 

on Nylon instruments, can anyway be experimented.

Non-guitar instruments like: Ukuleles, Acoustic 

Basses, Mandolins, etc..

Not advisable. Will make the instrument sound 

unnatural. Factory calibration sounds great on these 

instruments.

Calibration process

As soon as a calibration has been successfully completed the button will turn green.
To start the calibration the iRig Acoustic microphone must be connected:
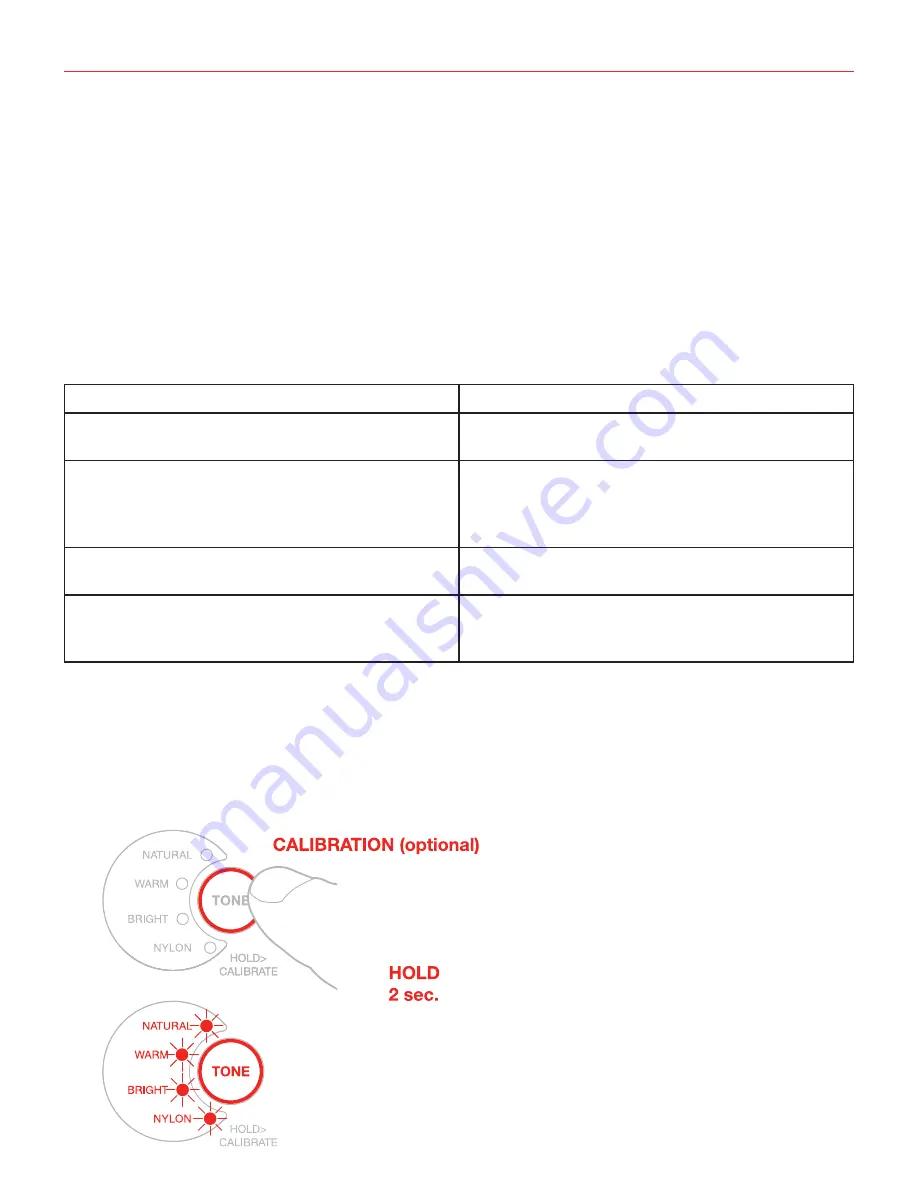
1.  Keep pressed the Tone button for at least 2sec (after 2 sec begins the calibration process).
2.  The four presets LEDs will start to blink along with the TONE LED

Содержание iRig Acoustic Stage

Страница 1: ...The Advanced Digital Microphone System for Acoustic Guitar USER MANUAL...

Страница 2: ...ation and setup 4 Cancel feedback button 10 Tone button 11 Instrument calibration 12 Calibration process 12 Phase switch 14 AUX IN 15 Low battery indications 15 Specifications 16 Warranty 16 Support a...

Страница 3: ...coustic Stage is to make your guitar sound exactly as if it was captured with a classic recording studio setup with a very simple clip on microphone that can be applied in seconds to any instrument Th...

Страница 4: ...o have 2 sets of rechargeable AAs one in use and the other on charge and swap them every 2 3 gigs 2 Connect the iRig Acoustic microphone 3 Fix the microphone to your instrument If the soundboard of yo...

Страница 5: ...t to the PA mixer or to an acoustic guitar amplifier as you would do with a normal acoustic electric guitar 5 Turn ON the unit Tip Always turn down the channel volume on the mixer or the volume of the...

Страница 6: ...great results if your instrument already features an onboard undersaddle piezo pickup system you can also connect its output to iRig Acoustic Stage This will give more flexibility to your tone allowin...

Страница 7: ...pletely clockwise When performing live with loud sets and depending on the type of sound you re after it might be useful mixing in a portion of the guitar s built in piezo pickup This will make the sy...

Страница 8: ...ge output and it can be useful when playing in front of loud stage monitors to experiment with both positions to find the one that gives less feedback and a more solid tone 9 Use the volume knob to ad...

Страница 9: ...will ensure professional quality recording results with a minimal effort and ultra quick setup You can connect iRig Acoustic Stage to Mac computers Windows based computers iOS devices using a Camera C...

Страница 10: ...be feedback safe while performing is to follow these steps while setting the sound for the gig just raise the iRig Acoustic Stage channel volume slowly up to when the system starts to feedback Then w...

Страница 11: ...nd a bit too harsh or edgy BRIGHT gives a brighter tone useful to have it cutting thought the mix in complex live setups All the three settings apply to both steel and nylon strung instruments Nylon w...

Страница 12: ...d the typical situations when it is useful to perform the instrument calibration Instrument TYPE CALIBRATION Steel strings Dreadnought Optional will improve every instrument even if Factory Calibratio...

Страница 13: ...how calibration clusters should be played Tip The fact that the calibration end results depends on how you play the calibration clusters is actually something very useful once you get used to it becau...

Страница 14: ...e Tone button for at least 2 sec NOTE 1 the calibration process has a time out of 60 seconds After this time the process automatically ends NOTE 2 the calibration can start only if the microphone is c...

Страница 15: ...zo pickup onstage in feedback critical situations with just a touch of the iRig Acoustic microphone mixed in to make it sounding way more acoustic and rich Use the MIX control to balance the tone betw...

Страница 16: ...Signal to noise ratio 101 dB A MICROPHONE INPUT Connector female 2 5mm TS Jack AUX INPUT Connector unbalanced TS 1 4 Jack Tip signal Shield ground AUX Input Impedance 11kOhms active instruments only...

Страница 17: ...tage iRig Acoustic Stage 2 AA iRig Acoustic iRig Acoustic Stage iRig Acoustic Stage DSP 3 iRig Acoustic Stage iRig Acoustic Stage JamPointsTM JamPointsTM IK IK Register at www ikmultimedia com registr...

Страница 18: ...18 1 18 Tip 2 AA 2 iRig Acoustic 3 iRig Acoustic iRig Acoustic...

Страница 19: ...19 4 iRig Acoustic Stage PA 5 iRig Acoustic Stage Tip ON OFF iRig Acoustic Stage...

Страница 20: ...20 6 iRig Acoustic Stage iRig Acoustic Stage iRig Acoustic 7 iRig Acoustic Stage AUX MIX MIX 50...

Страница 21: ...21 8 MIX iRig Acoustic 0 180 AUX AUX iRig Acoustic Stage 9 Tip...

Страница 22: ...Rig Acoustic Stage 11 iRig Acoustic Stage USB GarageBand iRig Acoustic Stage Mac Windows iOS OTG iRig Acoustic Stage Micro USB to USB type A USB iRig Acoustic Stage USB iRig Acoustic Stage iRig Acoust...

Страница 23: ...23 CANCEL FEEDBACK 10 1 10 2 3 2 Tip 1 iRig Acoustic Stage CANCEL FEEDBACK Tip 2 PA iRig Acoustic Stage CANCEL FEEDBACK...

Страница 24: ...24 TONE NATURAL WARM BRIGHT Nylon NYLON TONE NATURAL WARM BRIGHT NYLON on NATURAL WARM BRIGHT NYLON off NATURAL LED iRig Acoustic Stage iRig Acoustic Stage...

Страница 25: ...25 Jumbo Parlor 001 Dreadnought iRig Acoustic 1 TONE 2 2 2 LED TONE LED...

Страница 26: ...26 3 6 Tip 4 TONE TONE LED...

Страница 27: ...27 5 FEEDBACK CANCEL iRig Acoustic Stage 6 1 TONE 2 NOTE 1 60 NOTE 2 0 180 MEMS Piezo MEMS MEMS MEMS Piezo Piezo...

Страница 28: ...28 AUX iRig Acoustic Stage AUX iRig Acoustic iRig Acoustic MIX CCW iRig Acoustic CW AUX iRig Acoustic PHASE iRig Acoustic Stage LED 2 LED...

Страница 29: ...48 kHz 2xAA 12 AA 15 2000 mAh 30 Hz 20 kHz 101 dB A 2 5mm TS AUX TS 1 4 Tip AUX 11kOhms TS 1 4 Tip 50Ohms USB 1x Micro USB B type USB 48kHz 24bit www ikmultimedia com warranty www ikmultimedia com sup...

Страница 30: ...rademarks and artists names are the property of their respective owners which are in no way associated or affiliated with IK Multimedia iPad iPhone iPod touch Mac Mac logo and GarageBand are trademark...

Отзывы: