background image

ENGLISH

8  BEFORE YOU OPERATE THE MONITOR

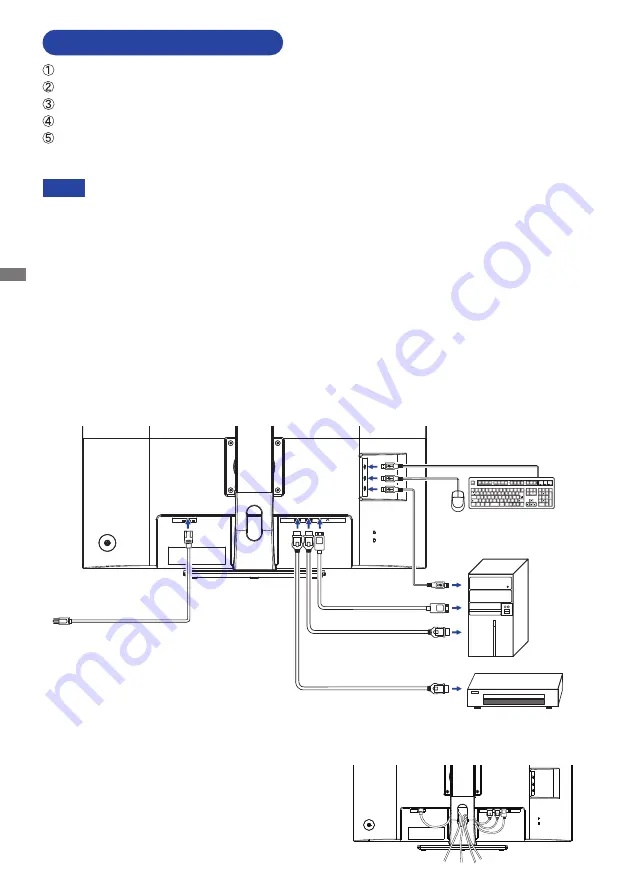
CONNECTING YOUR MONITOR


Ensure that both the computer and the monitor are switched off.

  Connect the computer to the monitor with the signal cable.

  Connect the Power Cable to the monitor first and then to the power source.

  Turn on your monitor and computer.

  To turn off your monitor, press and hold the Power Switch for 3 seconds when the menu is not 

displayed.

[Example of Connection]

<Back>

NOTE

 The signal cables used for connecting the computer and monitor may vary with the 

type of computer used. An incorrect connection may cause serious damage to both 

the monitor and the computer. The cable supplied with the monitor is for a standard 

connector. If a special cable is required please contact your local iiyama dealer or 

regional iiyama office.

 For connection to Macintosh computers, contact your local iiyama dealer or regional 

iiyama office for a suitable adaptor.

 The Class I pluggable equipment Type A must be connected to protective earth.

 The socket-outlet shall be installed near the equipment and shall be easily accessible.

 Excessive sound pressure from ear-/headphones can cause hearing damage/hearing loss.

HDMI Cable (Accessory)

Computer

HDMI Cable (Not included)

DisplayPort Cable (Accessory)

AV Equipment etc.

Power Cable (Accessory)

Mouse

Keyboard

USB Cable (Accessory)

[ Collect Cables ]

Put the cables through the cable hole to bundle them.

Содержание ProLite XB3288UHSU

Страница 1: ...ch for choosing the iiyama LCD monitor We recommend that you take a few minutes to read this comprehensive manual carefully before installing and switching on the monitor Please keep this manual in a...

Страница 2: ...ENGLISH...

Страница 3: ...e of different countries from there CE MARKING DECLARATION OF CONFORMITY This LCD monitor complies with the requirements of the EC EU Directive 2014 30 EU EMC Directive 2014 35 EU Low Voltage Directiv...

Страница 4: ...THE CONTENTS OF THE PACKAGE 4 INSTALLATION 5 FITTING AND REMOVAL OF BASE 6 CONTROLS AND CONNECTORS 7 CONNECTING YOUR MONITOR 8 COMPUTER SETTING 9 ADJUSTING THE HEIGHT AND THE VIEWING ANGLE 9 OPERATING...

Страница 5: ...e fire electric shock or damage INSTALL THE MONITOR ON A FLAT STABLE SURFACE The monitor may cause an injury if it falls or is dropped DO NOT USE THE MONITOR NEAR WATER Do not use where water may be s...

Страница 6: ...be sure the signal cable is disconnected If you do not disconnect them it may cause fire or electric shock UNPLUG THE MONITOR If the monitor is not in use for a long period of time it is recommended t...

Страница 7: ...or iiyama service center for advice or replacement packaging WARNING If you drop any materials or liquids such as water into the monitor when cleaning unplug the power cable immediately and contact y...

Страница 8: ...or damage caused by a power cable not supplied by iiyama An approved power cable greater or equal to H05VVF 3G 0 75mm must be used Power Cable HDMI Cable DisplayPort Cable USB Cable Stand Base with a...

Страница 9: ...t may contact with the electrical parts inside the monitor WARNING Screw Chassis Mounting Stage L WALL MOUNTING ROTATING THE MONITOR Available Landscape Portrait Power Indicator Power Indicator Power...

Страница 10: ...Put a piece of soft cloth on the table beforehand to prevent the monitor from being scratched Lay the monitor flat on a table with front face down Install the Stand Base as shown on the below picture...

Страница 11: ...ecurity lock and cable to prevent the monitor from being removed without your permission Headphone Connector DisplayPort Connector DP HDMI Connector HDMI2 HDMI Connector HDMI1 AC Connector AC POWER IN...

Страница 12: ...oth the monitor and the computer The cable supplied with the monitor is for a standard connector If a special cable is required please contact your local iiyama dealer or regional iiyama office For co...

Страница 13: ...so that the monitor does not topple when you change the monitor s height or angle You are able to adjust the monitor s height up to 120mm angle up to 45 right and left 22 upward and 3 downward Do not...

Страница 14: ...ns are aborted during adjustment On Screen Display disappears when the time set for the OSD Time Out has passed Also the button can be used to return previous menu and turn off the On Screen Display A...

Страница 15: ...isplay the picture dot by dot Dot By Dot Sharpness 1 You can change the picture quality from 0 to 100 sharp to soft Press the Button to change the picture quality in numerical order Press the Button t...

Страница 16: ...n the center of the screen with 4 3 aspect ratio 3 Adjust the Brightness when you are using the monitor in a dark room and feel the screen is too bright 4 Adjustable settable items depend on which ite...

Страница 17: ...tting Text For text editing and viewing in a word processing environment Scenery For displaying outdoor scenery images Cinema For movie and video environment Game For PC game environment Off Return to...

Страница 18: ...eft Reduce the size of the Sub screen Increase the size of the Sub screen Move the sub screen to the top right corner Move the sub screen to the top left corner Move the sub screen to the bottom right...

Страница 19: ...sabled Input source is fixed not selected automatically when HDMI1 HDMI2 and DisplayPort which are selected NOTE Select the HDMI1 input HDMI1 Select the DisplayPort input DisplayPort Search for an ava...

Страница 20: ...lowing button operations Volume Press the Button when the Menu is not displayed Mute Keep pressing the Button for about 2 seconds when the Menu is not displayed Mute and Unmute are switched by repeati...

Страница 21: ...3 4 English Deutsch English German Fran ais French Japanese Russian Polski Polish Nederlands Dutch Adjustment Item Option Language esky Czech Italiano Italian Language OSD Settings PICTURE COLOR PIP P...

Страница 22: ...light NOTE Auto Pow Off Enable the Auto Pow Off function Off Auto Pow Off function is turned Off On The Auto Pow Off function is enabled as default setting Monitor will turn off automatically after 3...

Страница 23: ...deactivated by pressing the button again for 5 seconds Power Switch 1 The power switch lock will be activated by pressing the button for 5 seconds Locking the power switch means that won t be able to...

Страница 24: ...he power indicator turns to orange From Power Management Mode the image reappears in several seconds when either the keyboard or the mouse are touched again The power management feature of this produc...

Страница 25: ...oo dark The screen is shaking The video output level of the computer is within the specification of the monitor The power voltage is within the specification of the monitor The signal timing of the co...

Страница 26: ...ENGLISH 22 RECYCLING INFORMATION For better environment protection please don t dispose your monitor Please visit our web site www iiyama com for monitor recycling RECYCLING INFORMATION...

Страница 27: ...5 0kHz Vertical 38 60Hz Native Resolution 3840 2160 8 3 MegaPixels Supported max resolution 3840 2160 60Hz Input Connector HDMI 2 DisplayPort Plug Play VESA DDC2BTM Input Video Signal HDMI DisplayPort...

Страница 28: ...0 000MHz 46 875kHz 75 000Hz 49 500MHz 1024 768 48 363kHz 60 004Hz 65 000MHz 60 023kHz 75 029Hz 78 750MHz 1280 1024 63 981kHz 60 020Hz 108 000MHz 79 976kHz 75 025Hz 135 000MHz 1920 1080 67 500kHz 60 00...

Отзывы: