Iiyama ProLite X2788QS Скачать руководство пользователя страница 15

ENGLISH

  BEFORE YOU OPERATE THE MONITOR  11  

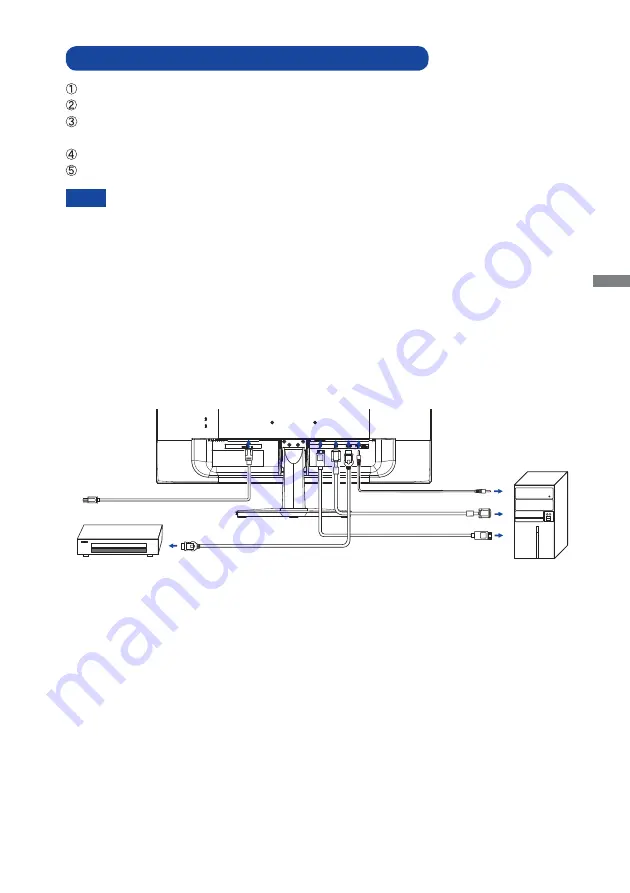
CONNECTING YOUR MONITOR : ProLite X2788QS


Ensure that both the computer and the monitor are switched off .

  Connect the computer to the monitor with the signal cable.
  Connect the monitor to the audio equipment with the Audio Cable for computer when using the 

audio features.

  Connect the Power Cable to the monitor fi rst and then to the power supply.
  Turn on your monitor and computer.

[Example of Connection]

<Back>

NOTE

 The  signal  cables  used  for  connecting  the  computer  and  monitor  may  vary  with  the 

type  of  computer  used. An  incorrect  connection  may  cause  serious  damage  to  both 
the  monitor  and  the  computer.  The  cable  supplied  with  the  monitor  is  for  a  standard 
connector.  If  a  special  cable  is  required  please  contact  your  local  iiyama  dealer  or 
regional iiyama offi  ce.

 For  connection  to  Macintosh  computers,  contact  your  local  iiyama  dealer  or  regional 

iiyama offi  ce for a suitable adaptor.

 Make sure you tighten the fi nger screws at each end of the signal cable.

 Excessive sound pressure from ear-/headphones can cause hearing damage/hearing loss.

Power Cable (Accessory)

Audio Cable (Not Included)

Computer

DVI-D Cable (Not Included)*

DisplayPort Cable (Accessory)

HDMI Cable (Accessory)

AV Equipment

* DVI dual-link cable is not supplied with the monitor. If you use low quality DVI dual-link cable, it 

may cause a result of electro-magnetic interference. Please contact the iiyama Support Centre in 
your country if you wish to connect the monitor via the DVI input.

Содержание ProLite X2788QS

Страница 1: ...oosing the iiyama LCD monitor We recommend that you take a few minutes to read carefully through this brief but comprehensive manual before installing and switching on the monitor Please keep this man...

Страница 2: ......

Страница 3: ...CONFORMITY This LCD monitor complies with the requirements of the EC EU Directive 2014 30 EU EMC Directive 2014 35 EU Low Voltage Directive 2009 125 EC ErP Directive and 2011 65 EU RoHS Directive The...

Страница 4: ...788QS 8 CONTROLS AND CONNECTORS ProLite X2788QS 9 CONNECTING YOUR MONITOR ProLite XB2788QS 10 CONNECTING YOUR MONITOR ProLite X2788QS 11 COMPUTER SETTING 12 ADJUSTING THE HEIGHT AND THE VIEWING ANGLE...

Страница 5: ...ay cause re electric shock or damage INSTALL THE MONITOR ON A FLAT STABLE SURFACE The monitor may cause an injury if it falls or is dropped DO NOT USE THE MONITOR NEAR WATER Do not use where water may...

Страница 6: ...signal cable is disconnected If you do not disconnect them it may cause re or electric shock UNPLUG THE MONITOR If the monitor is not in use for a long period of time it is recommended that it is left...

Страница 7: ...yama service center for advice or replacement packaging WARNING If you drop any materials or liquids such as water into the monitor when cleaning unplug the power cable immediately and contact your de...

Страница 8: ...h HDMI DisplayPort input Flicker Free Blue Light Reducer Digital Character Smoothing Stereo Speakers 2 2 5W Stereo Speakers Plug Play VESA DDC2B Compliant Windows Vista 7 8 8 1 10 Compliant Power Mana...

Страница 9: ...Screw with washer which L length is 7mm to fasten the monitor Using the screw longer than this may cause electric shock or damage because it may contact with the electrical parts inside the monitor Pl...

Страница 10: ...h front face down Hold the monitor and push the Stand Base Use thumb screw provided to secure base to monitor column Removal Put a piece of soft cloth on the table beforehand to prevent the monitor fr...

Страница 11: ...ITTING AND REMOVAL OF BASE ProLite X2788QS Installation Put a piece of soft cloth on the table beforehand to prevent the monitor from being scratched Lay the monitor at on a table with front face down...

Страница 12: ...Button i Menu Button MENU EXIT Speakers Keyhole for Security Lock You can fasten a security lock and cable to prevent the monitor from being removed without your permission Headphone Connector EARPHO...

Страница 13: ...Color Button i Menu Button MENU EXIT Speakers Keyhole for Security Lock You can fasten a security lock and cable to prevent the monitor from being removed without your permission Headphone Connector E...

Страница 14: ...standard connector If a special cable is required please contact your local iiyama dealer or regional iiyama o ce For connection to Macintosh computers contact your local iiyama dealer or regional iiy...

Страница 15: ...The cable supplied with the monitor is for a standard connector If a special cable is required please contact your local iiyama dealer or regional iiyama o ce For connection to Macintosh computers co...

Страница 16: ...erence Hold the panel so that the monitor does not topple when you change the monitor s height or angle You are able to adjust the monitor s height up to 130mm angle up to 45 degrees right and left 17...

Страница 17: ...In order to ensure a healthy and relaxed body position when using the monitor at visual display workstations it is recommended that the adjusted tilt angle should not exceed 10 degrees Adjust the mon...

Страница 18: ...the desired adjustment icon Press the SELECT Button again Use the Buttons to make the appropriate adjustment or setting Press the EXIT Button to leave the menu and the settings you just made would be...

Страница 19: ...Press the INPUT Button when the Menu is not displayed Direct Direct However it will automatically be selected when just one source is using In Power Management Mode input switching is disabled Input s...

Страница 20: ...e gray level response time of the LCD panel A higher level results in a faster response time Sharpness You can change the picture quality from 0 to 100 soft to sharp Press the Button to change the pic...

Страница 21: ...MI input HDMI Audio Input Suitable for HDMI DisplayPort input only You can skip the Menu items and display an adjustment scale directly by using the following button operations Audio Press the Button...

Страница 22: ...items and display an adjustment scale directly by using the following button operations i Style Color Press the i Button when the Menu is not displayed Direct Standard For general windows environment...

Страница 23: ...justment Item Problem Option Button to Press OSD Settings OSD Time Out OSD Background The background of OSD is mode transparent English Deutsch English German Fran ais French Japanese Russian Polski P...

Страница 24: ...ment Item Problem Option Button to Press Setup Menu FreeSync DP Reset Information iiyama Logo displayed when the monitor is turned on On O iiyama Logo does not display when the monitor is turned on Op...

Страница 25: ...lock will be activated by pressing the front buttons MENU and for 10 seconds Locking the power switch means that won t be able to turn o the Monitor while the power switch is locked If presses the pow...

Страница 26: ...5W The screen becomes dark and the power indicator turns to orange From Power Management Mode the image reappears in several seconds when either the keyboard or the mouse are touched again The power...

Страница 27: ...with another piece of equipment If the blank screen saver is in active mode touch the keyboard or the mouse Increase the Contrast and or Brightness The computer is ON The Signal Cable is properly con...

Страница 28: ...equipment is within the speci cation of the monitor The audio output level of the audio equipment is within the speci cation of the monitor The Audio Cable is properly connected The sound is too loud...

Страница 29: ...gaPixels Supported max resolution DVI 2880 x 1620 60Hz HDMI FreeSync O 2560 x 1440 60Hz HDMI FreeSync On 2560 x 1440 60Hz DisplayPort FreeSync O 2880 x 1620 60Hz DisplayPort FreeSync On 2880 x 1620 60...

Страница 30: ...tion DVI 2880 x 1620 60Hz HDMI FreeSync O 2560 x 1440 60Hz HDMI FreeSync On 2560 x 1440 60Hz DisplayPort FreeSync O 2880 x 1620 60Hz DisplayPort FreeSync On 2880 x 1620 60Hz Input Connector DVI D 24 p...

Страница 31: ...0mm 15 0 300 0mm 11 8 230 0mm 9 0 54 5mm 2 1 412 0mm 16 2 542 0mm 21 3 Maximum adjustment range Protruding portion s not included DIMENSIONS ProLite X2788QS 599 5mm 23 6 643 5mm 25 3 270 0mm 10 6 242...

Страница 32: ...480 31 469kHz 59 940Hz 25 175MHz 37 500kHz 75 000Hz 31 500MHz SVGA 800 600 37 879kHz 60 317Hz 40 000MHz 46 875kHz 75 000Hz 49 500MHz XGA 1024 768 48 363kHz 60 004Hz 65 000MHz 60 023kHz 75 029Hz 78 750...

Отзывы: