background image

ENGLISH

  BEFORE YOU OPERATE THE MONITOR  5

 

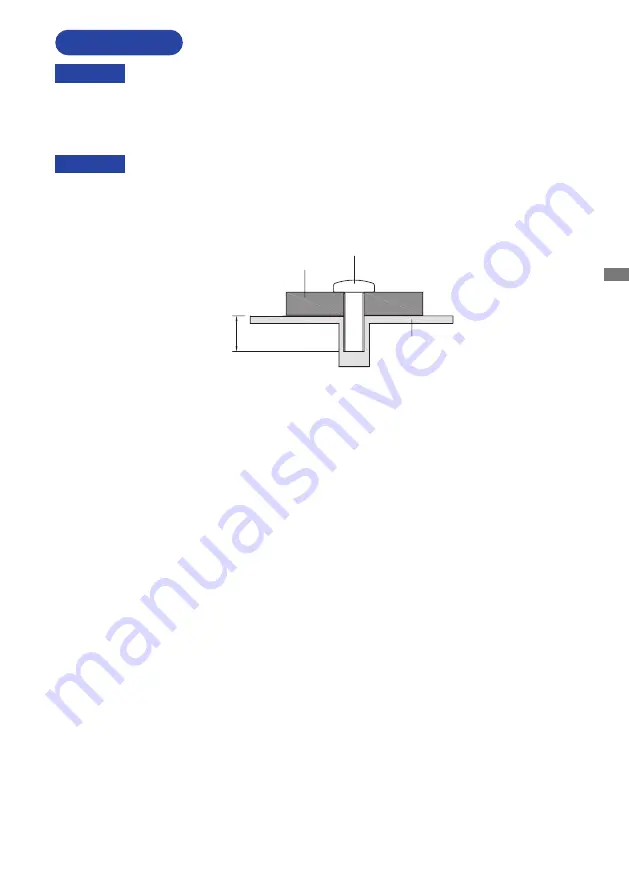
When you use with the wall mounting, in consideration of thickness of the mounting 

stage, tighten the M4 Screws (4pcs)  with washer which “L” length is 7mm to fasten 

the monitor. Using the screw longer than this may cause electric shock or damage 
because it may contact with the electrical parts inside the monitor.

WARNING

Screw

Chassis

 Mounting Stage

L

INSTALLATION

< WALL MOUNTING >

WARNING

 

Before installation, make sure the wall, ceiling or desktop arm is strong enough to 
hold the necessary weight of the monitor and the mount.

Содержание ProLite X2283HS

Страница 1: ...ch for choosing the iiyama LCD monitor We recommend that you take a few minutes to read this comprehensive manual carefully before installing and switching on the monitor Please keep this manual in a...

Страница 2: ...ENGLISH...

Страница 3: ...ture Criteria in TCO Certified have a life cycle perspective and balance environmental and social responsibility Conformity is verified by independent and approved verifiers that specialize in IT prod...

Страница 4: ...iiyama com You can access the Web page of different countries from there CE MARKING DECLARATION OF CONFORMITY This LCD monitor complies with the requirements of the EC EU Directive 2014 30 EU EMC Dire...

Страница 5: ...S ProLite X2283HS 10 CONNECTING YOUR MONITOR ProLite XB2283HS 11 CONNECTING YOUR MONITOR ProLite X2283HS 12 DISCONNECTING YOUR MONITOR 13 COMPUTER SETTING 14 ADJUSTING THE HEIGHT AND THE VIEWING ANGLE...

Страница 6: ...e fire electric shock or damage INSTALL THE MONITOR ON A FLAT STABLE SURFACE The monitor may cause an injury if it falls or is dropped DO NOT USE THE MONITOR NEAR WATER Do not use where water may be s...

Страница 7: ...e sure the signal cable is disconnected If you do not disconnect them it may cause fire or electric shock UNPLUG THE MONITOR If the monitor is not in use for a long period of time it is recommended th...

Страница 8: ...or iiyama service center for advice or replacement packaging WARNING If you drop any materials or liquids such as water into the monitor when cleaning unplug the power cable immediately and contact y...

Страница 9: ...ot supplied by iiyama An approved power cable greater or equal to H05VVF 3G 0 75mm2 must be used 2 Accessory for ProLite XB2283HS 3 Accessory for ProLite X2283HS Power Cable 1 HDMI Cable Stand Base wi...

Страница 10: ...gth is 7mm to fasten the monitor Using the screw longer than this may cause electric shock or damage because it may contact with the electrical parts inside the monitor WARNING Screw Chassis Mounting...

Страница 11: ...The monitor is designed to be compatible with both landscape and portrait modes Video card for portrait display will be required for rotating the image on the screen With Stand ProLite XB2283HS ProLit...

Страница 12: ...e beforehand to prevent the monitor from being scratched Lay the monitor flat on a table with front face down Loosen the thumb screw to remove the Stand Base from the monitor Installation Put a piece...

Страница 13: ...e down Keep pressing the Hooks inward to pull out the Stand Base Press the Hook on the back of the monitor and remove the Stand Neck from the monitor Installation Put a piece of soft cloth on the tabl...

Страница 14: ...yle Color Button EXIT Input Select Button INPUT Speakers Keyhole for Security Lock You can fasten a security lock and cable to prevent the monitor from being removed without your permission VGA Connec...

Страница 15: ...e Color Button EXIT Input Select Button INPUT Speakers Keyhole for Security Lock You can fasten a security lock and cable to prevent the monitor from being removed without your permission VGA Connecto...

Страница 16: ...yama office For connection to Macintosh computers contact your local iiyama dealer or regional iiyama office for a suitable adaptor Make sure you tighten the finger screws at each end of the signal ca...

Страница 17: ...ama office For connection to Macintosh computers contact your local iiyama dealer or regional iiyama office for a suitable adaptor Make sure you tighten the finger screws at each end of the signal cab...

Страница 18: ...TOR Ensure that both the computer and the monitor are switched off Disconnect the power source first and then the Power Cable from the monitor Disconnect the audio cable from the computer and the moni...

Страница 19: ...monitor s height or angle You are able to adjust the monitor s height up to 130mm angle up to 45 right and left 22 upward and 5 downward Do not touch the LCD screen when you change the height or the a...

Страница 20: ...nsure a healthy and relaxed body position when using the monitor at visual display workstations it is recommended that the adjusted tilt angle should not exceed 10 Adjust the monitor s angle to your o...

Страница 21: ...position select Menu item of Geometry and then press the ENTER Button Then select Vertical Position by using the Buttons An adjustment page appears after you press the ENTER Button Then use the Butto...

Страница 22: ...ition Clock and Phase automatically ProLite XB2283HS AUTO ADJUST PICTURE ADJUST GEOMETRY COLOR SETTINGS OSD LANGUAGE RECALL MISCELLANEOUS INPUT SELECT AUDIO SETTINGS CLICK ENTER AGAIN TO AUTO ADJUST A...

Страница 23: ...n a faster response time You can skip the Menu items and directly display an option settting screen by using the following button operations ECO Press the Button when the Menu is not displayed Blue Li...

Страница 24: ...NGUAGE RECALL MISCELLANEOUS INPUT SELECT AUDIO SETTINGS ProLite XB2283HS OSD HORIZONTAL POSITION GEOMETRY VERTICAL POSITION PIXEL CLOCK PHASE Phase Pixel Clock Too left Too right Too low Too high Hori...

Страница 25: ...TTINGS ProLite XB2283HS OSD COLOR TEMPERATURE USER PRESET 9300K 7500K 6500K RED GREEN BLUE I STYLE COLOR OFF i Style Color 2 Standard For general windows environment and monitor default setting Text F...

Страница 26: ...ft OSD is too right OSD is too low OSD is too high OSD Vertical Position AUTO ADJUST PICTURE ADJUST GEOMETRY COLOR SETTINGS LANGUAGE RECALL MISCELLANEOUS INPUT SELECT AUDIO SETTINGS ProLite XB2283HS O...

Страница 27: ...ProLite XB2283HS AUTO ADJUST PICTURE ADJUST GEOMETRY COLOR SETTINGS LANGUAGE RECALL MISCELLANEOUS INPUT SELECT AUDIO SETTINGS OSD FRAN AIS DEUTSCH ITALIANO POLSKI ESPA OL NEDERLANDS ESK ENGLISH Adjus...

Страница 28: ...INPUT SELECT AUDIO SETTINGS ProLite XB2283HS OSD MISCELLANEOUS SHARP AND SOFT VIDEO MODE ADJUST OPENING LOGO DISPLAY INFORMATION FULL OFF ON 1920 x 1080 60Hz VGA Full screen display Full Aspect Expans...

Страница 29: ...een by using the following button operations Input Select Press the INPUT Button when the Menu is not displayed Direct Search for an available input source and select automatically Auto Select the Ana...

Страница 30: ...he Buttons NOTE Select the Line In input LINE IN Select the HDMI input HDMI Audio Input For HDMI DisplayPort inputs only Direct You can skip the Menu items and directly display an adjustment scale by...

Страница 31: ...screen 3 The OSD lock will be deactivated by pressing the front ENTER Button again for about 10 seconds Power Switch The Power Switch can be locked to avoid an accidental power operation 1 Make sure...

Страница 32: ...displaying the picture other than the screen adjustment pattern In this case manual adjustments are required There are two ways to adjust the screen One way is automatic adjustment for Position Pixel...

Страница 33: ...ing the Pixel Clock Horizontal Position and Vertical Position adjustment In case the picture frame is bigger or smaller than the data display area after the Pixel Clock adjustment repeat steps from 2...

Страница 34: ...favorite wallpaper Adjust the Phase to correct horizontal wavy noise flicker or blur in the zebra pattern NOTE In case the strong flicker or blurs remain on a part of the screen repeat steps and beca...

Страница 35: ...image reappears in several seconds when either the keyboard or the mouse are touched again The power management feature of this product complies with power saving requirement of VESA DPMS When activat...

Страница 36: ...center The screen is too bright or too dark The Power Cable is firmly seated in the socket The Power Switch is turned ON The AC socket is live Please check with another piece of equipment If the blan...

Страница 37: ...e Volume is turned up The Mute is ON The audio output level of the audio equipment is within the specification of the monitor The audio output level of the audio equipment is within the specification...

Страница 38: ...VESA DDC2BTM Input Sync Signal Separate sync TTL Positive or Negative Input Video Signal Analog 0 7Vp p Standard 75 Positive Digital HDMI DisplayPort Input Audio Connector 3 5mm mini jack Stereo Inpu...

Страница 39: ...ay VESA DDC2BTM Input Sync Signal Separate sync TTL Positive or Negative Input Video Signal Analog 0 7Vp p Standard 75 Positive Digital HDMI DisplayPort Input Audio Connector 3 5mm mini jack Stereo In...

Страница 40: ...mm 2 0 207 0mm 8 2 187 0mm 7 4 383 0mm 15 1 504 5mm 19 9 Maximum adjustment range 50 5mm 2 0 362 5mm 14 3 492 5mm 19 4 380 0mm 15 0 240 0mm 9 4 210 0mm 8 3 504 5mm 19 9 478 0mm 18 8 308 5mm 12 1 269 5...

Страница 41: ...469kHz 59 940Hz 25 175MHz 800 600 37 879kHz 60 317Hz 40 000MHz 1024 768 48 363kHz 60 004Hz 65 000MHz 1280 1024 63 981kHz 60 020Hz 108 000MHz 1440 900 55 935kHz 59 887Hz 106 500MHz 1680 1050 65 290kHz...

Отзывы: