Iiyama ProLite T2735MSC Скачать руководство пользователя страница 15

ENGLISH

  OPERATING THE MONITOR   11  
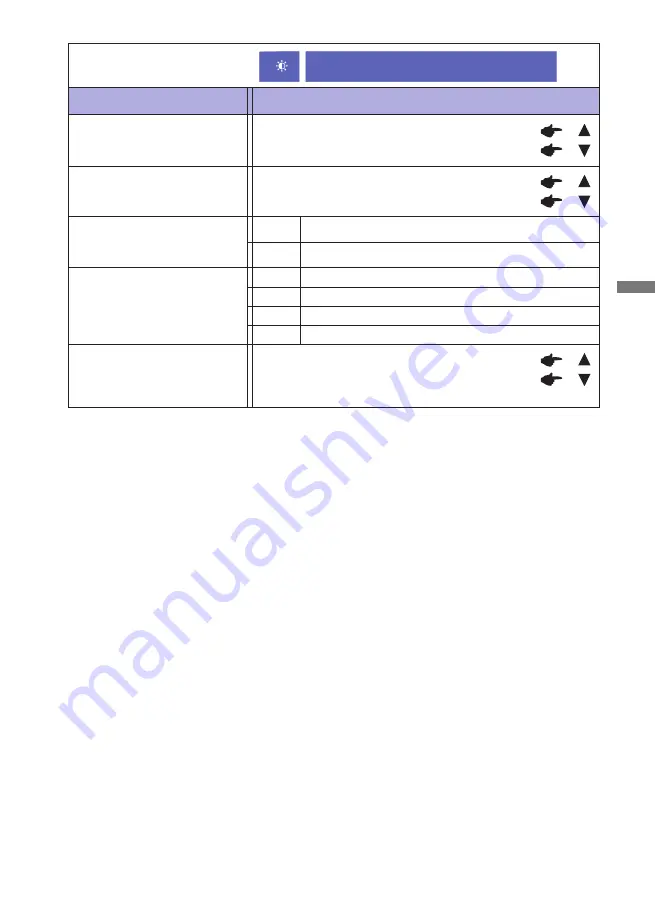
Too dark 
Too bright

Brightness *

1,2,3

Too dull
Too intense

*

1  

Adjust the Brightness when you are using the monitor in a dark room and feel the screen is too 
bright. Can not select when Adv. Contrast is On.

*

2

 Brightness and Adv. Contrast can not enable the same time when ECO Mode is on.

*

3

 Contrast, Brightness, Adv. Contrast and ECO Mode adjustments are disabled when i-Style Color 

is activated.

*

4

 To activate the option, mark it in the setup menu.  To deactivate it, remove the marking.

Brightness of back-light is reduced.

Off 

Normal

ECO Mode *

3

Adv. Contrast *

2,3,4

Increased Contrast Ratio

On

Off 

Typical Contrast Ratio

Adjustment Item

Problem / Option                                        Button to Press

Picture Adjust

Contrast *

3

1

Brightness of back-light is reduced more than 1.

2

Brightness of back-light is reduced more than 2.

3

Overdrive

Off  / -2 / -1 / 0 / +1 / +2
It will improve the gray level response time of the 
LCD panel.
A higher level results in a faster response time.

Picture Adjust

Содержание ProLite T2735MSC

Страница 1: ...oosing the iiyama LCD monitor We recommend that you take a few minutes to read carefully through this brief but comprehensive manual before installing and switching on the monitor Please keep this man...

Страница 2: ......

Страница 3: ...CONFORMITY This LCD monitor complies with the requirements of the EC EU Directive 2014 30 EU EMC Directive 2014 35 EU Low Voltage Directive 2009 125 EC ErP Directive and 2011 65 EU RoHS Directive The...

Страница 4: ...4 CHECKING THE CONTENTS OF THE PACKAGE 4 WALL MOUNTING 5 CONTROLS AND CONNECTORS 6 CONNECTING YOUR MONITOR 7 COMPUTER SETTING 8 ADJUSTING THE VIEWING ANGLE 8 OPERATING THE MONITOR 9 ADJUSTMENT MENU CO...

Страница 5: ...ay cause re electric shock or damage INSTALL THE MONITOR ON A FLAT STABLE SURFACE The monitor may cause an injury if it falls or is dropped DO NOT USE THE MONITOR NEAR WATER Do not use where water may...

Страница 6: ...ISCONNECT THE CABLES WHEN YOU MOVE THE MONITOR When you move the monitor turn o the power switch unplug the monitor and be sure the signal cable is disconnected If you do not disconnect them it may ca...

Страница 7: ...yama service center for advice or replacement packaging WARNING If you drop any materials or liquids such as water into the monitor when cleaning unplug the power cable immediately and contact your de...

Страница 8: ...oothing Automatic Set up Stereo Speakers 2 2W Stereo Speakers Plug Play VESA DDC2B Compliant Windows 7 8 1 10 Compliant Power Management VESA DPMS Compliant VESA Mounting Standard 100mm 100mm Complian...

Страница 9: ...Screw with washer which L length is 7mm to fasten the monitor Using the screw longer than this may cause electric shock or damage because it may contact with the electrical parts inside the monitor Pl...

Страница 10: ...oll up Audio Adjust Button Scroll down i Style Color Button Menu Button Speakers Keyhole for Security Lock You can fasten a security lock and cable to prevent the monitor from being removed without yo...

Страница 11: ...omputer used An incorrect connection may cause serious damage to both the monitor and the computer The cable supplied with the monitor is for a standard connector If a special cable is required please...

Страница 12: ...rence NOTE Do not touch the LCD screen when you change the angle It may cause damage or break the LCD screen Careful attention is required not to pinch your ngers or hands into the moving part of the...

Страница 13: ...ry when the On Screen Display disappears Turning o the power should be avoided while using the Menu Adjustments for H V Position Clock and Phase are saved for each signal timing Except for these adjus...

Страница 14: ...For best results use the Auto Image Adjust in conjunction with the adjustment pattern See page 17 for SCREEN ADJUSTMENTS Only Analog Input You can skip the Menu items and directly display an option s...

Страница 15: ...isabled when i Style Color is activated 4 To activate the option mark it in the setup menu To deactivate it remove the marking Brightness of back light is reduced O Normal ECO Mode 3 Adv Contrast 2 3...

Страница 16: ...ct Volume Too soft Too loud Adjustment Item Problem Option Button to Press Audio Adjust Mute 1 Direct Direct Return the sound volume to the previous level Turn o the sound temporarily Select the Line...

Страница 17: ...i Style Color Press the Button when the Menu is not displayed Direct Direct Bluish white Red Green Blue Cool Reddish white Normal Greenish white Warm i Style Color Standard For general windows enviro...

Страница 18: ...t Ratio 3 Video Mode Adjust Full screen display 0 1 2 3 You can change the picture quality from 0 to 3 soft to sharp Press the Button to change the picture quality in numerical order Press the Button...

Страница 19: ...tton to Press Setup Menu Language Select OSD Position OSD Time Out OSD Background LED The background of OSD is made transparent O Retune the background of OSD On The Power Indicator is turned On O The...

Страница 20: ...l be deactivated by pressing the front buttons and again for 10 seconds Power Switch 1 The power switch lock will be activated by pressing the front buttons and for 10 seconds Locking the power switch...

Страница 21: ...hen displaying the picture other than the screen adjustment pattern In this case manual adjustments are required There are two ways to adjust the screen One way is automatic adjustment for Position Cl...

Страница 22: ...Clock H Position and V Position adjustment In case the picture frame is bigger or smaller than the data display area after the Clock adjustment repeat steps from 2 Stretch the right side of the pictur...

Страница 23: ...e refresh rate of computer to low 60Hz and repeat steps from again Adjust the H Position after the Phase adjustment if the horizontal position moves during the adjustment Adjust the Phase to correct h...

Страница 24: ...reen becomes dark and the power indicator turns to orange From Power Management Mode the image reappears in several seconds when either the keyboard or the mouse are touched again The power management...

Страница 25: ...e Increase the Contrast and or Brightness The computer is ON The Signal Cable is properly connected The signal timing of the computer is within the speci cation of the monitor If the monitor is in pow...

Страница 26: ...ON The audio output level of the audio equipment is within the speci cation of the monitor The Audio Cable is properly connected The sound is too loud or too quiet A strange noise is heard Problem Che...

Страница 27: ...Input Connector VGA DVI D HDMI Plug Play VESA DDC2BTM Input Sync Signal Separate sync TTL Positive or Negative Input Video Signal Analog 0 7Vp p Standard 75 Positive Digital DVI Digital Visual Interf...

Страница 28: ...z 25 175MHz 37 500kHz 75 000Hz 31 500MHz 37 861kHz 72 809Hz 31 500MHz 800 600 35 156kHz 56 250Hz 36 000MHz 37 879kHz 60 317Hz 40 000MHz 46 875kHz 75 000Hz 49 500MHz 1024 768 48 363kHz 60 004Hz 65 000M...

Отзывы: