Iiyama ProLite T1931SAW Скачать руководство пользователя страница 9

ENGLISH

  BEFORE YOU OPERATE THE MONITOR  5  

The  following  accessories  are  included  in  your  package.  Check  to  see  if  they  are  enclosed  with 
the monitor. If anything is missing or damaged, please contact your local  iiyama dealer or regional 
iiyama offi  ce.

*

The rating of  the Power Cable enclosed in 120V area is 10A/125V. If you are using  
a power supply higher than this rating, then a power cable with a rating of 10A/  
250V must be used. However, all guarantees and warranties are void for any    
problems or damage caused by a power cable not supplied by iiyama.


*

2

 This CD-ROM contains the touch screen driver software. 

  Install the Touch Panel Driver Disk after connecting the computer to the monitor with 

RS-232C Cable or USB Cable. For the details, see Readme fi le in the Touch Panel  
Driver Disk.

  Basically,  if  you  are  using  Windows7  or  above  OS  to  connect  via  USB,  you  can 

operate without installing the driver.

 Power Cable*

1

 VGA(D-sub) Signal Cable 

 DVI-D Cable 



RS-232C Cable 



USB Cable 



Audio Cable   



Screw (M3x6mm) 



Touch Panel Driver Disk (CD-ROM)*

2


 Safety Guide 

 Quick Start Guide




CHECKING THE CONTENTS OF THE PACKAGE
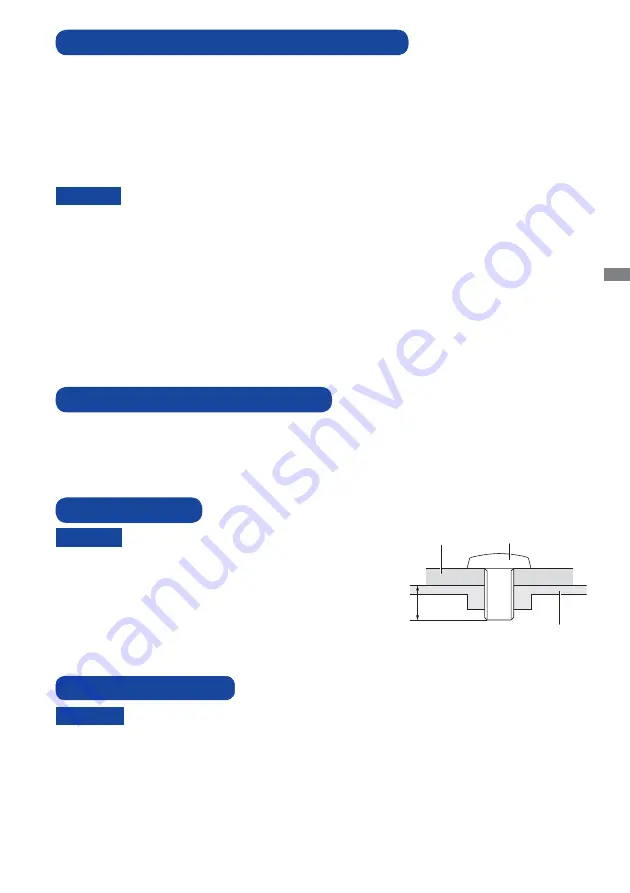
CAUTION

W h e n  y o u  u s e  w i t h  t h e  w a l l  m o u n t i n g ,  i n 
consideration of thickness of the mounting stage, 
tighten the M4 Screw with washer which “L” length 
is  8mm  to  fasten  the  monitor.  Using  the  screw 
longer  than  this  may  cause  electric  shock  or 
damage because it may contact with the electrical 
parts inside the monitor.

WALL MOUNTING

Screw

Chassis

Mounting Stage

L

WARNING

Permanent damage can occur if Sharp Edged, Pointed or Metal items are used to activate Touch.
This could invalidate any remaining warranty.
We recommend to use a plastic stylus (tip R0.8 or over) or fi nger.

SPECIAL NOTES ON TOUCH PANEL

This  product  is  not  designed  for  the  purpose  of  being  used  in  high  temperature 
environment.
If  the  product  is  placed  in  an  external  cabinet,  you  need  to  design  cooling  fans 
and  vents  to  keep  the  temperature  low  enough  to  fit  in  the  product  temperature 
specifi cation.

BUILT-IN EQUIPMENT

WARNING

Содержание ProLite T1931SAW

Страница 1: ...ing the iiyama LCD monitor We recommend that you take a few minutes to read this comprehensive manual carefully before installing and switching on the monitor Please keep this manual in a safe place f...

Страница 2: ...ENGLISH...

Страница 3: ...ATION OF CONFORMITY This LCD monitor complies with the requirements of the EC EU Directive 2014 30 EU EMC Directive 2014 35 EU Low Voltage Directive 2009 125 EC ErP Directive and 2011 65 EU RoHS Direc...

Страница 4: ...TES ON TOUCH PANEL 5 WALL MOUNTING 5 BUILT IN EQUIPMENT 5 CONTROLS AND CONNECTORS 6 CONNECTING YOUR MONITOR 7 COMPUTER SETTING 8 ADJUSTING THE VIEWING ANGLE 8 OPERATING THE MONITOR 9 ADJUSTMENT MENU C...

Страница 5: ...use re electric shock or damage INSTALL THE MONITOR ON A FLAT STABLE SURFACE The monitor may cause an injury if it falls or is dropped DO NOT USE THE MONITOR NEAR WATER Do not use where water may be s...

Страница 6: ...ISCONNECT THE CABLES WHEN YOU MOVE THE MONITOR When you move the monitor turn o the power switch unplug the monitor and be sure the signal cable is disconnected If you do not disconnect them it may ca...

Страница 7: ...nitor when cleaning unplug the power cable immediately and contact your dealer or iiyama service center To protect the Touch screen surface do not scratch or rub the screen with a hard object Never us...

Страница 8: ...VESA DPMS Compliant VESA Mounting Standard 100mm 100mm Compliant Keyhole for Security Lock IP54 Standard Compliant Only front face Windows 8 8 1 10 touch environment Basic touch operations can be perf...

Страница 9: ...iver Power Cable 1 VGA D sub Signal Cable DVI D Cable RS 232C Cable USB Cable Audio Cable Screw M3x6mm Touch Panel Driver Disk CD ROM 2 Safety Guide Quick Start Guide CHECKING THE CONTENTS OF THE PACK...

Страница 10: ...to prevent the monitor from being removed without your permission Speakers USB Connector RS 232C Connector Audio Connector VGA D sub mini 15pin Connector DVI D 24pin Connector AC Connector NOTE Front...

Страница 11: ...monitor and the computer The cable supplied with the monitor is for a standard connector If a special cable is required please contact your local iiyama dealer or regional iiyama o ce For connection...

Страница 12: ...tems For further information please contact your computer dealer rst for advice COMPUTER SETTING NOTE ADJUSTING THE VIEWING ANGLE For optimal viewing it is recommended to look at the full face of the...

Страница 13: ...cally saved When button operations are aborted during adjustment On Screen Display disappears when the time set for the OSD TIMEOUT has passed button can be used to return previous menu item Any chang...

Страница 14: ...lem Option OSD POWER UNLOCK LOCK The POWER SWITCH is Locked The POWER SWITCH is Unlocked UNLOCK LOCK The OSD menu is Locked The OSD menu is Unlocked TOUCH FANCTION DISABLE ON Pressing and holding of t...

Страница 15: ...POSITION Too narrow Too wide To correct ickering text or lines AUTO ADJUST H POSITION V POSITION H SIZE FINE AUTO ADJUST 1 Adjust H V POSITION H SIZE and FINE automatically 1 For best results use the...

Страница 16: ...s using In Power Management Mode input switching is disabled Input source is xed not selected automatically when VGA and DVI which are selected Select the analog input Select the digital input VGA DVI...

Страница 17: ...EUTSCH English German FRAN AIS French Japanese ITALIANO Italian Simpli ed Chinese ESPA OL Spanish Traditional Chinese 9300 6500 5500 7500 USER RED GREEN BLUE 94 90 100 Adjustment Item Problem Option B...

Страница 18: ...Too soft Too loud MUTE OFF ON Turn o the sound temporarily Return the sound volume to the previous level You can skip the Menu items and display an adjustment scale directly by using the following but...

Страница 19: ...is case manual adjustments are required There are two ways to adjust the screen One way is automatic adjustment for H V POSITION H SIZE and FINE The other way is performing each adjustment manually Pe...

Страница 20: ...picture may icker during the H SIZE H V POSITION adjustment In case the picture frame is bigger or smaller than the data display area after the H SIZE adjustment repeat steps from 2 Stretch the right...

Страница 21: ...the refresh rate of computer to low 60Hz and repeat steps from again Adjust the H POSITION after the FINE adjustment if the horizontal position moves during the adjustment Adjust the Brightness and Co...

Страница 22: ...on to less than 2W or 3W The screen becomes dark From Power Management Mode the image reappears in several seconds when either the keyboard or the mouse are touched again The power management feature...

Страница 23: ...Brightness The computer is ON The Signal Cable is properly connected The signal timing of the computer is within the speci cation of the monitor If the monitor is in power management mode touch the k...

Страница 24: ...ENGLISH 20 RECYCLING INFORMATION For better environment protection please don t dispose your monitor Please visit our web site www iiyama com recycle for monitor recycling RECYCLING INFORMATION...

Страница 25: ...al 56 75Hz Maximum Resolution 1280 1024 1 3 MegaPixels Input Connector VGA D sub mini 15 pin DVI D 24 pin Plug Play VESA DDC2BTM Input Sync Signal Separate sync TTL Positive or Negative Input Video Si...

Страница 26: ...al 56 75Hz Maximum Resolution 1280 1024 1 3 MegaPixels Input Connector VGA D sub mini 15 pin DVI D 24 pin Plug Play VESA DDC2BTM Input Sync Signal Separate sync TTL Positive or Negative Input Video Si...

Страница 27: ...lock VESA VGA 640 480 31 469kHz 59 940Hz 25 175MHz 37 500kHz 75 000Hz 31 500MHz 37 861kHz 72 809Hz 31 500MHz SVGA 800 600 35 156kHz 56 250Hz 36 000MHz 37 879kHz 60 317Hz 40 000MHz 46 875kHz 75 000Hz 4...

Отзывы: