background image

ENGLISH

  OPERATING THE MONITOR  13  

OPERATING THE MONITOR

To create the best picture, your iiyama LCD monitor has been preset at the factory with the 

COMPLIANT TIMING shown on page 28. You are also able to adjust the picture by following 

the button operation shown below. For more detailed adjustments, see page 22 for SCREEN 

ADJUSTMENTS.

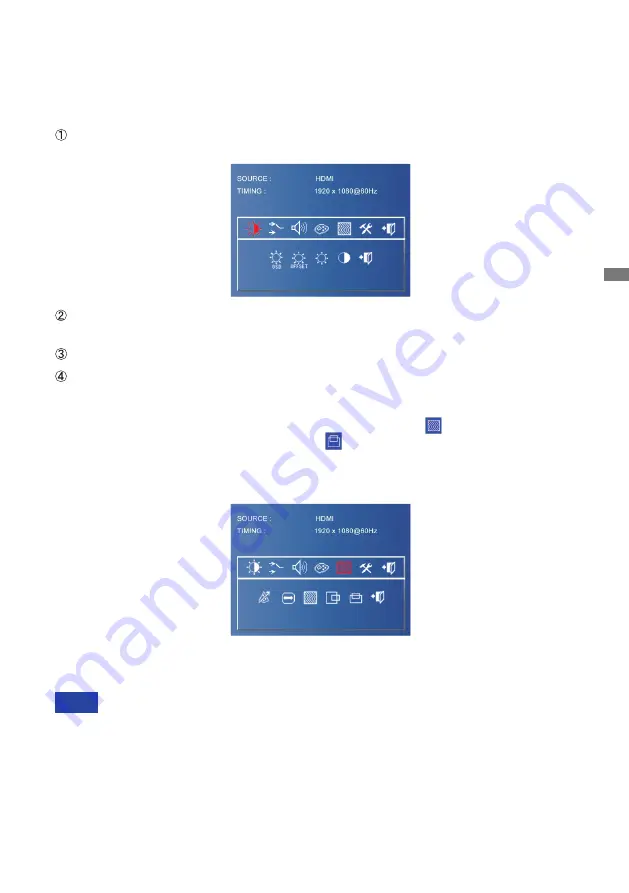
   Press the MENU button to start the On Screen Display feature. There are additional 

Menu items which can be switched by using the < / > buttons.


Select the Menu item of the adjustment you want to make. Press the MENU button  

and enter the menu page.  


Use the < / > buttons to make the appropriate adjustment or setting. 


Press the MENU button to leave the menu, and the settings you just made would be  

automatically saved.

 

When button operations are aborted during adjustment, On-Screen Display disappears when the 
time set for the OSD Timeout has passed. Also, the MENU button can be used to return previous 

menu and turn off the On-Screen Display. 

 

Any changes are automatically saved in the memory when the On Screen Display disappears. 

Turning off the power should be avoided while using the Menu.

 

Adjustments for Image Position, Clock and Phase are saved for each signal timing. Except for 

these adjustments, all other adjustments have only one setting which applies to all signal timings.

NOTE

For example, to correct for vertical position, select Menu item of 

 "Image" by using the < / > 

buttons. Press the MENU button. Then, select 

 "V. Position" by using the < / > buttons. Press 

the MENU button.

Use the


< / >


buttons to change the vertical position settings. The vertical position of the overall 

display should be changing accordingly while you are doing this.

Press the MENU button on the remote control lastly, it ends, all changes are saved in the 

memory.

Содержание ProLite S2820HSB

Страница 1: ...ing the iiyama LCD monitor We recommend that you take a few minutes to read this comprehensive manual carefully before installing and switching on the monitor Please keep this manual in a safe place f...

Страница 2: ...ama com You can access the Web page of different countries from there CE MARKING DECLARATION OF CONFORMITY This LCD monitor complies with the requirements of the EC EU Directive 2014 30 EU EMC Directi...

Страница 3: ...ATURES 6 CHECKING THE CONTENTS OF THE PACKAGE 6 CONTROLS AND CONNECTORS MONITOR 7 INSTALLATION 9 CONNECTING YOUR MONITOR 11 COMPUTER SETTING 12 OPERATING THE MONITOR 13 ADJUSTMENT MENU CONTENTS 15 SCR...

Страница 4: ...e fire electric shock or damage INSTALL THE MONITOR ON A FLAT STABLE SURFACE The monitor may cause an injury if it falls or is dropped DO NOT USE THE MONITOR NEAR WATER Do not use where water may be s...

Страница 5: ...you move the monitor turn off the power switch unplug the monitor and be sure the signal cable is disconnected If you do not disconnect them it may cause fire or electric shock UNPLUG THE MONITOR If...

Страница 6: ...n brightness on the screen depending on the desktop pattern you use Due to the nature of the LCD screen an afterimage of the previous screen may remain after switching the image when the same image is...

Страница 7: ...the monitor when not in use to assist the prevention Other ways to reduce the risk of Image Persistence will be to utilise the FAN on function if available Low Backlight and Low Brightness settings FO...

Страница 8: ...o protect the LCD panel do not scratch or rub the screen with a hard object Never use any of the following strong solvents These will damage the cabinet and the LCD screen Touching the cabinet with an...

Страница 9: ...r cable or AC adapter not supplied by iiyama 2 Applicable AC Adapter AC Adapter Type Name 2ABF060F Channel Well Technology Co Ltd 3 An approved power cable greater or equal to H05VVF 3G 0 75mm2 must b...

Страница 10: ...THE MONITOR 7 CONTROLS AND CONNECTORS MONITOR Top Controller Front Decrease Brightness Button Menu Enter Button Increase Input Select Button Power Indicator Green Normal Operation Red Power Management...

Страница 11: ...AC Adapter Direct current DC IN DVI DVI D DVI D Connector VGA VGA VGA Connector HDMI HDMI HDMI Connector RS232 RS 232C 9pin RS 232C Connector AUDIO IN PC Audio In Mini Jack Audio Connector LIGHT SENS...

Страница 12: ...is strong enough to hold the necessary weight of the display and the mount WALL MOUNTING When using the wall mounting consideration of thickness of the mounting stage needs to be taken Tighten the M4...

Страница 13: ...ENGLISH 10 BEFORE YOU OPERATE THE MONITOR ROTATING THE DISPLAY Landscape Portrait Available Not Available It is designed to be compatible in both landscape and portrait modes Portrait A A A A...

Страница 14: ...or regional iiyama office For connection to Macintosh computers contact your local iiyama dealer or regional iiyama office for a suitable adaptor Make sure you tighten the finger screws at each end of...

Страница 15: ...ENGLISH 12 BEFORE YOU OPERATE THE MONITOR Signal Timing Change to the desired signal timing listed on page 28 COMPLIANT TIMING COMPUTER SETTING...

Страница 16: ...during adjustment On Screen Display disappears when the time set for the OSD Timeout has passed Also the MENU button can be used to return previous menu and turn off the On Screen Display Any changes...

Страница 17: ...ENGLISH 14 OPERATING THE MONITOR LOCK MODE Back Controller Button Pressing and holding the MENU and buttons when Menu is not displayed will lock unlock the Back Controller Button Lock function...

Страница 18: ...when you are using the monitor in a dark room and feel the screen is too bright OSD Brightness Ambient Light Sensor 1 Automatically adjust image brightness to changing ambient lighting conditions Ambi...

Страница 19: ...GA input Select the Digital DVI input Select the Digital HDMI input Direct You can skip the Menu items and directly display an option setting screen by using the following button operations Signal Sel...

Страница 20: ...H OPERATING THE MONITOR 17 Adjustment Item Problem Option Button to Press Sound Volume Too soft Too loud Return the sound volume to the previous level Turn off the sound temporarily Mute Exit Return t...

Страница 21: ...Press Color Cool Warm Color Temperature sRGB sRGB NOTE sRGB is an international standard which defines and unifies the difference of color appearance between equipment Too weak Too strong Red Green B...

Страница 22: ...tem Problem Option Button to Press Image 1 Clock Too narrow Too wide Phase To correct flickering text or lines H Position Too left Too right Too low Too high V Position Return to Menu Exit 1 Only VGA...

Страница 23: ...et the OSD display duration time between 3 and 27 seconds OSD H Position OSD is too left OSD is too right OSD is too low OSD is too high OSD V Position Reset Factory preset data is restored Sharpness...

Страница 24: ...ENGLISH OPERATING THE MONITOR 21 Adjustment Item Problem Option Button to Press Exit Exit Exit...

Страница 25: ...djustment pattern In this case manual adjustments are required There are two ways to adjust the screen One way is automatic adjustment for Position Clock and Phase The other way is performing each adj...

Страница 26: ...picture may flicker during the Clock H V Position adjustment In case the picture frame is bigger or smaller than the data display area after the Clock adjustment repeat steps from 2 Stretch the right...

Страница 27: ...he refresh rate of computer to low 60Hz and repeat steps from again Adjust the H Position after the Phase adjustment if the horizontal position moves during the adjustment Adjust the Brightness and Co...

Страница 28: ...cted TROUBLE SHOOTING Problem Check If the monitor fails to operate correctly please follow the steps below for a possible solution 1 Perform the adjustments described in OPERATING THE MONITOR dependi...

Страница 29: ...ENGLISH 26 Recycling information For better environment protection please don t dispose your monitor Please visit our web site www iiyama com for monitor recycling RECYCLING INFORMATION...

Страница 30: ...r VGA DVI HDMI Serial Port RS 232C In Plug Play VESA DDC2BTM Input Sync Signal Separate sync TTL Positive or Negative Input Video Signal Analog 0 7Vp p Standard 75 Positive Digital DVI Digital Visual...

Страница 31: ...15 7 75 0mm 2 9 75 0mm 2 9 4xM6 SCREW HOLE VESA MOUNT 4xM4 SCREW HOLE VESA MOUNT 75 0mm 2 9 COMPLIANT TIMING M228A21 Video Mode Horizontal Frequency Vertical Frequency Dot Clock 640 480 31 469kHz 59...

Отзывы: