Iiyama ProLite B2780HSU Скачать руководство пользователя страница 29

ENGLISH

24  APPENDIX 

APPENDIX 

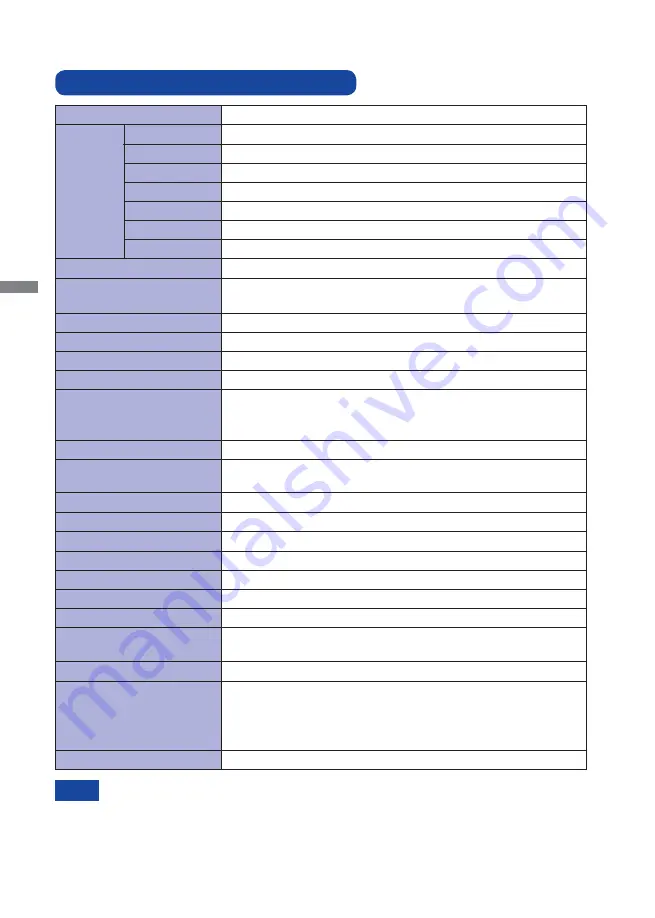
SPECIFICATIONS : ProLite XB2780HSU

LCD Panel  Panel technology MVA

0.3113mm H × 0.3113mm V

Response time

Pixel pitch

12ms (Black, White), 5ms (Gray to Gray)

Display Colours

16,777,216 (8bit per colour)

Sync Frequency

Analog: Horizontal: 24.0-80.0kHz, Vertical: 56-70Hz 
Digital: Horizontal: 30.0-80.0kHz, Vertical: 56-70Hz 

Maximum Resolution

1920 × 1080, 2.1 MegaPixels

Input Connector

D-Sub mini 15 pin, DVI-D 24 pin, HDMI

Input Sync Signal

Separate sync: TTL, Positive or Negative

Plug & Play

VESA DDC2B

TM

41W typical, Power management mode: 1W maximum

Power Consumption*

Dimensions / Net Weight 

642.0 × 438.0 - 548.0 × 250.0mm / 25.3 × 17.2 - 21.6 × 9.8" (W×H×D)
7.6kg / 16.75lbs

Upward: 22 degrees, Downward: 4 degrees, Left/Right: 170 degrees each

Viewable angle

Right / Left / Up / Down: 89 degrees each (Typical) 

Maximum Screen Size 

597.6mm W × 336.2mm H / 23.5" W × 13.2" H

Power Source

100-240VAC, 50/60Hz, 1.5A 

Environmental 

Considerations

Approvals

TCO Certifi ed, CE, TÜV-Bauart, VCCI-B, PSE, ENERGY STAR

®

Tilt Angle

*

 USB peripherals / Audio equipment are not connected. 

NOTE

Brightness

Contrast ratio

300cd/m

2

 (Typical)

5000 : 1 (Typical), Adv. Contrast Function Available

Analog: 0.7Vp-p (Standard), 75



Positive

Digital: DVI (Digital Visual Interface Standard Rev.1.0) compliance
Digital: HDMI

Input Video Signal

Input Audio Signal

1.0Vrms maximum

Speakers

2W × 2 (Stereo speakers)

Input Audio Connector

ø 3.5mm mini jack (Stereo)

Operating: Temperature

Humidity

Storage:    

-20 to 60°C / -4 to 140°F

Humidity

5 to 35°C / 41 to 95°F 

  5 to 85% (No condensation)

10 to 80% (No condensation)

Temperature

Size Category

27"

Diagonal: 27" (69cm)

Size

Headphone Connector

ø 3.5mm mini jack (Stereo)

USB Standard

USB2.0

Number of USB Ports
Connector shape

1 Upstream (For computer) : Series B
3 Downstream (For peripherals) : Series A 

Содержание ProLite B2780HSU

Страница 1: ...uch for choosing the iiyama LCD monitor We recommend that you take a few minutes to read this comprehensive manual carefully before installing and switching on the monitor Please keep this manual in a safe place for your future reference ...

Страница 2: ...ENGLISH ...

Страница 3: ...tories Electric and magnetic fields emissions as low as normal household background levels Low acoustic noise emissions When applicable Some of the Environmental features of the TCO Certified for displays The brand owner demonstrates corporate social responsibility and has a certified environmental management system EMAS or ISO 14001 Very low energy consumption both in on and standby mode minimize...

Страница 4: ...lacement of the display as the bezel may cause disturbing reflections from surrounding light and bright surfaces CE MARKING DECLARATION OF CONFORMITY This LCD monitor complies with the requirements of the EC Directive 2004 108 EC EMC Directive 2006 95 EC Low Voltage Directive and 2009 125 EC ErP Directive The electro magnetic susceptibility has been chosen at a level that gives correct operation i...

Страница 5: ...ITTING AND REMOVAL OF BASE 6 CONTROLS AND CONNECTORS 7 CONNECTING YOUR MONITOR 8 COMPUTER SETTING 9 ADJUSTING THE HEIGHT AND THE VIEWING ANGLE 10 PANEL ROTATION 10 OPERATING THE MONITOR 11 ADJUSTMENT MENU CONTENTS 12 SCREEN ADJUSTMENTS 18 POWER MANAGEMENT FEATURE 21 TROUBLE SHOOTING 22 RECYCLING INFORMATION 23 APPENDIX 24 SPECIFICATIONS ProLite XB2780HSU 24 SPECIFICATIONS ProLite B2780HSU 25 DIMEN...

Страница 6: ...se fire electric shock or damage INSTALL THE MONITOR ON A FLAT STABLE SURFACE The monitor may cause an injury if it falls or is dropped DO NOT USE THE MONITOR NEAR WATER Do not use where water may be splashed or spilt onto the monitor as it may cause fire or electric shock OPERATE UNDER THE SPECIFIED POWER SUPPLY Be sure to operate the monitor only with the specified power supply Use of an incorre...

Страница 7: ...f you do not disconnect them it may cause fire or electric shock UNPLUG THE MONITOR If the monitor is not in use for a long period of time it is recommended that it is left unplugged to avoid accidents HOLD THE PLUG WHEN DISCONNECTING To disconnect the power cable or signal cable always pull it by the plug Never pull on the cable itself as this may cause fire or electric shock DO NOT TOUCH THE PLU...

Страница 8: ...it by yourself SPECIAL NOTES ON LCD MONITORS NOTE If you have to return your unit for service and the original packaging has been discarded please contact your dealer or iiyama service center for advice or replacement packaging WARNING If you drop any materials or liquids such as water into the monitor when cleaning unplug the power cable immediately and contact your dealer or iiyama service cente...

Страница 9: ...Cable Audio Cable Stand Base Screw for stand fixing 2 pieces Safety Guide Quick Start Guide BEFORE YOU OPERATE THE MONITOR CHECKING THE CONTENTS OF THE PACKAGE CAUTION FEATURES Supports Resolutions up to 1920 1080 High Contrast 5000 1 Typical Adv Contrast Function Available Brightness 300cd m2 Typical Response Time 5ms Gray to Gray ProLite XB2780HSU High Contrast 1000 1 Typical Adv Contrast Functi...

Страница 10: ... Screw with washer which L length is 7mm to fasten the monitor Using the screw longer than this may cause electric shock or damage because it may contact with the electrical parts inside the monitor Please check if the wall or ceiling can support the weight of the monitor before mounting it WALL MOUNTING WARNING Screw Chassis Mounting Stage L ...

Страница 11: ...loth on the table beforehand to prevent the monitor from being scratched Lay the monitor flat on a table with front face down Install the Stand Base to the Monitor Fix the Monitor to the Stand by both screws firmly and then push down knob Remove Put a piece of soft cloth on the table beforehand to prevent the monitor from being scratched Lay the monitor flat on a table with front face down Pull up...

Страница 12: ...USB Downstream Connector USB Downstream Connector Headphone Connector USB Downstream Connector USB Upstream Connector Audio Connector AUDIO D SUB mini 15pin Connector D SUB DVI D 24pin Connector DVI D HDMI Connector HDMI Cable Holder AC Connector AC IN Keyhole for Security Lock You can fasten a security lock and cable to prevent the monitor from being removed without your permission NOTE Front Bac...

Страница 13: ...ed with the monitor is for a standard connector If a special cable is required please contact your local iiyama dealer or regional iiyama office For connection to Macintosh computers contact your local iiyama dealer or regional iiyama office for a suitable adaptor Make sure you tighten the finger screws at each end of the signal cable The Class I pluggable equipment Type A must be connected to pro...

Страница 14: ...r with the Signal Cable supplied For installation on Windows 95 98 2000 Me XP The monitor Information File for iiyama monitors may be necessary for your computer and obtained via the Internet using the address http www iiyama com For additional information on how to download the driver for your touch screen monitor please access the internet site noted above Monitor Drivers are not required in mos...

Страница 15: ...ot touch the LCD screen when you change the height or the angle It may cause damage or break the LCD screen Careful attention is required not to catch your fingers or hands when you change the height or the angle Injury can occur if care is not taken to avoid finger contact with the displays base when adjusting the height NOTE PANEL ROTATION A Adjust the mother s height B Rotate the panel 90 degre...

Страница 16: ... Screen Display disappears when the time set for the Timeout has passed Also the AUTO button can be used to return previous menu and turn off the On Screen Display Any changes are automatically saved in the memory when the On Screen Display disappears Turning off the power should be avoided while using the Menu Adjustments for H V Position Clock and Phase are saved for each signal timing Except fo...

Страница 17: ...tyle Color Standard For general windows environment and monitor default setting Text For text editing and viewing in a word processing environment Internet For internet environment Game For PC game environment Movie For movie and video environment Sports For sport environment Adv Contrast Increased Contrast Ratio On Off Typical Contrast Ratio Adv Contrast adjusts brightness according to the image ...

Страница 18: ...2 Too left Too right Too low Too high H Position 2 V Position 2 Too narrow Too wide To correct flickering text or lines Image Setup Clock Phase H Position V Position 50 50 50 50 Aspect Full 1 See page 18 for SCREEN ADJUSTMENTS 2 Only Analog Input Expansion display Full Aspect Expansion display of Aspect Aspect ...

Страница 19: ...Normal Mode1 Mode2 High contrast Dark Mode3 Color Temp Gamma User R User G User B 50 50 Mode1 50 Color Temp Warm Gamma Color Temp Normal Warm Cool sRGB sRGB NOTE sRGB is an international standard which defines and unifies the difference of color appearance between equipment You can not adjust the Brightness Contrast Gamma and Eco during sRGB mode because those settings are locked ...

Страница 20: ...an Simplified Chinese Español Spanish Portuguese Timeout H Position OSD is too left OSD is too right OSD is too low OSD is too high You can set the OSD display duration time between 5 and 60 seconds Adjustment Item Problem Option Button to Press OSD Setup V Position OSD Setup H Position V Position Timeout Language 50 50 English 50 ...

Страница 21: ... sub DVI D and HDMI which are selected NOTE Select the D SUB input Select the DVI D input D sub DVI Others Reset Information V Frequency 60Hz Yes Signal Select Auto HDMI audio LINE IN Input Auto Resolution 1920 H 㸨1080 V H Frequency 68KHz Over Drive Off Auto Select the signal input automatically Select the HDMI input LINE IN Select the LINE IN input HDMI HDMI audio 1 Select the HDMI input HDMI 1 S...

Страница 22: ... and display an adjustment scale directly by using the following button operations Direct Adjust H V Position Clock and Phase automatically For best results use the Auto Adjust in conjunction with the adjustment pattern See page 18 for SCREEN ADJUSTMENTS Only Analog Input Auto Adjust Press the AUTO Button when the Menu is not displayed Volume Press the Button when the Menu is not displayed ...

Страница 23: ...anual adjustments are required There are two ways to adjust the screen One way is automatic adjustment for Position Clock and Phase The other way is performing each adjustment manually Perform the Auto Adjust first when the monitor is connected to a new computer or resolution is changed If the screen has a flicker or blur or the picture does not fit in the display area after performing the Auto Ad...

Страница 24: ...flicker during the Clock H Position and V Position adjustment In case the picture frame is bigger or smaller than the data display area after the Clock adjustment repeat steps from C 2 Stretch the right side of the picture frame to the right edge of the display area by adjusting the Clock C Press the Auto Button Auto Adjust D Adjust the image manually by following procedure below when the screen h...

Страница 25: ...he refresh rate of computer to low 60Hz and repeat steps from C again Adjust the H Position after the Phase adjustment if the horizontal position moves during the adjustment H Adjust the Brightness and Color to get the desired picture after you complete the Clock and Phase adjustments Put back your favorite wallpaper G Adjust the Phase to correct horizontal wavy noise flicker or blur in the zebra ...

Страница 26: ...1W The screen becomes dark and the power indicator turns to orange From Power Management Mode the image reappears in several seconds when either the keyboard or the mouse are touched again The power management feature of this product complies with power saving requirement of ENERGY STAR and VESA DPMS When activated it automatically reduces unnecessary power consumption of the monitor when your com...

Страница 27: ...e problem you have If the monitor does not get a picture skip to 2 2 Consult the following items if you cannot find an appropriate adjustment item in OPERATING THE MONITOR or if the problem persists 3 If you are experiencing a problem which is not described below or you cannot correct the problem discontinue using the monitor and contact your dealer or iiyama service center for further assistance ...

Страница 28: ...dio equipment is within the specification of the monitor G The sound is too loud or too quiet The audio output level of the audio equipment is within the specification of the monitor H A strange noise is heard The Audio Cable is properly connected For better environment protection please don t dispose your monitor Please visit our web site www iiyama com recycle for monitor recycling RECYCLING INF...

Страница 29: ...grees each Typical Maximum Screen Size 597 6mm W 336 2mm H 23 5 W 13 2 H Power Source 100 240VAC 50 60Hz 1 5A Environmental Considerations Approvals TCO Certified CE TÜV Bauart VCCI B PSE ENERGY STAR Tilt Angle USB peripherals Audio equipment are not connected NOTE Brightness Contrast ratio 300cd m2 Typical 5000 1 Typical Adv Contrast Function Available Analog 0 7Vp p Standard 75 Positive Digital ...

Страница 30: ... 80 degrees each Typical Maximum Screen Size 597 6mm W 336 2mm H 23 5 W 13 2 H Power Source 100 240VAC 50 60Hz 1 5A Environmental Considerations Approvals TCO Certified CE TÜV Bauart ENERGY STAR Tilt Angle USB peripherals Audio equipment are not connected NOTE Brightness Contrast ratio 300cd m2 Typical 1000 1 Typical Adv Contrast Function Available Analog 0 7Vp p Standard 75 Positive Digital DVI D...

Страница 31: ... 363kHz 63 981kHz 55 935kHz 75 000kHz 65 290kHz 66 590kHz 24 827kHz Video Mode SXGA VESA 640 480 1280 1024 VGA SVGA XGA Dot Clock 25 175MHz 40 000MHz 65 000MHz 108 000MHz 106 500MHz 162 000MHz 146 250MHz 138 500MHz 21 053MHz 800 600 1024 768 WXGA 1440 900 WSXGA 1680 1050 Full HD 1920 1080 UXGA 1600 1200 PC9801 640 400 599 5mm 23 6 642 0mm 25 3 338 0mm 13 3 392 5mm 15 5 250 0mm 9 8 65 0mm 2 5 438 0...

Отзывы: