Iiyama ProLite B2008HDS Скачать руководство пользователя страница 11

ENGLISH

  BEFORE YOU OPERATE THE MONITOR  7  

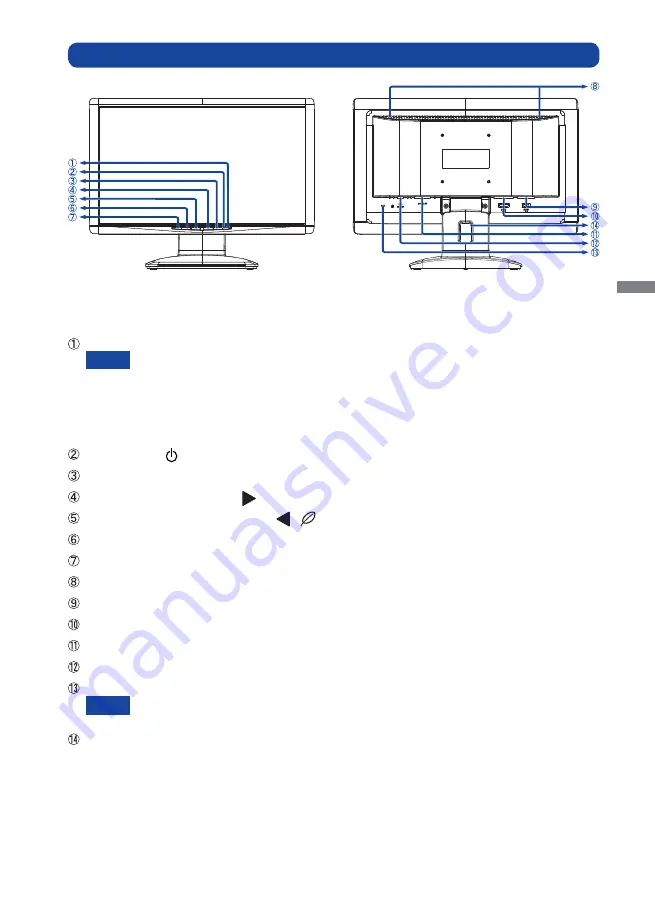
CONTROLS AND CONNECTORS : ProLite E2008HDS / ProLite E2008HDD

   Power  Indicator 


Blue:  Normal 

operation


Orange: 

Power 

Management


The monitor enters into power management mode which reduces the power  


consumption to less than 1W when receiving no horizontal and/or vertical  

  sync 

signal. 


Power Switch (     ) 

  Menu / Select Button (ENTER)  


Scroll Up / Brightness Button (     )

  Scroll  Down / ECO Mode Button*

1

  (      /      )  


  Exit Button (EXIT)

  Auto Button (AUTO) 

   Speakers*

2


D-SUB mini 15pin Connector (D-SUB)


DVI-D 24pin Connector (DVI-D)


AC Connector (POWER IN) 


Audio Connector*

2

 (LINE IN)


Keyhole for Security Lock


You can fasten a security lock and cable to prevent the monitor from being removed  


without your permission.


Cable Holder

NOTE

<Front>

<Back>

NOTE

*

1   

See page 17 for Direct.

*

2   

Available for ProLite E2008HDS only.

Содержание ProLite B2008HDS

Страница 1: ...or choosing the iiyama LCD monitor We recommend that you take a few minutes to read this comprehensive manual carefully before installing and switching on the monitor Please keep this manual in a safe place for your future reference AB52 AB52 ...

Страница 2: ...ENGLISH ...

Страница 3: ...plies with the requirements of the EC Directive 2004 108 EC EMC Directive 2006 95 EC Low Voltage Directive and 2009 125 EC ErP Directive The electro magnetic susceptibility has been chosen at a level that gives correct operation in residential areas business and light industrial premises and small scale enterprises inside as well as outside of the buildings All places of operation are characterise...

Страница 4: ...ONTROLS AND CONNECTORS ProLite B2008HDS 6 CONTROLS AND CONNECTORS ProLite E2008HDS ProLite E2008HDD 7 CONNECTING YOUR MONITOR ProLite B2008HDS 8 CONNECTING YOUR MONITOR ProLite E2008HDS ProLite E2008HDD 9 COMPUTER SETTING 10 ADJUSTING THE HEIGHT AND THE VIEWING ANGLE ProLite B2008HDS 11 ADJUSTING THE VIEWING ANGLE ProLite E2008HDS ProLite E2008HDD 11 OPERATING THE MONITOR 12 ADJUSTMENT MENU CONTEN...

Страница 5: ...se fire electric shock or damage INSTALL THE MONITOR ON A FLAT STABLE SURFACE The monitor may cause an injury if it falls or is dropped DO NOT USE THE MONITOR NEAR WATER Do not use where water may be splashed or spilt onto the monitor as it may cause fire or electric shock OPERATE UNDER THE SPECIFIED POWER SUPPLY Be sure to operate the monitor only with the specified power supply Use of an incorre...

Страница 6: ...or any other soft material may also cause damage DISCONNECT THE CABLES WHEN YOU MOVE THE MONITOR When you move the monitor turn off the power switch unplug the monitor and be sure the signal cable is disconnected If you do not disconnect them it may cause fire or electric shock UNPLUG THE MONITOR If the monitor is not in use for a long period of time it is recommended that it is left unplugged to ...

Страница 7: ...onitor may have to be periodically replaced For the warranty coverage on this component please check with local iiyama service center If you have to return your unit for service and the original packaging has been discarded please contact your dealer or iiyama service center for advice or replacement packaging WARNING If you drop any materials or liquids such as water into the monitor when cleanin...

Страница 8: ... Accessory for ProLite B2008HDS ProLite E2008HDS 3 Accessory for ProLite E2008HDS ProLite E2008HDD Power Cable 1 D Sub Signal Cable DVI D Cable 2 Audio Cable 2 Stand Base 3 Safety Guide Quick Start Guide BEFORE YOU OPERATE THE MONITOR CHEKING THE CONTENTS OF THE PACKAGE CAUTION FEATURES Supports Resolutions up to 1600 900 High Contrast 1000 1 Typical ACR Function Available Brightness 250cd m2 Typi...

Страница 9: ...oid electric shock or damage CAUTION Installation Put a piece of soft cloth on the table beforehand to prevent the monitor from being scratched Lay the monitor flat on a table with front face down The Stand Bottom is pulled up as shown in the figure Install the Stand Base to the Stand Bottom Remove Put a piece of soft cloth on the table beforehand to prevent the monitor from being scratched Lay th...

Страница 10: ...al and or vertical sync signal Power Switch Menu Select Button ENTER Scroll Up Brightness Button Scroll Down ECO Mode Button 1 Exit Button EXIT Auto Button AUTO Speakers D SUB mini 15pin Connector D SUB DVI D 24pin Connector DVI D AC Connector POWER IN Audio Connector 2 LINE IN Keyhole for Security Lock You can fasten a security lock and cable to prevent the monitor from being removed without your...

Страница 11: ...rtical sync signal Power Switch Menu Select Button ENTER Scroll Up Brightness Button Scroll Down ECO Mode Button 1 Exit Button EXIT Auto Button AUTO Speakers 2 D SUB mini 15pin Connector D SUB DVI D 24pin Connector DVI D AC Connector POWER IN Audio Connector 2 LINE IN Keyhole for Security Lock You can fasten a security lock and cable to prevent the monitor from being removed without your permissio...

Страница 12: ...mputer and monitor may vary with the type of computer used An incorrect connection may cause serious damage to both the monitor and the computer The cable supplied with the monitor is for a standard 15 pin D Sub connector If a special cable is required please contact your local iiyama dealer or regional iiyama office For connection to Macintosh computers contact your local iiyama dealer or regiona...

Страница 13: ...l out the hook Hold the both sides of the hook and remove one tab at a time Fitting Collect cables at the back of the stand Hold the both sides of the hook and insert one tab at a time into the holes 1 Not included in the ProLite E2008HDD 2 Available for ProLite E2008HDS only NOTE The signal cables used for connecting the computer and monitor may vary with the type of computer used An incorrect co...

Страница 14: ...er with the Signal Cable supplied For installation on Windows 95 98 2000 Me XP The monitor Information File for iiyama monitors may be necessary for your computer and obtained via the Internet using the address http www iiyama com For additional information on how to download the driver for your touch screen monitor please access the internet site noted above Monitor Drivers are not required in mo...

Страница 15: ...equired not to catch your fingers or hands when you change the angle Do not tilt the post beyond 20 degrees except when repacking the monitor in its box To do so may cause the monitor to fall over and break ADJUSTING THE HEIGHT AND THE VIEWING ANGLE ProLite B2008HDS For optimal viewing it is recommended to position yourself directly opposite to the full face of the monitor then adjust the monitor ...

Страница 16: ...me has passed Also press the EXIT button to quickly turn off the On Screen Display Any changes are automatically saved in the memory when the On Screen Display disappears Turning off the power should be avoided while using the Menu Adjustments for H V Position Pixel Clock and Phase are saved for each signal timing Except for these adjustments all other adjustments have only one setting which appli...

Страница 17: ...sults use the Auto Adjust in conjunction with the adjustment pattern See page 18 for SCREEN ADJUSTMENTS Adjustment Item Problem Option Button to Press Luminance 1 Direct Too dark Too bright Brightness 2 Contrast Too dull Too intense 1 Luminance adjustment disabled when ACR mode is active 2 Adjust the Brightness when you are using the monitor in a dark room and feel the screen is too bright You can...

Страница 18: ...g text or lines Only Analog Input Adjustment Item Problem Option Button to Press Color 9300K 7500K Yellowish white Bluish white Green Red Blue Too weak Too strong User Preset 6500K Reddish white OSD Time H Position OSD is too left OSD is too right OSD is too low OSD is too high You can set the OSD display duration time between 5 and 30 seconds Adjustment Item Problem Option Button to Press OSD V P...

Страница 19: ...anguage Language English Deutsch English German Français French Japanese Polski Polish Dutch Adjustment Item Problem Option Button to Press Recall Recall All Factory preset data is restored No Return to Menu Italiano Italian Russian Simplified Chinese Español Spanish Nederlands Yes ...

Страница 20: ... turned OFF See your graphic card user guide for more information about changing the resolution and refresh NOTE Displays information regarding the current input signal coming from the graphic card in your computer Display Information DDC CI On and Off are switched as follows by pressing the Button successively On Off NOTE Miscellaneous Display Information 1600x900 60 Hz ACR Increased Contrast Rat...

Страница 21: ... adjustment scale directly by using the following button operations ECO Mode Press the Button when the Menu is not displayed On Brightness of back light is reduced Off Normal ProLite B2008HDS ProLite E2008HDS OptiColor Press the EXIT Button when the Menu is not displayed Standard For general windows environment and monitor default setting Office For text editing and viewing in a word processing en...

Страница 22: ... adjustments are required There are two ways to adjust the screen One way is automatic adjustment for Position Pixel Clock and Phase The other way is performing each adjustment manually Perform the Auto Adjust first when the monitor is connected to a new computer or resolution is changed If the screen has a flicker or blur or the picture does not fit in the display area after performing the Auto A...

Страница 23: ...flicker during the Pixel Clock H Position and V Position adjustment In case the picture frame is bigger or smaller than the data display area after the Pixel Clock adjustment repeat steps from 2 Stretch the right side of the picture frame to the right edge of the display area by adjusting the Pixel Clock Press the Auto Button Auto Adjust Adjust the image manually by following procedure below when ...

Страница 24: ...rizontal wavy noise flicker or blur in the zebra pattern NOTE In case the strong flicker or blurs remain on a part of the screen repeat steps F and G because the Clock may not be adjusted correctly If the flicker or blurs still remain set the refresh rate of computer to low 60Hz and repeat steps from C again Adjust the H Position after the Phase adjustment if the horizontal position moves during t...

Страница 25: ...SUMPTION Blue Orange Power Indicator NORMAL MODE POWER MANAGEMENT MODE Power Management Mode When the H sync signal V sync signal H and V sync signals from the computer are off the monitor enters into Power Management Mode which reduces the power consumption to less than 1W The screen becomes dark and the power indicator turns to orange From Power Management Mode the image reappears in several sec...

Страница 26: ...with another piece of equipment If the blank screen saver is in active mode touch the keyboard or the mouse Increase the Contrast and or Brightness The computer is ON The Signal Cable is properly connected The signal timing of the computer is within the specification of the monitor If the monitor is in power management mode touch the keyboard or the mouse The computer is ON The Signal Cable is pro...

Страница 27: ...quipment is within the specification of the monitor The audio output level of the audio equipment is within the specification of the monitor The Audio Cable is properly connected The sound is too loud or too quiet A strange noise is heard For better environment protection please don t dispose your monitor Please visit our web site www iiyama com recycle for monitor recycling RECYCLING INFORMATION ...

Страница 28: ...egrees Right Left 45 degrees each Viewable angle Right Left 80 degrees each Up Down 80 degrees each Typical Maximum Screen Size 442 8mm W 249 1mm H 17 4 W 9 8 H Power Source 100 240VAC 50 60Hz 0 7A Environmental Considerations Approvals CE TÜV Bauart VCCI B Tilt Angle Audio equipment is not connected NOTE Brightness Contrast ratio 250cd m2 Typical 1000 1 Typical ACR Function Available Analog 0 7Vp...

Страница 29: ... degrees Viewable angle Right Left 80 degrees each Up Down 80 degrees each Typical Maximum Screen Size 442 8mm W 249 1mm H 17 4 W 9 8 H Power Source 100 240VAC 50 60Hz 0 7A Environmental Considerations Approvals CE TÜV Bauart VCCI B Tilt Angle Audio equipment is not connected NOTE Brightness Contrast ratio 250cd m2 Typical 1000 1 Typical ACR Function Available Analog 0 7Vp p Standard 75 Positive D...

Страница 30: ...367 0 193 0mm 19 1 14 4 7 6 W H D 4 0kg 8 8lbs Upward 20 degrees Downward 5 degrees Viewable angle Right Left 80 degrees each Up Down 80 degrees each Typical Maximum Screen Size 442 8mm W 249 1mm H 17 4 W 9 8 H Power Source 100 240VAC 50 60Hz 0 7A Environmental Considerations Approvals CE TÜV Bauart VCCI B Tilt Angle Brightness Contrast ratio 250cd m2 Typical 1000 1 Typical ACR Function Available ...

Страница 31: ...te E2008HDS ProLite E2008HDD 367 0mm 14 4 62 5mm 2 5 242 5mm 9 6 291 5mm 11 5 251 0mm 9 9 485 0mm 19 1 445 0mm 17 5 193 0mm 7 6 214 5mm 8 4 485 0mm 19 1 445 0mm 17 5 251 5mm 9 9 62 5mm 2 5 389 5mm 15 3 489 5mm 19 3 309 0mm 12 2 292 0mm 11 5 Maximum adjustment range ...

Страница 32: ...uency 59 940Hz 75 000Hz 60 317Hz 75 000Hz 60 004Hz 75 029Hz 60 020Hz 75 025Hz 60 000Hz 70 087Hz 70 087Hz VGA TEXT VESA SVGA VGA XGA 1024 768 640 480 800 600 640 350 Video Mode SXGA 1280 1024 Horizontal Frequency 31 469kHz 37 500kHz 37 879kHz 46 875kHz 48 363kHz 60 023kHz 63 981kHz 79 976kHz 55 540kHz 31 469kHz 31 469kHz HD 1600 900 720 400 DVI input is not compliant NOTE PC Input ...

Отзывы: