Iiyama ProLite B1702S Скачать руководство пользователя страница 36

ENGLISH

32     APPENDIX

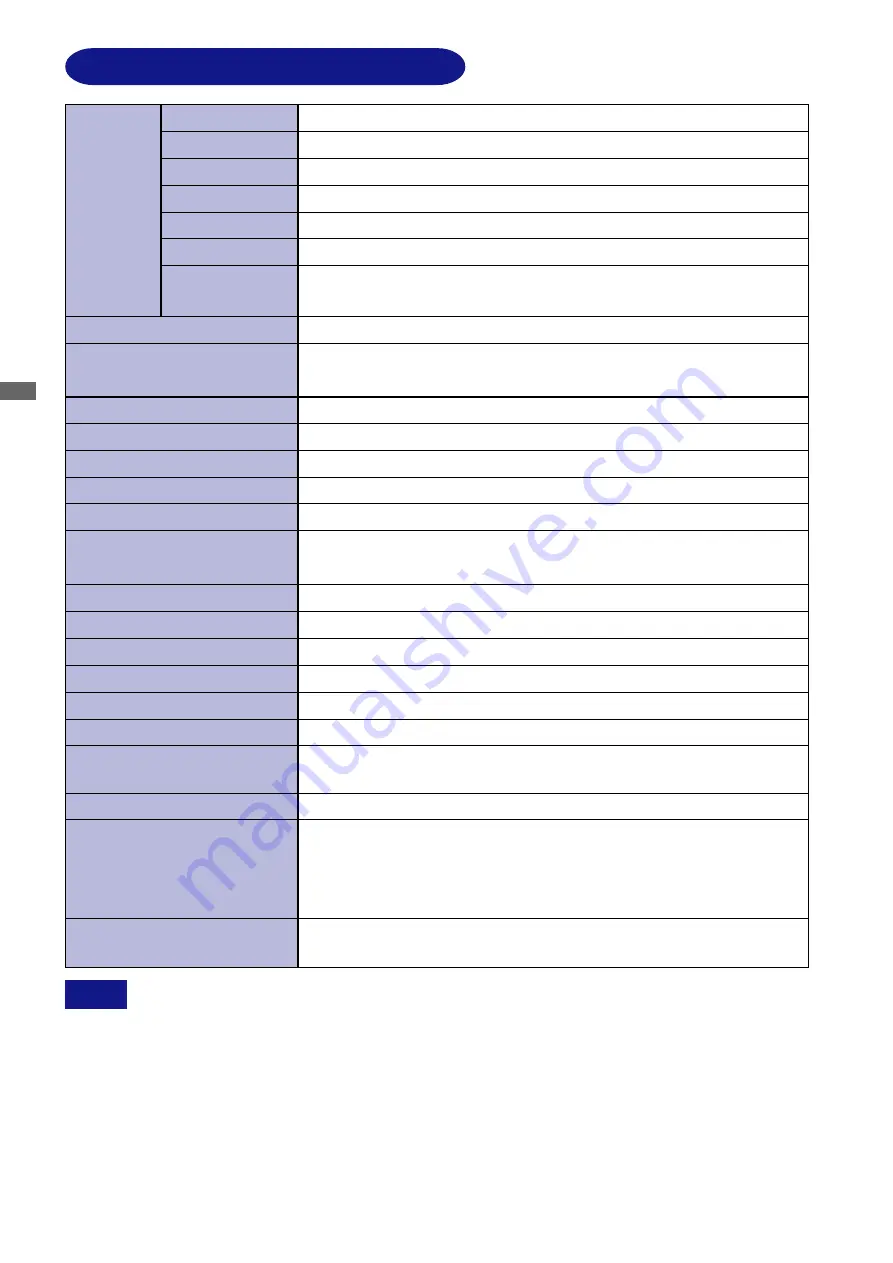
SPECIFICATIONS: ProLite B1702S

LCD Panel

Size

Driving system

a-Si TFT Active Matrix
Diagonal: 43cm  / 17"
0.264mm H × 0.264mm V

Response time

Pixel pitch

ProLite B1702S-1: 5ms (Black, white, black), 2ms (Gray to Gray)
ProLite B1702S-2: 5ms (Black, white, black)

Display Colors

Approx. 16.7 million maximum

Sync Frequency

Dot Clock

135MHz maximum

Maximum Resolution

1280 × 1024, 1.3 MegaPixels

Input Connector

Input Sync Signal

Plug & Play

VESA DDC2B

TM

40W maximum, Power management mode: 2W maximum*

Power Consumption
Dimensions / Net Weight

370.5 × 397.0-507.0 × 236.5mm / 14.6× 15.6-20.0 × 9.3"  (W×H×D),
5.5kg / 12.1lbs
Up: 20 degrees, Down: 5 degrees

Viewable angle

Right / Left / Up / Down: 80 degrees each

Maximum Screen Size

337.9mm W × 270.3mm H / 13.3" W × 10.6" H

Power Source

100-240VAC, 50/60Hz, 1.5A

Environmental
Considerations

Approvals

Tilt Angle

*

 Condition: Audio equipment is not connected.

NOTE

Brightness
Contrast ratio

300cd/m

2

 (Typical)

1000 : 1 (Typical)

Input Video Signal

Input Audio Signal

0.7Vrms maximum

Speakers

1.0W × 2 (Stereo speakers)

Input Audio Connector

ø 3.5mm mini jack (Stereo)

Operating: Temperature

Humidity

Storage:

Temperature -20 to 60°C / -4 to 140°F
Humidity

5 to 35°C / 41 to 95°F

10 to 80% (No condensation)

5 to 85% (No condensation)

Separate sync: TTL, Positive or Negative

D-Sub mini 15pin, DVI-D 24pin

Analog: 0.7Vp-p (Standard), 75

Ω,

 Positive

Digital: DVI (Digital Visual Interface Standard Rev.1.0) compliance

Analog: Horizontal 24.0-80.0kHz, Vertical 55-75Hz
Digital: Horizontal 31.0-80.0kHz, Vertical 55-75Hz

TCO ’03, CE, TÜV-GS, TÜV-Ergonomics, FCC-B, UL / C-UL, VCCI-B,
GOST-R, CCC

Содержание ProLite B1702S

Страница 1: ...itor We recommend that you take a few minutes to read carefully through this brief but comprehensive manual before installing and switching on the monitor Please keep this manual in a safe place for your future reference ENGLISH ENGLISH DEUTSCH FRANCAIS NEDERLANDS ...

Страница 2: ... saving mode after a certain time beneficial both for the user and the environment Electrical safety Emissions Electromagnetic fields Noise emissions Ecology The product must be prepared for recycling and the manufacturer must have a certified environmental management system such as EMAS or ISO 14 001 Restrictions on o chlorinated and brominated flame retardants and polymers o heavy metals such as...

Страница 3: ...ng antenna Increase the separation between the device and receiver Connect the device into an outlet on a circuit different from that to which the receiver is connected Consult the dealer or an experienced radio or TV technician for help To meet the FCC requirements you should use a signal cable with ferrite core at both ends CAUTION Changes or modifications not expressly approved by iiyama could ...

Страница 4: ...S 4 CHECKINGTHECONTENTSOFTHEPACKAGE 5 FITTING AND REMOVAL OF BASE ProLite E1702S E1702SV E1702WS E1702WSV 6 CONTROLS AND CONNECTORS ProLite E1702S E1702SV E1702WS E1702WSV 7 CONTROLSAND CONNECTORS ProLite B1702S 8 CONNECTING YOUR MONITOR ProLite E1702S E1702SV E1702WS E1702WSV 9 CONNECTING YOUR MONITOR ProLite B1702S 10 COMPUTERSETTING 11 ADJUSTING THE VIEWINGANGLE ProLite E1702S E1702SV E1702WS E...

Страница 5: ...se fire electric shock or damage INSTALL THE MONITOR ON A FLAT STABLE SURFACE The monitor may cause an injury if it falls or is dropped DO NOT USE THE MONITOR NEAR WATER Do not use where water may be splashed or spilt onto the monitor as it may cause fire or electric shock OPERATE UNDER THE SPECIFIED POWER SUPPLY Be sure to operate the monitor only with the specified power supply Use of an incorre...

Страница 6: ...turn off the power switch unplug the monitor and be sure the signal cable is disconnected If you do not disconnect them it may cause fire or electric shock UNPLUG THE MONITOR If the monitor is not in use for a long period of time it is recommended that it is left unplugged to avoid accidents HOLD THE PLUG WHEN DISCONNECTING To disconnect the power cable or signal cable always pull it by the plug N...

Страница 7: ... be periodically replaced For the warranty coverage on this component please check with local iiyama service center If you have to return your unit for service and the original packaging has been discarded please contact your dealer or iiyama service center for advice or replacement packaging WARNING If you drop any materials or liquids such as water into the monitor when cleaning unplug the power...

Страница 8: ...s sRGB International Standard Gamma Control Clear Display for Moving Pictures Photographs Digital Character Smoothing Automatic Set up Stereo Speakers 2 1W Stereo Speakers Economy Mode Reduced Power Consumption Plug Play VESA DDC2B Compliant Windows 95 98 2000 Me XP Vista Compliant DDC CI Compliant Power Management ENERGY STAR and VESA DPMS Compliant Ergonomic Design TCO 03 and TÜV Ergonomics Appr...

Страница 9: ... THE CONTENTS OF THE PACKAGE 2 Accessory for ProLite E1702S E1702WS B1702S 3 Accessory for ProLite E1702S E1702SV E1702WS E1702WSV softOSM The Desktop softOSM software complies with the DDC CI standard and can be downloaded from the iiyama website www iiyama com softOSM Software Functions Easy access to the range of user adjustments can be via the softOSM Software rather than the buttons located o...

Страница 10: ...t may cause damage Unplug the monitor before installation to avoid electric shock or damage Install Remove Hold the monitor and push the post down into the stand Press the stopper at the back of the stand and remove the stand from the post Press the stopper 6 BEFORE YOU OPERATE THE MONITOR Stand FITTING AND REMOVAL OF BASE ProLite E1702S E1702SV E1702WS E1702WSV ...

Страница 11: ...nto power management mode which reduces the power consumption to less than 2W when receiving no horizontal and or vertical sync signal G Speakers H AC Connector AC IN I Audio Connector J DVI D 24pin Connector DVI D K D sub mini 15pin Connector D SUB L Keyhole for Security Lock You can fasten a security lock and cable to prevent the monitor from being removed without your permission Front Back NOTE...

Страница 12: ...r Management Mode reducing power consumption to than 2W Analog Digital Signal Select The monitor enters into power management mode which reduces the power consumption to less than 2W when receiving no horizontal and or vertical sync signal G Speakers H AC Connector AC IN I Audio Connector J DVI D 24pin Connector DVI D K D sub mini 15pin Connector D SUB L Keyhole for Security Lock You can fasten a ...

Страница 13: ...monitor and the computer The cable supplied with the monitor is for a standard 15 pin D Sub connector If a special cable is required please contact your local iiyama dealer or regional iiyama office For connection to Macintosh computers contact your local iiyama dealer or regional iiyama office for a suitable adaptor Make sure you tighten the finger screws at each end of the signal cable Back Avai...

Страница 14: ...lied with the monitor is for a standard 15 pin D Sub connector If a special cable is required please contact your local iiyama dealer or regional iiyama office For connection to Macintosh computers contact your local iiyama dealer or regional iiyama office for a suitable adaptor Make sure you tighten the finger screws at each end of the signal cable Back Fitting of Cable Holder A Collect cables at...

Страница 15: ...gnal Timing Change to the desired signal timing listed on page 34 COMPLIANT TIMING Windows 95 98 2000 Me XP Vista Plug Play The iiyama LCD monitor complies with DDC2B of VESA standard The Plug Play function runs on Windows 95 98 2000 Me XP Vista by connecting the monitor to DDC2B compliant computer with the Signal Cable supplied Windows 95 98 2000 Me XP Monitor Information File for iiyama monitors...

Страница 16: ...rd 5 degrees downward NOTE Do not touch the LCD screen when you change the angle It may cause damage or break the LCD screen Careful attention is required not to catch your fingers or hands when you change the angle PANEL ROTATION ProLite B1702S A Ajust the monitor s height to the maximum B Rotate the panel 90 degrees Portrait Turn clockwise Landscape Turn counter clockwise Attempting to rotate wi...

Страница 17: ...utton can be used to exit OSD window immediately NOTE An adjustment scale appears after you press the Menu Button Use the Buttons to change the vertical position settings The vertical position of the overall display should be changing accordingly while you are doing this C C C C C Use the Buttons to make the appropriate adjustment or setting Adjustments for Clock Phase and Position are saved for e...

Страница 18: ...s not displayed Volume Mute With the OSD menu off the pressing and holding of the Menu Button for 1 2 seconds will enable disable the Audio Mute facility Signal Select With the OSD menu off pressing and holding the Auto Button for 1 2 seconds will switch the input signal from Analogue to Digital Lock Out With the OSD menu off pressing and holding the Menu and Buttons simultaneously for a period of...

Страница 19: ...hase 2 H Position Too far to the left Too far to the right V Position Too low Too high Return to Menu Highlight Menu 1 again To correct flickering text or lines Direct Direct 1 Adjust the Brightness when you are using the monitor in a dark room and feel the screen is too bright 2 See page 22 for SCREENADJUSTMENTS Menu 1 Analog Analog Input See page 14 for Direct adjustment Direct OPERATING THE MON...

Страница 20: ... Auto Set up in conjunction with the adjustment pattern See page 22 for SCREENADJUSTMENTS 1 NOTE sRGB is an international standard which defines and unifies the difference of color appearance between equipment You can not adjust the Gamma and Economy Mode during sRGB mode because those settings are locked is displayed while sRGB is active 3 Color 3 6500K Color 2 7500K sRGB Setting The Auto Set up ...

Страница 21: ... Off Mode1 High contrast Dark Gamma Mode1 Brightness of back light is reduced Mode2 Brightness of back light is reduced more than Mode1 Economy Mode Off Normal Mode2 Problem Option Adjustment Item NOTE is displayed while Economy Mode is active OPERATING THE MONITOR 17 ...

Страница 22: ... Direct Return to Menu Highlight Menu 3 again Reset NO YES Return to Menu Factory preset data is restored NOTE is displayed while Mute is active Auto Analog Select the signal input automatically Select the Analog input D SUB Signal Select Direct When both Analogue and Digital cables are connected you can switch between them using the direct access facility described earlier If only one input is pr...

Страница 23: ...ance between equipment You can not adjust the Gamma and Economy Mode during sRGB mode because those settings are locked is displayed while sRGB is active 3 Color 3 6500K Color 2 7500K sRGB Too weak Too strong s 1 2 3 4 5 Adjust the picture quality at resolutions of less than 1280 1024 ProLite E1702S B1702S 1440 900 ProLite E1702WS You can change the picture quality from 1 to 5 sharp to soft Press ...

Страница 24: ...ital Return to Menu Highlight Menu 1 again Mode1 Brightness of back light is reduced Mode2 Brightness of back light is reduced more than Mode1 Economy Mode Off Normal Problem Option Adjustment Item NOTE is displayed while Economy Mode is active ...

Страница 25: ...Return to Menu Highlight Menu 2 again Reset NO YES Return to Menu Factory preset data is restored NOTE is displayed while Mute is active Auto Analog Select the signal input automatically Select the Analog input D SUB Signal Select Direct When both Analogue and Digital cables are connected you can switch between them using the direct access facility described earlier If only one input is present th...

Страница 26: ...iming The Auto Set up may not work correctly when displaying the picture other than the screen adjustment pattern In this case manual adjustments are required There are two ways to adjust the screen One way is automatic adjustment for Clock Phase and Position The other way is performing each adjustment manually Perform the Auto Set up first when the monitor is connected to a new computer or resolu...

Страница 27: ...tion and V Position adjustment In case the picture frame is bigger or smaller than the data display area after the Clock adjustment repeat steps from C 2 Stretch the right side of the picture frame to the right edge of the display area by adjusting the Clock C C C C C Press the Auto Button Auto Set up D D D D D Adjust the image manually by following procedure below when the screen has a flicker or...

Страница 28: ...w 60Hz and repeat steps from C again Adjust the H Position after the Phase adjustment if the horizontal position moves during the adjustment H H H H H Adjust the Brightness and Color Temp to get the desired picture after you complete the Clock and Phase adjustments Put back your favorite wallpaper G G G G G Adjust the Phase to correct horizontal wavy noise flicker or blur in the zebra pattern NOTE...

Страница 29: ...anagement Mode which reduces the power consumption to less than 2W The screen becomes dark and the power indicator turns to orange From Power Management Mode the image reappears in several seconds when either the keyboard or the mouse are touched again The power management feature of this product complies with power saving requirement of ENERGY STAR and VESA DPMS When activated it automatically re...

Страница 30: ...r Switch is turned ON A The signal timing of the computer is within the specification of the monitor Power indicator is orange If the monitor is in power management mode touch the keyboard or the mouse The screen is not synchronized The Signal Cable is properly connected The signal timing of the computer is within the specification of the monitor B The signal timing of the computer is within the s...

Страница 31: ... the specification of the monitor F The audio equipment computer etc is ON The Volume is turned up The Mute is OFF The sound is too loud or too quiet G The audio output level of the audio equipment is within the specification of the monitor A strange noise is heard H The Audio Cable is properly connected TROUBLE SHOOTING 27 ...

Страница 32: ...each Maximum Screen Size 337 9mm W 270 3mm H 13 3 W 10 6 H Power Source 100 240VAC 50 60Hz 1 5A Environmental Considerations Approvals Tilt Angle Condition Audio equipment is not connected NOTE Brightness Contrast ratio 300cd m2 Typical 1000 1 Typical Input Video Signal Input Audio Signal 0 7Vrms maximum Speakers 1 0W 2 Stereo speakers Input Audio Connector ø 3 5mm mini jack Stereo Humidity Storag...

Страница 33: ...es Viewable angle Right Left Up Down 80 degrees each Maximum Screen Size 337 9mm W 270 3mm H 13 3 W 10 6 H Power Source Environmental Considerations Approvals Tilt Angle Condition Audio equipment is not connected NOTE Brightness Contrast ratio 300cd m2 Typical 1000 1 Typical Input Video Signal Input Audio Signal 0 7Vrms maximum Speakers 1 0W 2 Stereo speakers Input Audio Connector ø 3 5mm mini jac...

Страница 34: ...W 229 5mm H 14 5 W 9 0 H Power Source 100 240VAC 50 60Hz 1 5A Environmental Considerations Approvals Tilt Angle Condition Audio equipment is not connected NOTE Brightness Contrast ratio 250cd m2 Typical 600 1 Typical Input Video Signal Input Audio Signal 0 7Vrms maximum Speakers 1 0W 2 Stereo speakers Input Audio Connector ø 3 5mm mini jack Stereo Operating Temperature Humidity Storage Temperature...

Страница 35: ... 85 degrees Down 65 degrees Maximum Screen Size 367 2mm W 229 5mm H 14 5 W 9 0 H Power Source 100 240VAC 50 60Hz 1 5A Environmental Considerations Approvals Tilt Angle Condition Audio equipment is not connected NOTE Brightness Contrast ratio 250cd m2 Typical 600 1 Typical Input Video Signal Input Audio Signal 0 7Vrms maximum Speakers 1 0W 2 Stereo speakers Input Audio Connector ø 3 5mm mini jack S...

Страница 36: ...s each Maximum Screen Size 337 9mm W 270 3mm H 13 3 W 10 6 H Power Source 100 240VAC 50 60Hz 1 5A Environmental Considerations Approvals Tilt Angle Condition Audio equipment is not connected NOTE Brightness Contrast ratio 300cd m2 Typical 1000 1 Typical Input Video Signal Input Audio Signal 0 7Vrms maximum Speakers 1 0W 2 Stereo speakers Input Audio Connector ø 3 5mm mini jack Stereo Operating Tem...

Страница 37: ...NSIONS ProLite B1702S 400 5mm 15 8 368 5mm 14 5 174 0mm 6 9 231 0mm 9 1 286 5mm 11 3 55 5mm 2 2 337 0mm 13 3 185 0mm 7 3 DIMENSIONS ProLite E1702S E1702SV DIMENSIONS ProLite E1702WS E1702WSV 370 5mm 14 6 339 5mm 13 4 204 0mm 8 0 272 0mm 10 7 330 0mm 13 0 59 5mm 2 3 381 5mm 15 0 210 0mm 8 3 APPENDIX 33 Maximum adjustment range ...

Страница 38: ...940Hz 75 000Hz 72 809Hz 56 250Hz 60 317Hz 75 000Hz 72 188Hz 60 004Hz 70 069Hz 75 029Hz 59 870Hz 74 893Hz 75 000Hz 60 020Hz 75 025Hz 59 887Hz 74 984Hz 70 087Hz 66 667Hz 74 500Hz 74 720Hz 56 424Hz VGA TEXT VESA Macintosh SVGA VGA XGA 1024 768 640 480 800 600 Horizontal Frequency 31 469kHz 37 500kHz 37 861kHz 35 156kHz 37 879kHz 46 875kHz 48 077kHz 48 363kHz 56 476kHz 60 023kHz 47 776kHz 60 289kHz 67...

Страница 39: ...d port 3 8 1 2 4 5 6 7 9 10 11 12 15 20 13 14 16 17 18 19 21 22 23 24 Pin Input Signal Input Signal Pin T M D S Data 2 T M D S Data 2 T M D S Data 2 Ground Clock line SCL Data line SDA T M D S Data 1 T M D S Data 1 T M D S Data 1 Ground Ground Hot Plug Detect T M D S Data 0 T M D S Data 0 T M D S Data 0 Ground T M D S Clock Ground T M D S Clock T M D S Clock Compliant to VESA DDC DVI D 24pin Conne...

Отзывы: