ENGLISH
8 BEFORE YOU OPERATE THE MONITOR
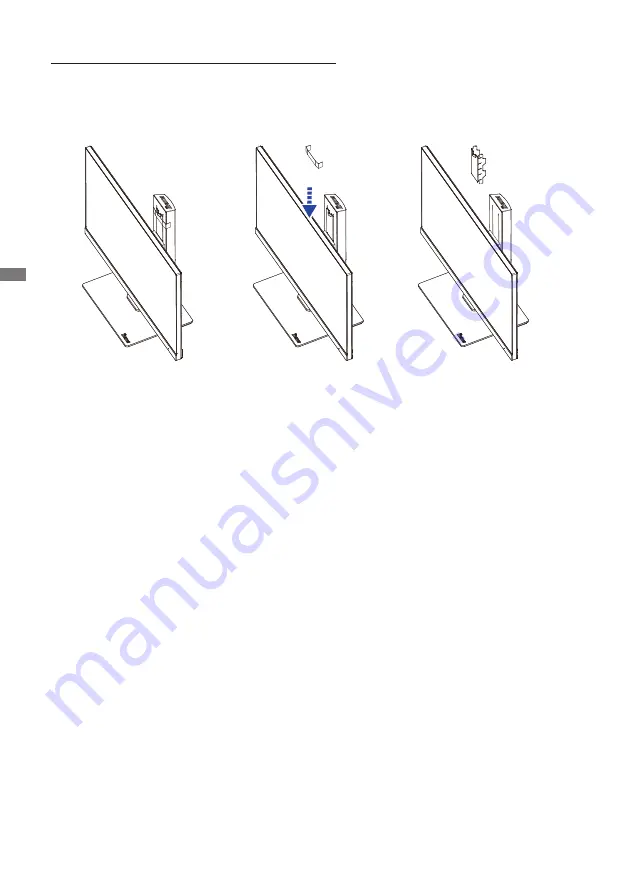
<Removing the stopper>
Place the monitor upright on a flat, stable surface.
1. Remove the tape. 2. Push down the monitor head. 3. Remove the stopper.
1
2
3
Страница 1: ...uch for choosing the iiyama LCD monitor We recommend that you take a few minutes to read this comprehensive manual carefully before installing and switching on the monitor Please keep this manual in a safe place for your future reference ...
Страница 2: ...ENGLISH ...
Страница 3: ...et using the address http www iiyama com You can access the Web page of different countries from there CE MARKING DECLARATION OF CONFORMITY This LCD monitor complies with the requirements of the EC EU Directive 2014 30 EU EMC Directive 2014 35 EU Low Voltage Directive 2009 125 EC ErP Directive and 2011 65 EU RoHS Directive The electro magnetic susceptibility has been chosen at a level that gives c...
Страница 4: ...ING THE CONTENTS OF THE PACKAGE 4 INSTALLATION 5 FITTING AND REMOVAL OF BASE 7 CONTROLS AND CONNECTORS 9 CONNECTING YOUR MONITOR 10 COMPUTER SETTING 11 ADJUSTING THE HEIGHT AND THE VIEWING ANGLE 11 OPERATING THE MONITOR 12 ADJUSTMENT MENU CONTENTS 13 STANDBY FEATURE 20 TROUBLE SHOOTING 21 RECYCLING INFORMATION 22 APPENDIX 23 SPECIFICATIONS 23 DIMENSIONS 24 COMPLIANT TIMING 24 ...
Страница 5: ...se fire electric shock or damage INSTALL THE MONITOR ON A FLAT STABLE SURFACE The monitor may cause an injury if it falls or is dropped DO NOT USE THE MONITOR NEAR WATER Do not use where water may be splashed or spilt onto the monitor as it may cause fire or electric shock OPERATE UNDER THE SPECIFIED POWER SUPPLY Be sure to operate the monitor only with the specified power supply Use of an incorre...
Страница 6: ...at the monitor and may cause fire or damage Make sure to allow enough ventilation when removing the tilt stand Operating the monitor on its back side upside down or on a carpet or any other soft material may also cause damage DISCONNECT THE CABLES WHEN YOU MOVE THE MONITOR When you move the monitor turn off the power switch unplug the monitor and be sure the signal cable is disconnected If you do ...
Страница 7: ...r or iiyama service center for advice or replacement packaging WARNING If you drop any materials or liquids such as water into the monitor when cleaning unplug the power cable immediately and contact your dealer or iiyama service center CAUTION For safety reasons turn off the power switch and unplug the monitor before you clean it NOTE To protect the LCD panel do not scratch or rub the screen with...
Страница 8: ... cable not supplied by iiyama An approved power cable greater or equal to H05VVF 3G 0 75mm2 must be used Power Cable HDMI Cable DisplayPort Cable USB Cable Stand Base with a screw Safety Guide Quick Start Guide BEFORE YOU OPERATE THE MONITOR CHECKING THE CONTENTS OF THE PACKAGE CAUTION FEATURES Supports Resolutions up to 2560 1440 High Contrast 1000 1 Typical Adv Contrast Function Available Bright...
Страница 9: ...sten the monitor Using the screw longer than this may cause electric shock or damage because it may contact with the electrical parts inside the monitor Screw Chassis Mounting Stage L INSTALLATION DISPLAY ARM OR DESK ARM STAND Before installation make sure the display arm or desk arm stand is strong enough to hold the necessary weight of the display and the mount Angle adjustment range 22 degrees ...
Страница 10: ...l forcibly without adjusting the stand height may cause damage to the panel or the stand The monitor is designed to be compatible with both landscape and portrait modes Video card for portrait display will be required for rotating the image on the screen With Stand A A Not Available Power Indicator A A Portrait Available Power Indicator Landscape ...
Страница 11: ...t a piece of soft cloth on the table beforehand to prevent the monitor from being scratched Lay the monitor flat on a table with front face down Loosen the thumb screw to remove the Stand Base from the monitor Installation Put a piece of soft cloth on the table beforehand to prevent the monitor from being scratched Lay the monitor flat on a table with front face down Install the stand base as show...
Страница 12: ...ENGLISH 8 BEFORE YOU OPERATE THE MONITOR Removing the stopper Place the monitor upright on a flat stable surface 1 Remove the tape 2 Push down the monitor head 3 Remove the stopper 1 2 3 ...
Страница 13: ...Button INPUT Speakers USB Downstream Connector 5V 900mA USB Upstream Connector Keyhole for Security Lock You can fasten a security lock and cable to prevent the monitor from being removed without your permission DisplayPort Connector DP HDMI Connector HDMI DVI D Connector DVI D Cable Hole Headphone Connector LINE OUT Audio Connector LINE IN AC Connector Alternating current NOTE NOTE CONTROLS AND C...
Страница 14: ... standard connector If a special cable is required please contact your local iiyama dealer or regional iiyama office Make sure you tighten the finger screws at each end of the signal cable The Class I pluggable equipment Type A must be connected to protective earth The socket outlet shall be installed near the equipment and shall be easily accessible Excessive sound pressure from ear headphones ca...
Страница 15: ...the monitor s height up to 130mm angle up to 45 right and left 22 upward and 5 downward Do not touch the LCD screen when you change the height or the angle It may cause damage or break the LCD screen Careful attention is required not to pinch your fingers or hands into the moving part of the stand when you change the height or the angle Injury can occur if care is not taken to avoid finger contact...
Страница 16: ...ighlight the desired adjustment icon Press the ENTER Button again Use the Buttons to make the appropriate adjustment or setting Press the EXIT Button to leave the menu and the settings you just made would be automatically saved For example to correct for OSD vertical position select Menu item of Setup Menu and then press the ENTER Button Then select OSD Position by using the Buttons An adjustment ...
Страница 17: ... higher level results in a faster response time You can skip the Menu items and directly display an option setting screen by using the following button operations ECO Mode Press the Button when the Menu is not displayed Blue Light Reducer Pressing and holding of the EXIT Button for 2 3 seconds when the Menu is not displayed Direct Brightness of back light is reduced Off Normal ECO Mode Mode1 Brigh...
Страница 18: ...tal DVI input Select the Digital HDMI input DVI HDMI Select the Digital DisplayPort input DisplayPort Adjustment Item Problem Option Button to Press Audio Adjust Volume Too soft Too loud Mute Return the sound volume to the previous level Turn off the sound temporarily Off On Mute On and Off are switched as follows by pressing the Button successively On Off NOTE Select the Line In input Line In Sel...
Страница 19: ...to Press Store User Setting Store User Setting Save the settings of the screen adjustment User Mode 1 Save the settings of the screen adjustment User Mode 3 NOTE Save the settings of the screen adjustment User Mode 2 You can memorize your customized monitor settings The following settings can be memorized Contrast Brightness Overdrive Adv Contrast ECO mode Volume Mute Color Adjust i Style Color Sh...
Страница 20: ...ronment Sport Game For Sports game environment FPS Game For FPS game environment Strategy Game For Strategy game environment User Mode 1 User Mode 3 User Mode 2 Applies customized monitor settings Applies customized monitor settings Applies customized monitor settings HDMI RGB Range 2 Full Range Limited Range For full range color scale signal For limited color scale signal On Off Direct Drive Mode...
Страница 21: ...Out You can set the OSD display duration time between 5 and 30 seconds Adjustment Item Problem Option Button to Press Setup Menu iiyama Logo displayed when the monitor is turned on On Off iiyama Logo does not display when the monitor is turned on Opening Logo H Position OSD is too left OSD is too right OSD is too low OSD is too high V Position OSD Position FreeSync On Off The FreeSync function is ...
Страница 22: ...ion about changing the resolution and refresh NOTE Displays information regarding the current input signal coming from the graphic card in your computer Display Information 1920x1080 60Hz Adjustment Item Problem Option Button to Press Reset Reset All Factory preset data is restored No Return to Menu Yes ...
Страница 23: ...e deactivated by pressing the front button ENTER again for about 10 seconds Power Switch 1 The power switch lock will be activated by pressing the front button for about 10 seconds Locking the power switch means that won t be able to turn off the Monitor while the power switch is locked If presses the power switch message Power Button Locked will appear on the screen 2 The power switch lock will b...
Страница 24: ...onds when either the keyboard or the mouse are touched again The standby feature of this product complies with power saving requirement of VESA DPMS When activated it automatically reduces unnecessary power consumption of the monitor when your computer is not in use To use the feature the monitor needs to be connected to a VESA DPMS compliant computer There is a standby step the monitor takes as d...
Страница 25: ... not light up The screen position is not in the center The screen is too bright or too dark The Power Cable is firmly seated in the socket The Power Switch is turned ON The AC socket is live Please check with another piece of equipment If the blank screen saver is in active mode touch the keyboard or the mouse Increase the Contrast and or Brightness The computer is ON The Signal Cable is properly ...
Страница 26: ...he Volume is turned up The Mute is OFF The audio output level of the audio equipment is within the specification of the monitor The audio output level of the audio equipment is within the specification of the monitor The Audio Cable is properly connected Problem Check No sound For better environment protection please don t dispose your monitor Please visit our web site www iiyama com for monitor r...
Страница 27: ... 60Hz HDMI without FreeSync 2560 1440 144Hz HDMI with FreeSync 2560 1440 144Hz DisplayPort without FreeSync 2560 1440 144Hz DisplayPort with FreeSync 2560 1440 144Hz Input Connector DVI D HDMI DisplayPort Input Video Signal DVI Digital Visual Interface Standard Rev 1 0 compliance HDMI DisplayPort USB Standard USB3 0 DC5V 900mA Number of USB Ports Connector shape 1 Upstream Series B 2 Downstream Se...
Страница 28: ...z 75 029Hz 78 750MHz 1280 1024 79 980kHz 75 020Hz 135 000MHz 1600 1200 75 000kHz 60 000Hz 162 000MHz 1680 1050 65 290kHz 60 000Hz 146 250MHz 1920 1080 66 590kHz 59 930Hz 138 500MHz 166 442kHz 143 856Hz 332 883MHz 1 2560 1440 88 787kHz 59 951Hz 241 500MHz 221 970kHz 143 856Hz 586 000MHz 2 609 0mm 24 0 613 5mm 24 2 342 0mm 13 5 370 5mm 14 6 300 0mm 11 8 230 0mm 9 1 54 0mm 2 1 412 0mm 16 2 542 0mm 21...