

2.3.1. Switching via mouse (panning)
When panning the mouse cursor beyond the border of the moni-
tor, you can switch from your console between different monitors
that are in vertical or horizontal position to each other.
Monitors that are only arranged horizontally (e. g. 4x1, 8x1) have
to be operated with the one-dimensional Multi-Screen mode. Mo-
nitors that are arranged vertically and horizontally (e. g. 2x2, 4x2)
have to be operated with the two-dimensional Multi-Screen mode.
1. Activate the switching via mouse by executing the
following keyboard sequences:
■
One-dimensional mode:
‚Hot Key‘, <x>, <1>, <Enter>
■
Two-dimensional mode:
‚Hot Key‘, <x>, <2>, <Enter>
2.
Move the mouse pointer beyond the border of the
monitor to the vertically or horizontally located
monitor.
The switching operation will be immediately executed
to the connected source (computer, CPU) by passing
over the mouse pointer.
3. Deactivate the switching via mouse by executing the
following keyboard sequence:
‚Hot Key‘, <x>, <0>, <Enter>
Additional software for calibration and positioning of the
mouse pointer is not necessary.
When using sources (computers, CPUs) in multi-head
operation (e. g. dual-head), the switching is only working
manually via keyboard commands. Any non-observance
may have a negative influence on the stability of the
system.
2.3. Operation
2.3.1. Switching via keyboard
From your console, you can switch via keyboard sequence be-
tween different monitors
1.
Open Command Mode with the ‚Hot Key‘ (2x <Right
Shift>).
2.
Enter the number of the specific source or monitor and
confirm with <Enter>.
At the same time Command Mode is closed and the key-
board LEDs return to previous status.
Keyboard and mouse are connected to the specified sour
ce or monitor.
When using the numeric keypad for switching, a confirma-
tion of the switching operation by using the key <Enter> is
not necessary.
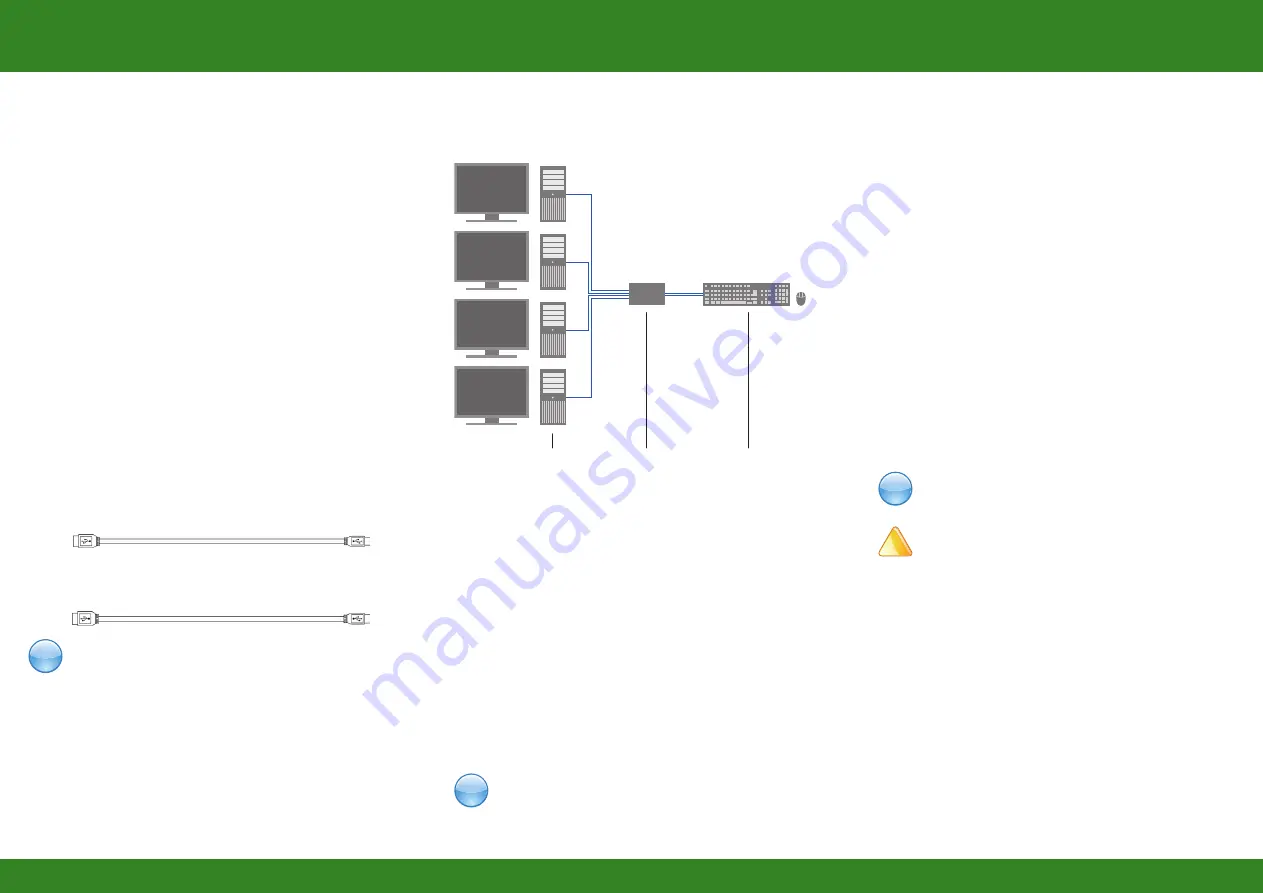
2.2. System Overview
This section illustrates typical installations of the U-Switch:
!
Draco U-Switch Series 476
Draco U-Switch Series 476
Draco U-Switch Series 476
1. System Setup
First time users are recommended to carry out a test placement
by setting up the system in a single room. This will allow you to
identify and solve any cabling problems, and experiment with your
system more conveniently.
1. Switch off all devices.
2. Connect the USB cables to the CPUs (CON Units) and to
the U-Switch
3.
Connect mouse and keyboard to the U-Switch
4. Connect the 5VDC power supply with the U-Switch
5.
Power up the system
2. Specifications
2.1. Package Contents
Your extender package contains the following items:
■
U-Switch
■
5VDC international power supply unit
■
Country specific power cord
■
Quick Setup
■
4x USB cable ( 1.8 m, USB type A to type B)
Additional content for K476-8U/ K476-4U2
■
4x USB cable (1.8 m, USB type A to type B)
If anything is missing, contact your dealer.
!
!
!
Quick Setup
Quick Setup
Quick Setup
1
2
3
1.
Sources (computers, CPU, KVM extender CON units)
2. CPU Unit
Keyboard, mouse


