background image

DC 7.5V, 2.5A

Quick Start: Connections
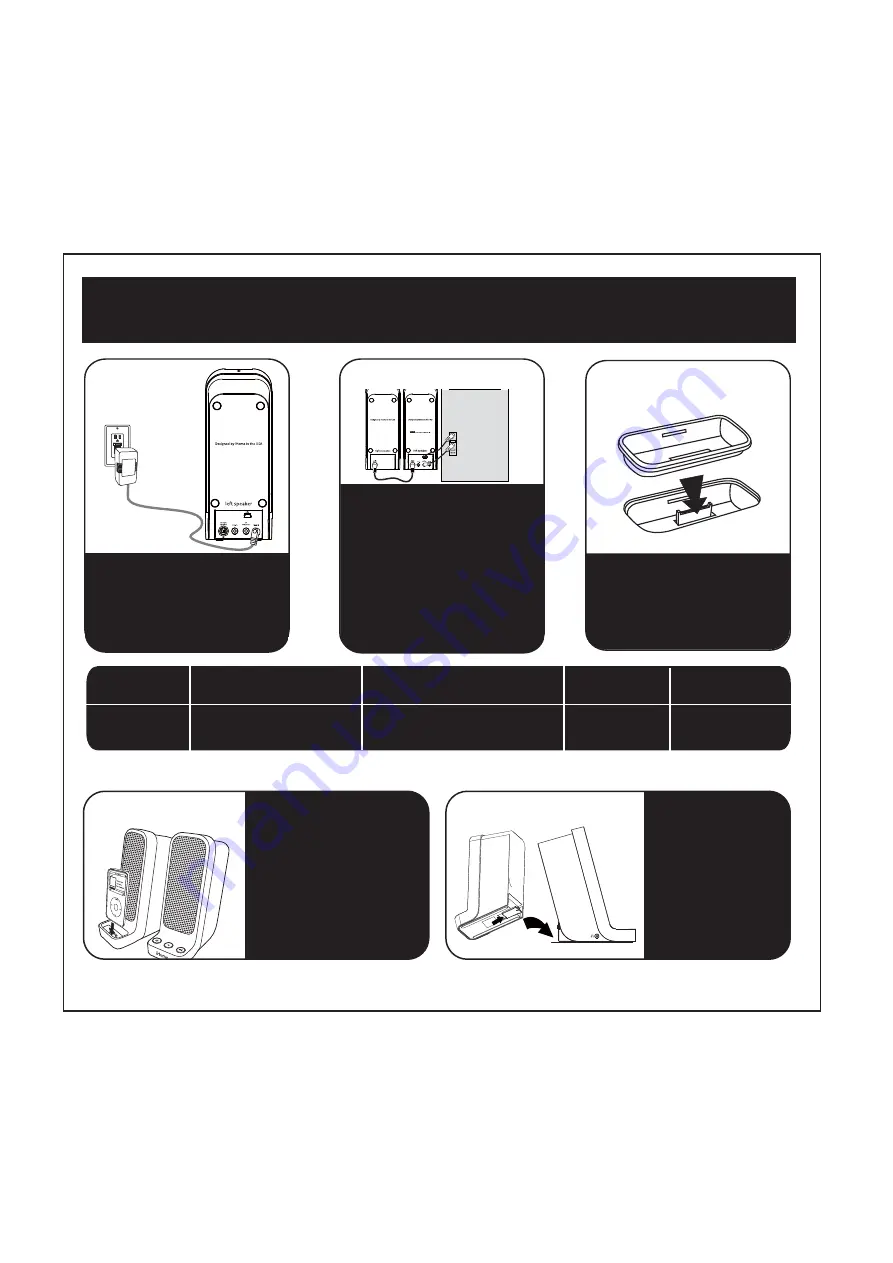
1

NOTE: If the insert for your iPod isn’t listed, please visit an Apple store or www.ihomeaudio.com 

to purchase the proper insert.

iPod Touch

3rd Gen nano 
insert  13

3rd Gen nano 

thin iPod with video (30 GB)
Insert 9

iPod with video (60,80 GB)
Insert 10

thin (30 GB) iPod with video
thin (80GB) iPod classic

thick (60, 80 GB) iPod with video
thick (160 GB) iPod classic

iPod Touch 
insert 14

For this iPod

Use this insert

3:inserts

1:power

Attach the  AC adaptor cable to 
the jack on the back of the left 
speaker and plug the other end 
into a working wall socket.

RESETRESET

TESTTEST

4:iPod

Insert iPod into dock with 
proper insert (iPod  must not 
be in a skin or case). iPod 
will charge while docked. 
Press the Power button on 
the iH69 then press 
play/pause button on your 
iPod  to play the iPod.

5:stand

The iH69 has pull out 
“feet” (stands) on the 
back of each speaker 
for added stability. Grip 
the stands and pull 
outward for use. Press 
back under speaker 
body when not 
needed.

2:connections

Select the dock insert for your 
iPod model from the table below 
and place insert in dock.

Never dock an iPod without an 
insert in place.

DC 7.5V, 2.5A

1) Connect the left and right speaker 
using the included speaker cable. 
The arrows on the plugs should face 
downward to match arrows on unit. 
2) Connect the USB cable to the left 
speaker and a powered USB port 
on your computer. 
3) Connect the computer audio cable 
to the audio out jack on your 
computer and to the computer  jack 
(marked “to computer”) on the iH69 
to listen to computer audio.

Содержание iH69

Страница 1: ...l iH69 Computer Speaker System for your iPod Questions Visit www ihomeaudio com Model iH69 Top Sync button version Instruction Manual Date June 6 08 Print color Black text on white paper Size 178W x 178H mm ...

Страница 2: ...lemas Warranty Information Table of Contents Place the unit on a level surface away from sources of direct sunlight or excessive heat Protect your furniture when placing your unit on a natural wood and lacquered finish A cloth or other protective material should be placed between it and the furniture Clean your unit with a soft cloth moistened only with mild soap and water Stronger cleaning agents...

Страница 3: ...enerates uses and can radiate radio frequency energy and if not installed and used in accordance with the instructions may cause harmful interference to radio communications However there is no guarantee that interference will not occur in a particular installation If this equipment does cause harmful interference to radio or television reception which can be determined by turning the equipment of...

Страница 4: ...t be in a skin or case iPod will charge while docked Press the Power button on the iH69 then press play pause button on your iPod to play the iPod 5 stand The iH69 has pull out feet stands on the back of each speaker for added stability Grip the stands and pull outward for use Press back under speaker body when not needed 2 connections Select the dock insert for your iPod model from the table belo...

Страница 5: ...ck Headphone Jack Aux in Jack To Computer audio Jack To Right Speaker Jack To Left Speaker Jack iPod Dock 2 Controls and Indicators Front Panel Back Panel Side Left Speaker Panel Left Speaker Right Speaker Left Speaker Right Speaker Power LED Stand iPod sync on DC 7 5V 2 5A DC Jack ...

Страница 6: ...n standby mode press the button on the iH69 then press play pause on your iPod to play it 3 Press play pause on your iPod to pause play press again to resume it 4 Press the or buttons on the right speaker to adjust the system volume 5 To turn off the unit press the button on the right speaker Your iPod will continue charging while in the dock NOTE IF YOU PLAY YOUR iPOD AND A COMPUTER AUDIO SOURCE ...

Страница 7: ...led when headphones are in use The iH69 allows you to sync your docked iPod with a computer directly from the iH69 without removing the iPod 1 Plug the USB cable into a powered USB port on your computer and the other end to the iH69 s USB port located on the back of the left speaker 2 Make sure the iPod is properly docked Press the Sync Button located on the top of the left speaker A green LED on ...

Страница 8: ...currently playing track Pressing Play Pause from power off mode will play iPod Pressing Play Pause while iPod is docked and playing will pause iPod Pressing the up down buttons for Bass and Treble will raise or lower bass or treble Power Button turns unit ON and OFF Pressing the mute button will mute unit While unit is muted LED will flash as long as unit is muted Pressing mute again or pressing v...

Страница 9: ...cket 6 Cleaning The unit should be cleaned only as recommended See the Maintenance section of this manual for cleaning instructions 7 Objects and Liquid Entry Care should be taken so that objects do not fall and liquids are not spilled into any openings or vents located on the product 8 Attachments Do not use attachments not recommended by the product manufacturer 9 Lightning and Power Surge Prote...

Страница 10: ...he dock and check for obstruction on the connectors in the dock and on your iPod Then reseat it in the dock Remove your iPod from the dock and check for obstruction on the connectors in the dock and on your iPod Then reseat it in the dock Upgrade software on your iPod via iTunes Please refer to your iPod manual for details Please make sure your iPod is working properly before docking in the unit R...

Страница 11: ...ncastre correspondiente antes de intentar acoplarlo al aparato Retire el iPod de la muesca y elimine la obstrucción Vuelva a acoplar su iPod Actualice su programa vía iTunes Verifique el correcto funcionamiento de su iPod antes de acoplarlo a la unidad Por favor refiérase al Manual del Usuario de su iPod para mayor información Retire el iPod de la muesca y elimine la obstrucción Vuelva a acoplar s...

Страница 12: ... insured to the Factory Service Center listed below Consumer Repair Department SDI Technologies Inc 1330 Goodyear Drive El Paso TX 79936 6420 Disclaimer of Warranty NOTE This warranty is valid only if the product is used for the purpose for which it was designed It does not cover i products which have been damaged by negligence or willful actions misuse or accident or which have been modified or r...

Отзывы: