background image

www.igmtools.com

8

20

21

1

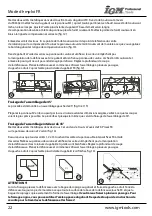
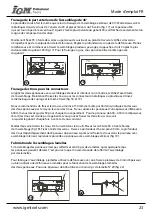
Radius and 45° finishing of worktop corners

For radius finishing of corners use the E holes (fig. 20).
For beveling of corners to 45° use the F holes (fig. 21).

Operating instructions  EN

Insert the metal stops into the holes. Fix the jig FK to the edge of the worktop using the stops. Tighten the 
jig to the kitchen worktop using the clamps and check that the clamps do not hinder the movement of the 
router. Set the cutting depth on the router. Insert the router and begin to cut the joint on multiple-pass from 
left to right. Copy according to the outer edge of the radius or groove.

SECURITY

• Always unplug the router when exchanging the router bit or setting the router. 
 • Use protection glasses when cutting. 
• Use hearing protectors. 
• Always use dust mask or respirator. 
• Use dust exhausting plant. 
• Don’t wear loose clothing. Ensure that you have tucked your sleeves and that you don’t wear any tie.  
• Before switching the router on, remove all tools, nuts, keys and other free objects from the cutting area.
 • Prevent unwanted switching of the router: ensure that the switch of the router is in position “off” before 
plugging-in. 
• Wait until the cutting bit is completely stopped before starting any setting of the router. 

FK650 – FK651  SPARE PARTS LIST                                                                                                          v .4

Pos. #

Description

Quantity

Code

2

Sliding stop 200x30x10 mm

1

FK650-02

3

Bolt-stop set 3 pcs D30/10x35 black

1

FK650-03

Set of connecting material for sliding stop

1

FK650-05

4

 O rings set 6 pcs

1

FS990001

Содержание FK650

Страница 1: ... S 10 17 Mode d emploi FR p 18 24 Návod k obsluze CZ s 26 32 Návod na obshluhu SK s 34 40 KITCHEN WORKTOP JIG SCHABLONE FÜR KÜCHENARBEITSPLAN VERBINDUNGEN GABARIT POUR ASSEMBLAGES DU PLAN DE TRAVAIL ŠABLONA PRO SPOJE KUCHYŇSKÝCH DESEK ŠABLÓNA PRE SPOJ PRACOVNÝCH DOSIEK FK650 ...

Страница 2: ... diameter Hereafter referred to as FK Basic accessories 1 pc Jig made of rigid laminated phenolic with letters indicating the positions of the stops 3 pc Metal stops 1 pc Plastic sliding stop 1 pc Nut with plastic rosette for sliding stop 1 pc Bolt for sliding stop 1 pc Washer 1 pc Operating instructions Accessories required for the work with the jig PORTABLE ROUTER with superior performance we re...

Страница 3: ...ensure that the stops are completely inserted into the holes Before using check that the stops are not leaning against the work table Setting of cutting axis and copying edge The cutting line is always shifted by 9 mm FK650 resp 8 5 mm FK651 from the copying edge of the jig upon use of a guide bush dia 30 mm and a router bit dia 12 mm FK650 resp 12 7 mm FK651 fig 5 To obtain a precise joint don t ...

Страница 4: ...he kitchen worktop The length of the joint is thus set Remove the metal stops from the B holes Cutting of inner 90 joint Insert two metal stops into the C holes from the underside of FK leave plastic length stop 3 clamped Place FK on the kitchen worktop F1 according to fig 7 Ensure that all stops are touching the edge of the worktop Now tighten FK to the kitchen worktop and working table using the...

Страница 5: ...e router and begin to cut the joint on multiple pass from left to right Copy the edge of jig which is closer to the remaining kitchen worktop fig 11 If you don t cut all the worktop thickness at one cut you can use for rough cutting the opposite edge the jig groove and so you will have ca 1 5 7 mm of material left for the final cutting Now use the right edge of the groove fig 8 and make the final ...

Страница 6: ...he far edge of jig FK fig 12 Cutting of 45 joint The work procedure is demonstrated on a left handed 45 joint fig 14 and 15 PrepareworktopF2bycutting withthecircularsawaccordingtotherequireddimensions cutaspreciseaspossible The working procedure is almost identical as for shaping connections to 90 Cutting of inner 45 joint Insert two metal stops into the C holes and one into the G hole from the fa...

Страница 7: ...th a width of less than 600 mm it is necessary to rearrange FK for each hole separately For a worktop of 600 650 mm the spacing of the holes is given by the jig and you may mill out both holes in one clamping should this spacing suit your purposes Insert two metal stops into the D holes and one into the B hole Fix FK to the cut edge of the joint using the stops fig 18 Tighten using the clamps Cut ...

Страница 8: ...router when exchanging the router bit or setting the router Use protection glasses when cutting Use hearing protectors Always use dust mask or respirator Use dust exhausting plant Don t wear loose clothing Ensure that you have tucked your sleeves and that you don t wear any tie Before switching the router on remove all tools nuts keys and other free objects from the cutting area Prevent unwanted s...

Страница 9: ...www igmtools com 9 ...

Страница 10: ...für Arbeit mit Nutfräser mit Schnittdurchmesser von D12 7 mm bestimmt Nachfolgend nur FK Basiszubehör 1St SchabloneauswiderstandfähigemKunststoffmitBuchstabenfürBezeichnungvonPositioneneinzelnerAnschläge 3 St Metallanschläge 1 St Schiebeanschlag aus Kunststoff 1 St Mutter mit Kunststoffrosette für Schiebeanschlag 1 St Schraube für Scheibeanschlag 1 St Schraubenunterlage 1 St Gebrauchsanweisung Not...

Страница 11: ...rsehen die Herausfallen der Anschläge aus Löchern verhindern Metallanschlag mit Bolzen ins Loch einschieben sodass er völlig eingeschoben ist Falls die Metallanschläge schwer einzuschieben sind Gummiringe mit Öl reiben Vor Gebrauch immer überprüfen ob die Anschläge völlig in Löchern eingeschoben sind Vor Gebrauch ist ebenfalls zu überprüfen ob die Anschläge Arbeitstisch nicht berühren Einstellung ...

Страница 12: ...s Schiebeanschlag Einstellung des Schiebeanschlages Auf Rückseite von FK zwei Metallanschläge in B Löcher einschieben und FK quer auf Küchenarbeisplatte M1 legen Abb 5 FK an Anschläge in B Löchern 1 und 2 anlegen Auf der Rückseite Längenkunststoffanschlag 3 mit Schraube und Mutter befestigen Abb 6 Längenkunststoffanschlag so einstellen dass er die Kanten der Küchenarbeitsplatte berührt Somit ist d...

Страница 13: ...en Unterschied zwischen der Schnittebene und der Kante der Schablone FK dar Abb 10 Längenschiebeanschlag aus dem Loch entnehmen Auf Vorderseite von FK zwei Metallanschläge in B Löcher einschieben und FK mit der Vorderseite nach Abb 11 auf Platte M1 die mit Rückseite nach oben gewendet ist legen Die entfernte Ecke der Schablone FK siehe Pfeile genau nach der gezeichneten Kompensationslinie einstell...

Страница 14: ...itze des Schiebeanschlages so drehen dass die Schablonenkante mit der Kompensationslinie nach Abb 13 ausgeglichen wird Schablone mit Spannzangen an Küchenarbeitsplatte befestigen und überprüfen ob die Spannzangen die Bewegung der Oberfräse nicht verhindern und ob die Schablone auf der Küchenarbeitsplatte fest befestigt ist Längenschiebeanschlag lockern und entfernen um seine Beschädigung durch Frä...

Страница 15: ...pensationslinie einstellen Jetzt FK mittels Spannzagen an Küchenarbeitsplatte und an Arbeitstisch befestigen und überprüfen ob die Spannzangen Bewegung der Oberfräse nicht verhindern Schnitttiefe der Oberfräse einstellen Oberfräse einlegen und Verbindung auf mehrere Durchläufe fräsen von links nach rechts Dabei die entfernte Kante der Schablone FK kopieren Abb 17 Für grobes Anfräsen kann die gegen...

Страница 16: ... Für Radiusendung E Löcher verwenden Abb 20 Für Einschneiden der Ecke auf 45 F Löcher verwenden Abb 21 Metallanschläge in Löcher einschieben FK mit Anschlägen an Plattenkante legen Schablone mittels Spannzangen an Küchenarbeitsplatte befestigen und überprüfen ob die Spannzagen Bewegung der Oberfräse nicht verhindern Schnitttiefe der Oberfräse einstellen Oberfräse einlegen undVerbindung auf mehrere...

Страница 17: ... v 4 Pos Beschreibung Menge Bestell Nr 2 Schiebeanschlag 200x30x10 mm 1 FK650 02 3 Bolzen Anschlag Set 3 St D30 10x35 schwarz 1 FK650 03 Satz von Verbindungselementen für Schiebeanschlag 1 FK650 05 4 O Ringe Set 6 St 1 FS990001 Gebrauchsanweisung DE ...

Страница 18: ...é pour le travail avec fraise à queue avec diamètre de coupe D12 7 mm 1 2 FK ci après Accessoires de base 1 pc Gabarit en plastique résistant muni des lettres pour indiquer la position des arrêts 3 pc Arrêts métalliques 1 pc Arrêt coulissant plastique 1 pc Ecrou avec rosette plastique pour arrêt coulissant 1 pc Boulon pour arrêt coulissant 1 pc Rondelle du boulon 1 pc Mode d emploi Accessoires néc...

Страница 19: ...complètement inséré dans le trou Si les arrêts métalliques sont difficiles à insérer huilez lez bagues en caoutchouc Avant l usage rassurez vous toujours que les arrêts sont complètement insérés dans les trous Avant l usage vérifiez également si les arrêts ne touchent pas la table de travail Mise au point de l axe de coupe et de l arête de copiage Lors de l utilisation d une bague de copiage de 30...

Страница 20: ...de cuisine Ainsi vous avez mesuré la longueur de l assemblage Enlevez les arrêts métalliques des trous B Fraisage de l assemblage intérieur de 90 Mettez deux arrêts métalliques dans des trous C à l envers de FK n enlevez pas l arrêt coulissant plastique 3 Placez FK sur le panneau de cuisine F1 selon fig 7 Rassurez vous que tous les arrêts touchent les arêtes du panneau Maintenant fixez FK à l aide...

Страница 21: ... gauche à droit copiant l arête du gabarit FK qui est plus proche au panneau de cuisine restant fig 11 Si vous ne fraisez pas l épaisseur entière du panneau à la fois vous pouvez utiliser l arête opposée de la rainure du gabarit pour le fraisage en gros et pour le fraisage fin vous aurez ainsi un ajout d à peu près 1 5 7 mm Puis vous utilisez la bonne arête de la rainure pour le fraisage fin Obser...

Страница 22: ...semblage de 45 Le procédé est démontré à un assemblage gauche de 45 fig 14 et 15 Préparez le panneau F2 en le coupant par la scie circulaire selon les dimensions exigées veillez à ce que les coupes soient le plus précis possible Le procédé est presque le même que celui du fraisage de l assemblage de 90 Fraisage de l assemblage intérieur de 45 Mettez deux arrêts métalliques dans des trous C et un d...

Страница 23: ...e fraiser les trous au moins à 150 mm de l arête postforming Indiquez en dessous des deux panneaux par le crayon les axes des trous Si vous utilisez les panneaux d une épaisseur inférieure à 600 mm vous devez ajuster FK pour chaque trou séparément Pour le panneau de 600 650 mm d épaisseur l écart des trous est donné par le gabarit et vous pouvez fraiser les deux trous sans avoir à rajuster le gaba...

Страница 24: ...e intérieure du radius ou de la rainure SÉCURITÉ Il faut toujours débrancher la défonceuse et la mettre hors circuit électrique avant l échange de la fraise à queue ou pendant la mise au point En fraisant utilisez des lunettes de protection Utilisez une protection acoustique Utilisez un masque à poussière ou un respirateur Utilisez une installation d aspiration Ne portez pas de vêtement ample Rass...

Страница 25: ...www igmtools com 25 ...

Страница 26: ...enství 1 ks Šablona z odolného plastu s písmeny označujícími pozice dorazů 3 ks Kovových dorazů 1 ks Plastový posuvný doraz 1 ks Matice s plastovou růžicí pro posuvný doraz 1 ks Šroub pro posuvný doraz 1 ks Podložka pro šroub 1 ks Návod k obsluze Pro práci se šablonou je potřeba HORNÍ FRÉZKA o vyšším výkonu z naší nabídky doporučujeme Horní frézku CMT KOPÍROVACÍ KROUŽEK prům 30 mm Pokud není možné...

Страница 27: ...gumové kroužky Před použitím se vždy přesvědčte že jsou dorazy zcela zasunuty do otvorů Před použitím zkontrolujte zda dorazy nejsou opřeny o pracovní stůl Nastavení osy řezu a kopírovací hrany Řezná čára je vždy posunuta o 9 mm FK650 resp 8 5 mm FK651 od kopírovací hrany šablony při použití kopírovacího kroužku průměru 30 mm a frézy průměru 12 mm pro FK650 resp 12 7 mm pro FK651 obr 5 Pro dosažen...

Страница 28: ...aby se dotýkal hrany kuchyňské desky Tím je zaměřena délka spoje Vyjměte kovové dorazy z otvorů B Frézování vnitřního spoje 90 Vložte dva kovové dorazy do otvorů C z rubové strany FK ponechte délkový plastový doraz 3 upnutý Umístěte FK na kuchyňskou desku F1 dle obr 7 Ujistěte se že se všechny dorazy dotýkají hrany desky Nyní upněte FK pomocí svěrek ke kuchyňské desce a pracovnímu stolu a prověřte...

Страница 29: ...ložte horní frézku a začněte frézovat spoj několika průchody zleva doprava Kopírujte hranu šablony FK která je blíže zbývající kuchyňské desce obr 11 Pokud nefrézujete celou tloušťku desky najednou můžete pro hrubé odfrézování použít protilehlou hranu drážky v přípravku pro čisté dofrézování tím vznikne přídavek cca 1 5 7 mm potom použijte správnou hranu drážky dle obr 11 a dofrézujte načisto Dodr...

Страница 30: ...ablony FK obr 13 Frézování spoje 45 Postup práce je ukázán na levostranném spoji 45 obr 14 a 15 Desku F2 si připravíte nařezáním kotoučovou pilou dle požadovaných rozměrů řezy proveďte co nejpřesněji Postup práce je téměř shodný s frézováním spoje na 90 Frézování vnitřního spoje 45 Vložte dva kovové dorazy z lícové strany do otvorů C a jeden doraz do otvoru G šablony FK Umístěte FK na kuchyňskou d...

Страница 31: ...eskách zespodu osy otvorů tužkou Pokud používáte desky o šířce menší než 600 mm musíte FK přestavit pro každý otvor zvlášť Pro desku 600 650 mm je rozteč otvorů dána šablonou a můžete vyfrézovat oba dva otvory při jednom upnutí pokud Vám tato rozteč vyhovuje Vložte dva kovové dorazy do otvorů D a jeden doraz do otvoru B Přiložte FK dorazy k ofrézované hraně spoje obr 18 Upevněte pomocí svěrek Fréz...

Страница 32: ... elektrického proudu Při frézování používejte ochranné brýle Používejte chrániče sluchu Vždy používejte protiprachovou masku nebo respirátor Používejte odsávací zařízení Nenoste volný oděv Ujistěte se že máte vyhrnuty nebo upnuty volné rukávy a že nemáte vázanku Před zapnutím frézky odstraňte všechny nástroje matice klíče a další volné objekty z pracovního prostoru Předejděte nechtěnému zapnutí fr...

Страница 33: ...www igmtools com 33 ...

Страница 34: ...zov 3ks Kovové dorazy 1ks Plastový posuvný doraz 1ks Matica s plastovou ružicou pre posuvný doraz 1ks Skrutka pre posuvný doraz 1ks Podložka pre skrutku 1ks návod na obsluhu Pre prácu so šablónou je potrebné HORNÁ FRÉZOVAČKA s vyšším výkonom z našej ponuky odporúčame Hornú frézku CMT KOPÍROVACÍ KRÚŽOK priemeru 30 mm Pokiaľ nieje možné zohnať kopírovací krúžok priemeru 30 mm preVáš typ hornej frézo...

Страница 35: ... Pred použitím skontrolujte či sa dorazy neopierajú o pracovný stôl Nastavenie osy rezu a kopírovacej hrany Čiara rezu je vždy posunutá o 9 mm FK650 resp 8 5 mm FK651 od kopírovacej hrany šablóny pri použití kopírovacieho krúžku priemeru 30 mm a frézy s priemerom 12 mm pre FK650 resp 12 7 mm pre FK651 obr 5 Pre dosiahnutie presného spoja nepoužívajte preostrený nástroj zmenšenie rezného priemeru F...

Страница 36: ...u F1 podľa obr 7 Uistite sa že sa všetky dorazy dotýkajú hrany dosky Teraz upnite FK pomocou svoriek ku kuchynskej doske a pracovnému stolu a preverte či svorky nebránia v pohybe hornej frézovačky v drážke prípravku a či sú riadne utiahnuté Nastavte hĺbku rezu na hornej frézovačke Vložte hornú frézovačku a začnite frézovať spoj niekoľkými priechodmi z ľava do prava pri tom kopírujte hranu šablóny ...

Страница 37: ...enzovať pravý uhol steny až do 3º natočením vonkajšieho spoja na doske M1 Spoj ktorý bude kompenzovať pravý uhol steny nebude nebude však nikdy tak presný ako spoj 90º Natočenie sa urobí cez hranu posuvného dorazu FK viz obr 12 a 13 až do 3º Pokiaľ máte možnosť položte dosku M1 na korpus a cez dosku F1 tak aby bolo možné nakresliť čiaru rezu na spodnej strane dosky M1 Po obkreslení vnútorného spoj...

Страница 38: ...ky na obr 16 UPOZORNENIE Pri frézovaní pritlačujte hornú frézovačku s kopírovacím krúžkom tesne k šablóne a frézujte z ľava do prava Udržujte horní frézovačku vždy kolmo tak aby sa základňa hornej frézovačky dotýkala celou plochou plochy FK650 a kopírovací krúžok presne kopíroval tvar spoja na šablóne Radšej frézujte na viacero priechodov pre hrubé odfrézovanie môžete použiť protiľahlú hranu drážk...

Страница 39: ... lamelový spoj použite hornú frézovačku s tanierovou drážkovacou frézou hrúbky 4 mm alebo použite lamelovaciu frézovačku pre výrobu lamelového spoja v oboch doskách Pre šírku 600 mm použite aspoň 4ks lamel č 20 obr 22 Pred montážou dosiek obrúste hrany spoja zľahka brúsnym papierom naneste lepidlo do lemelových spojov Na celý spoj odporúčame aplikovať vode odolné lepidlo alebo vode odolný tmel Pre...

Страница 40: ...BEZPEČNOSŤ Predvýmenoustopkovejfrézyaleboprinastavovanívždyvypnitefrézovačkuaodpojtejuodprívoduelektrickéhoprúdu Pri frézovani používajte ochranné okuliare Používajte chrániče sluchu Vždy používajte protiprachovú masku alebo respirátor Používajte odsávacie zariadenie Nenoste voľný odev Uistite sa že máte vyhrnuté alebo upnuté voľné rukávy a že nemáte kravatu Pred zapnutím frézovačky odstráňte všet...

Отзывы: