Safety precautions
Individual parameters, description by figures and design in the manual may differ depending on the version
and updates. Printing errors reserved. The buyer is obliged to provide a serial number on the warranty card as
well as in the delivery note and the proof of purchase. In this context, the buyer acknowledges that unless the
serial number of goods is not marked on the proof of purchase, delivery note and in the warranty card and
therefore it cannot be possible to compare this serial number marked on goods and its protective packaging
with the serial number stated in the warranty card, delivery note and the proof of purchase and thus to verify
that the goods runs from the seller, the service center is competent to claim such a goods automatically and
reject it immediately. The buyer must instruct all persons to whom the goods would be subsequently sold.
Product complaints do with your dealer if you are not on the web www.iget.eu indicated otherwise.
For household use: The given symbol (crossed-out wheeled bin) on the product or at accompanying
documents means that used electrical and electronic products should not disposed of with household waste.
To ensure proper disposal of the product, hand it over to a designated collection point, where it will be
accepted free of charge. The correct disposal of this product will help to save valuable natural resources and
prevent any potential negative impacts on the environment and human health, which could otherwise be
caused by inappropriate disposal of wastes. For more details, please, contact your local authorities or the
nearest collection point. The improper disposal of this waste can be penalized in accordance with national
regulations. Information for users to disposal of electrical and electronic devices (corporate and business use):
For proper disposal of electrical and electronic devices, ask for details from your dealer or distributor.
Information for users to disposal of electrical and electronic devices in other countries outside EU: The above
mentioned symbol (crossed-out wheeled bin) is valid only in the countries of EU. For proper disposal of
electrical and electronic devices, ask for details from your authorities or dealer. All is expressed by the symbol of
crossed-out wheeled bin on product, packaging or in printed materials.
Set up the claim for warranty repair of device at your dealer. If you have technical questions or problems,
contact your dealer. Follow the rules for working with electrical equipment. The user may not dismantle the
device or replace any part of this. Opening or removing the covers poses the risk of electric shock.
Declaration of Conformity:
Company INTELEK spol. s r.o. hereby declares that all M3P15v2
/M3P18v2/M3P20v2
devices are in compliance
with essential requirements and other relevant provisions of Directive 2014/53/EU. The full text of the EU
Declaration of Conformity is available on this website www.iget.eu.
The warranty period of the product is 24 months, unless stated otherwise.
This device can be used in the following countries:
RoHS:
The components used in the device meet the requirements on the restriction of hazardous substances in
electrical and electronic devices in accordance with Directive 2011/65/EU. The RoHS declaration can be
downloaded from www.iget.eu.
Producer / Exclusive importer of iGET products to EU:
INTELEK spol. s r.o., Ericha Roučky 1291/4, 627 00 Brno - Černovice, CZ, web: http://www.iget.eu
SUPPORT: http://www.iget.eu/helpdesk
Copyright © 2018 Intelek spol. s r.o. All rights reserved.
Insert Lan Cable and Power Up
Please always connect Smart Camera with LAN before
powering up when you first using it.
• Make sure the the settings like DHCP Server and UPNP are
enabled on your router.
• Connect the power cable, the Smart Camera will run some
diagnostic processes like rolling the camera. When it stops
rolling, the startup is completed.
Pairing with system
Tap “+” Add accessory to scan QR codes printed on the back
cover
of the camera. Then name the camera for daily use.
After that,
you’ve successfully paired the camera with system.
EN
M3P15v2
/M3P18v2/M3P20v2
i
G
ET
Setting Up Camera
M3P15v2/M3P18v2
Setting Up Camera
M3P20v2
Power up
• Insert power cable into the Micro-USB slot on the round edge.
•The camera will power up you will hear the prompt voice to
show you it is waiting to WiFi settings.
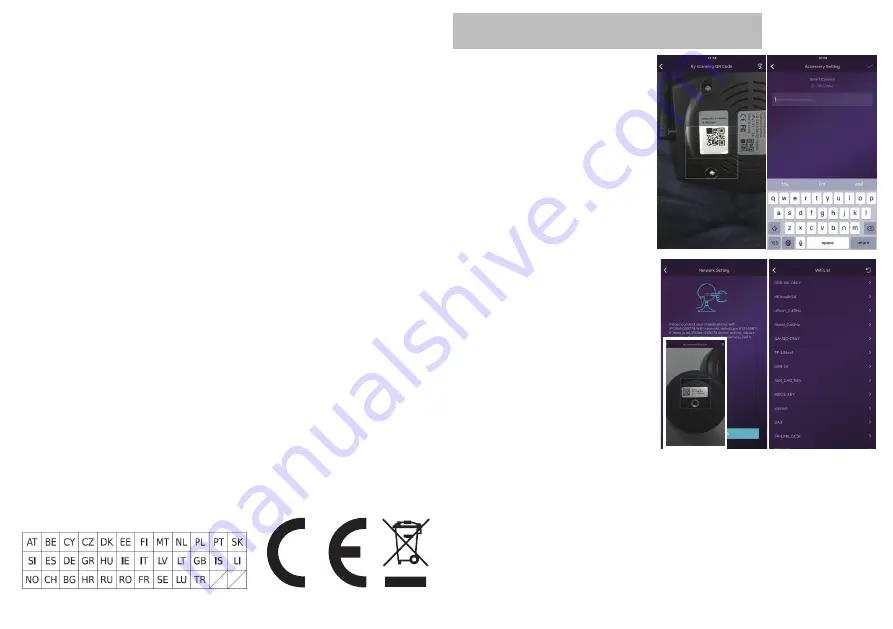
Pairing with system
Tap “+” Add accessory to scan QR codes printed on the back
cover of the camera, you will be guided to connect to Camera by
connected the AP started with IPCAM-XXXXXX.
WiFi Settings
•After switch back to App, you will have the page to set up WiFi
of camera.
•Select your WiFi router in the list, then input Password and Save.
•You will hear the camera play a special tone that means it was
connected to the router successfully.
•Name it, then getting started to use camera.
FAQ
I’ve Already Connected My Camera to Internet, But I Can’t Connect It in App.
Please make sure your router has successfully connected to Internet.
DHCP Server/Service should be Enable on the router. UPNP should be Enable too.
Your phone’s data plan should be available. Some carriers restricts the p2p connection protocol, try using App in the same Wi-Fi with Smart Camera to
figure out the problem.
If you still can’t connect it, try another router if possible. Some routers’ build-in firewall also interfere the connection.
I Can’t Save the Snapshots.
App will need to access to your phone’s album for saving snapshots. The authorization might need you to approve while using the function for the
first time in some phones.
If you mis-click the ‘No’ option during the authorization, you might need to enable it in the system setting menu.
How to Reset My Camera?
PLEASE MAKE SURE YOU CLEARLY KNOW THE RESULT OF RESETING:
ALL DATA WILL BE ERASED INCLUDING THE INTERNET SETTINGS.
Power up your Smart Camera, wait until the camera stops rolling. Hold the reset button for a while until the camera starts rolling again. Release the
button then the Smart Camera would be reset.


