background image


WAFER-ULT3/ULT4 3.5" SBC 

Page 97

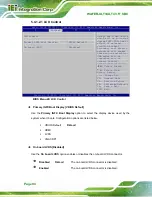
5.4.2.1.1 MINI_PCIe1/MINI_PCIe2 

Use the 

MINI_PCIe1/MINI_PCIe2 

menu (

BIOS Menu 23

) to configure the PCIe Mini slot 

settings. 

Aptio Setup Utility – Copyright (C) 2017 American Megatrends, Inc. 


Chipset 


PCIe Speed 

[Auto] 

Detect Non-Compliance Device 

[Disabled] 


Configure PCIe speed. 
 
 
--------------------- 

ÆÅ

: Select Screen 


: Select Item 

Enter: Select 
+/-:  Change  Opt. 
F1: General 

Help 

F2: Previous 

Values 

F3: Optimized 

Defaults

F4:  Save & Exit 
ESC: Exit 

Version 2.18.1263. Copyright (C) 2017 American Megatrends, Inc. 

BIOS Menu 23: M_PCIE2 Configuration Menu 

Î


PCIe Speed [Auto] 

Use this option to select the support type of the PCIe Mini slot. The following options are 

available: 

ƒ

 Auto 


Default


ƒ

 Gen1 


ƒ

 Gen2 

ƒ

 Gen3 

Î


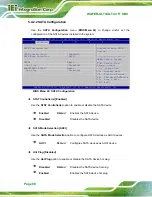
Detect Non-Compliance Device [Disabled] 

Use the 

Detect Non-Compliance Device

 option to enable or disable detecting if a 

non-compliance PCI Express device is connected to the PCI Express slot. 

Î


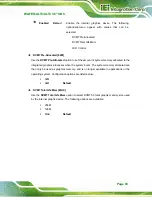
Disabled D

EFAULT


Disables to detect if a non-compliance PCI 

Express device is connected to the PCI Express 

slot. 

Î


Enabled  

Enables to detect if a non-compliance PCI Express 

device is connected to the PCI Express slot. 

Содержание WAFER-UTL3

Страница 1: ...ge i User Manual MODEL WAFER ULT3 ULT4 3 5 SBC with 6th 7th Generation Intel Mobile Core i7 i5 i3 or Celeron SoC DDR4 SO DIMM Triple Display Dual GbE PCIe Mini SATA 6Gb s USB 3 0 COM HD Audio and RoHS...

Страница 2: ...WAFER ULT3 ULT4 3 5 SBC Page ii Revision Date Version Changes October 23 2017 1 00 Initial release...

Страница 3: ...s arising out of the use or inability to use the product or documentation even if advised of the possibility of such damages This document contains proprietary information protected by copyright All r...

Страница 4: ...ON Cautionary messages should be heeded to help reduce the chance of losing data or damaging the product NOTE These messages inform the reader of essential but non critical information These messages...

Страница 5: ...PTIONAL ITEMS 14 3 CONNECTORS 15 3 1 PERIPHERAL INTERFACE CONNECTORS 16 3 1 1 WAFER ULT3 ULT4 Layout 16 3 1 2 Peripheral Interface Connectors 17 3 1 3 External Interface Panel Connectors 18 3 2 INTERN...

Страница 6: ...CE CONNECTORS 42 3 3 1 GbE Connectors 42 3 3 2 HDMI Connector 43 3 3 3 USB 3 0 Ports 44 3 3 4 VGA Connector 45 4 INSTALLATION 46 4 1 ANTI STATIC PRECAUTIONS 47 4 2 INSTALLATION CONSIDERATIONS 47 4 3 S...

Страница 7: ...iguration Changes 71 5 1 5 BIOS Menu Bar 71 5 2 MAIN 72 5 3 ADVANCED 73 5 3 1 CPU Configuration 74 5 3 2 PCH FW Configuration 76 5 3 3 ACPI Settings 77 5 3 4 F81866 Super IO Configuration 78 5 3 4 1 S...

Страница 8: ...Audio Configuration 99 5 5 SECURITY 100 5 6 BOOT 101 5 7 SAVE EXIT 103 A REGULATORY COMPLIANCE 104 B BIOS OPTIONS 106 C TERMINOLOGY 109 D DIGITAL I O INTERFACE 113 D 1 INTRODUCTION 114 D 2 ASSEMBLY LA...

Страница 9: ...ternal DisplayPort Connector Location 25 Figure 3 9 LVDS Backlight Control Connector Location 26 Figure 3 10 LVDS Connector Location 27 Figure 3 11 PCIe Mini Card Slot with mSATA Support Location 28 F...

Страница 10: ...r Mode Switch Location 53 Figure 4 9 Clear CMOS Button Location 54 Figure 4 10 Flash Descriptor Security Override Jumper Location 55 Figure 4 11 LVDS Panel Type Selection Switch Location 56 Figure 4 1...

Страница 11: ...ble 3 10 LVDS Backlight Control Connector Pinouts 26 Table 3 11 LVDS Connector Pinouts 28 Table 3 12 PCIe Mini Card Slot with mSATA Support Pinouts 29 Table 3 13 PCIe Mini Card Slot with SIM Card Sock...

Страница 12: ...urity Override Jumper Settings 54 Table 4 3 LVDS Panel Type Selection 56 Table 4 4 LVDS Voltage Selection Jumper Settings 57 Table 4 5 Signal Mode Settings for Serial Port 1 58 Table 4 6 Signal Mode S...

Страница 13: ...Redirection 84 BIOS Menu 12 Console Redirection Settings 85 BIOS Menu 13 Legacy Console Redirection Settings 87 BIOS Menu 14 USB Configuration 88 BIOS Menu 15 iEi Feature 89 BIOS Menu 16 Chipset 90 B...

Страница 14: ...WAFER ULT3 ULT4 3 5 SBC Page 1 Chapter 1 1 Introduction...

Страница 15: ...y request The WAFER ULT3 ULT4 provides two GbE interfaces through the Intel I219LM with Intel AMT 11 0 support and the Intel I211AT GbE controllers In addition the WAFER ULT3 ULT4 includes HDMI VGA LV...

Страница 16: ...to 3 GHz dual core 3 MB cache TDP 15W WAFER ULT3 i3 Intel Core i3 6100U up to 2 3 GHz dual core 3 MB cache TDP 15W WAFER ULT3 C Intel Celeron 3955U up to 2 GHz dual core 2 MB cache TDP 15W WAFER ULT3...

Страница 17: ...WAFER ULT3 ULT4 3 5 SBC Page 4 1 4 Connectors The connectors on the WAFER ULT3 ULT4 are shown in the figure below Figure 1 2 Connectors Front Side...

Страница 18: ...WAFER ULT3 ULT4 3 5 SBC Page 5 Figure 1 3 Connectors Solder Side...

Страница 19: ...WAFER ULT3 ULT4 3 5 SBC Page 6 1 5 Dimensions The main dimensions of the WAFER ULT3 ULT4 are shown in the diagram below Figure 1 4 WAFER ULT3 ULT4 Dimensions mm...

Страница 20: ...WAFER ULT3 ULT4 3 5 SBC Page 7 Figure 1 5 shows the dimensions of the WAFER ULT3 ULT4 installed with the optional heatsink P N 34000 000673 RS Figure 1 5 Dimensions with Optional Heatsink mm...

Страница 21: ...WAFER ULT3 ULT4 3 5 SBC Page 8 1 6 Data Flow Figure 1 6 shows the data flow between the system chipset the CPU and other components installed on the motherboard Figure 1 6 Data Flow Diagram...

Страница 22: ...0U up to 2 3 GHz dual core 3 MB cache TDP 15W Intel Celeron 3955U up to 2 GHz dual core 2 MB cache TDP 15W Intel Celeron 3855U up to 1 6 GHz dual core 2 MB cache TDP 15W Memory One 260 pin 2133 MHz DD...

Страница 23: ...pin wafer One power button connector 2 pin wafer One reset button connector 2 pin wafer Serial ATA One SATA 6Gb s connector One 5V SATA power connector Serial Ports Two RS 232 422 485 serial ports vi...

Страница 24: ...WAFER ULT3 ULT4 3 5 SBC Page 11 Chapter 2 2 Packing List...

Страница 25: ...ischarge Self grounding Touch a grounded conductor every few minutes to discharge any excess static buildup Use an anti static pad When configuring any circuit board place it on an anti static mat Onl...

Страница 26: ...reseller or vendor the WAFER ULT3 ULT4 was purchased from or contact an IEI sales representative directly by sending an email to 32sales ieiworld com The WAFER ULT3 ULT4 is shipped with the following...

Страница 27: ...2 1 Packing List 2 4 Optional Items These optional items are available Item and Part Number Image RS 232 422 485 cable 250 mm P 1 25 P N 32205 003500 200 RS Dual port USB 2 0 cable 210 mm p 2 00 mm P...

Страница 28: ...WAFER ULT3 ULT4 3 5 SBC Page 15 Chapter 3 3 Connectors...

Страница 29: ...3 1 Peripheral Interface Connectors This chapter details all the peripheral interface connectors 3 1 1 WAFER ULT3 ULT4 Layout The figure below shows all the peripheral interface connectors Figure 3 1...

Страница 30: ...pin box header DP1 LVDS backlight control connector 5 pin wafer INV1 LVDS connector 40 pin crimp LVDS1 PCIe Mini card slots PCIe Mini card slot MINI_PCIE1 MINI_PCIE2 Power and HDD LED connector 6 pin...

Страница 31: ...ripheral Connectors Internal peripheral connectors are found on the motherboard and are only accessible when the motherboard is outside of the chassis This section has complete descriptions of all the...

Страница 32: ...WAFER ULT3 ULT4 3 5 SBC Page 19 Figure 3 2 Power Connector Location Pin Description Pin Description 1 GND 2 GND 3 12V 4 12V Table 3 3 Power Connector Pinouts...

Страница 33: ...CN Pinouts See Table 3 4 Use the 5 V SATA power connector to connect to SATA device power connection Figure 3 3 5 V SATA Power Connector Location Pin Description 1 5V 2 GND Table 3 4 5 V SATA Power Co...

Страница 34: ...n 1 HDA_SYNC 2 HDA_CLK 3 HDA_SDO 4 HDA_BEEP 5 HDA_SDI 6 HDA_RESET 7 5V 8 AUD_GND 9 12V 10 AUD_GND Table 3 5 Audio Connector Pinouts 3 2 4 Battery Connector CAUTION Risk of explosion if battery is repl...

Страница 35: ...retain the time when power is turned off Figure 3 5 Battery Connector Location Pin Description 1 VBATT 2 GND Table 3 6 Battery Connector Pinouts 3 2 5 CPU Fan Connector CN Label CPU FAN1 CN Type 4 pi...

Страница 36: ...PWM control signal Table 3 7 CPU Fan Connector Pinouts 3 2 6 Digital I O Connector CN Label DIO1 CN Type 10 pin header p 2 mm CN Location See Figure 3 7 CN Pinouts See Table 3 8 The digital I O connec...

Страница 37: ...tput 1 6 Output 0 7 Input 3 8 Input 2 9 Input 1 10 Input 0 Table 3 8 Digital I O Connector Pinouts 3 2 7 Internal DisplayPort Connector NOTE The user can select either to use the VGA connector or the...

Страница 38: ...supports HDMI LVDS VGA DVI and DisplayPort graphics interfaces Figure 3 8 Internal DisplayPort Connector Location Pin Description Pin Description 1 HPD 2 AUX_P 3 GND 4 AUX_N 5 NC 6 GND 7 GND 8 LANE2P...

Страница 39: ...3 9 CN Pinouts See Table 3 10 The backlight control connector provides the backlight on the LCD display connected to the WAFER ULT3 ULT4 with 12V of power Figure 3 9 LVDS Backlight Control Connector...

Страница 40: ...le 3 11 The LVDS LCD connector can be connected to an 18 24 bit dual channel LVDS panel Figure 3 10 LVDS Connector Location Pin Description Pin Description 1 GND 2 GND 3 A_Y0 4 A_Y1 5 A_Y0 6 A_Y1 7 GN...

Страница 41: ...40 LVDS_VCC Table 3 11 LVDS Connector Pinouts 3 2 10 PCIe Mini Card Slot with mSAT Support CN Label MINI_PCIE2 CN Type PCIe Mini card slot CN Location See Figure 3 11 CN Pinouts See Table 3 12 The PCI...

Страница 42: ...C 17 N C 18 GND 19 N C 20 N C 21 GND 22 PCIRST 23 PCIE_RXN SATA_RX 24 N C 25 PCIE_RXP SATA_RX 26 GND 27 GND 28 1 5V 29 GND 30 SMBCLK 31 PCIE_TXN SATA_TX 32 SMBDATA 33 PCIE_TXP SATA_TX 34 GND 35 GND 3...

Страница 43: ...12 CN Pinouts See Table 3 13 The PCIe Mini card slot enables a full size PCIe Mini card expansion module to be connected to the board Figure 3 12 PCIe Mini Card Slot with SIM Card Socket Location Pin...

Страница 44: ...VCC3 40 GND 41 VCC3 42 N C 43 GND 44 N C 45 N C 46 N C 47 N C 48 1 5V 49 N C 50 GND 51 M SATA Detect 52 VCC3 Table 3 13 PCIe Mini Card Slot with SIM Card Socket Pinouts 3 2 12 Power and HDD LED Connec...

Страница 45: ...4 PWR_LED 5 HDD_LED HDD LED 6 HDD_LED Table 3 14 Power and HDD LED Connector Pinouts 3 2 13 Power Button Connector CN Label PWR_BTN1 CN Type 2 pin wafer p 2 mm CN Location See Figure 3 14 CN Pinouts...

Страница 46: ...Connector Pinouts 3 2 14 Reset Button Connector CN Label RST_BTN1 CN Type 2 pin wafer p 2 mm CN Location See Figure 3 15 CN Pinouts See Table 3 16 The reset button connector is connected to a reset sw...

Страница 47: ...1 25 mm CN Location See Figure 3 16 CN Pinouts See Table 3 17 These two connectors provide RS 232 RS 422 or RS 485 communications The default mode is set to RS 232 To configure the connectors as RS 4...

Страница 48: ...RS 232 422 485 Serial Port Connector Pinouts Use the optional RS 232 422 485 cable to connect to a serial device The pinouts of the DB 9 connector are listed below Pin RS 232 RS 422 RS 485 1 DCD TXD42...

Страница 49: ...ctor CN Location See Figure 3 17 CN Pinouts See Table 3 19 The SATA drive connector can be connected to the SATA drive and supports up to 6Gb s data transfer rate Figure 3 17 SATA 6Gb s Connector Loca...

Страница 50: ...N Label SIM1 CN Type SIM card slot CN Location See Figure 3 18 The SIM card slot accepts a SIM card for 3G network communication A 3G module must be installed in the MINI PICE1 PCIe Mini slot to provi...

Страница 51: ...p 1 25 mm CN Location See Figure 3 19 CN Pinouts See Table 3 20 The SMBus System Management Bus connector provides low speed system management communications Figure 3 19 SMBus Connector Location Pin D...

Страница 52: ...LT4 3 5 SBC Page 39 3 2 19 SO DIMM Slot CN Label DIMM2 CN Type 260 pin DDR4 SO DIMM slot CN Location See Figure 3 20 The SO DIMM slot is for installing the SO DIMM on the system Figure 3 20 SO DIMM Sl...

Страница 53: ...wafer p 1 25 mm CN Location See Figure 3 21 CN Pinouts See Table 3 21 The SPI flash connector is used to flash the SPI ROM Figure 3 21 SPI Flash Connector Location Pin Description 1 3 3V_SPI_CON 2 SP...

Страница 54: ...ader p 2 mm CN Location See Figure 3 22 CN Pinouts See Table 3 22 The USB header can connect to two USB 2 0 1 1 devices Figure 3 22 USB 2 0 Connector Location Pin Description Pin Description 1 USB_VCC...

Страница 55: ...IC panel consists of the following Figure 3 23 External Interface Connectors 3 3 1 GbE Connectors CN Label LAN1 LAN2 CN Type RJ 45 CN Location See Figure 3 23 CN Pinouts See Figure 3 24 and Table 3 23...

Страница 56: ...e 3 23 CN Pinouts See Figure 3 25 and Table 3 24 The HDMI connector can connect to an HDMI device Pin Description Pin Description 1 HDMI_DATA2 2 GND 3 HDMI_DATA2 4 HDMI_DATA1 5 GND 6 HDMI_DATA1 7 HDMI...

Страница 57: ...nd Table 3 25 The WAFER ULT3 ULT4 has four external USB 3 0 ports Pin Description Pin Description 1 USB_VCC 2 USB2_D0 3 USB2_D0 4 GND 5 USB3_RXD0 6 USB3_RXD0 7 GND 8 USB3_TXD0 9 USB3_TXD0 10 USB_VCC 1...

Страница 58: ...t Pin Description Pin Description 1 RED 2 GREEN 3 BLUE 4 NC 5 GND 6 GND 7 GND 8 GND 9 VCC 10 GND 11 NC 12 DDCDAT 13 HSYNC 14 VSYNC 15 DDCCLK Table 3 26 VGA Connector Pinouts Figure 3 27 VGA Connector...

Страница 59: ...WAFER ULT3 ULT4 3 5 SBC Page 46 Chapter 4 4 Installation...

Страница 60: ...wristband can help to prevent ESD from damaging the board Self grounding Before handling the board touch any grounded conducting material During the time the board is handled frequently touch any cond...

Страница 61: ...and helps prevent ESD damage Place the WAFER ULT3 ULT4 on an anti static pad o When installing or configuring the motherboard place it on an anti static pad This helps to prevent potential ESD damage...

Страница 62: ...t Align the notch on the memory with the notch on the memory socket Step 3 Insert the SO DIMM Push the memory in at a 20 angle See Figure 4 1 Step 4 Seat the SO DIMM Gently push downwards and the arms...

Страница 63: ...Retention Screw Step 3 Insert into the socket at an angle Line up the notch on the card with the notch on the slot Slide the PCIe Mini card into the socket at an angle of about 20 Figure 4 3 Figure 4...

Страница 64: ...w previously removed Figure 4 4 Step 0 Figure 4 4 Securing the PCIe Mini Card 4 5 SIM Card Installation To install a SIM card please follow the steps below Step 1 Locate the SIM card slot See Chapter...

Страница 65: ...the slot cover and place a SIM card onto the slot The cut mark on the corner should be facing away from the slot as shown in Figure 4 6 Figure 4 6 SIM Card Installation Step 4 Close the slot cover and...

Страница 66: ...The system configuration should be performed before installation 4 6 1 AT ATX Power Mode Selection The AT and ATX power mode selection is made through the AT ATX power mode switch which is shown in F...

Страница 67: ...n 4 6 3 Flash Descriptor Security Override Jumper CN Label ME_FLASH1 CN Type 2 pin header p 1 27 mm CN Location See Figure 4 10 CN Settings See Table 4 2 The Flash Descriptor Security Override jumper...

Страница 68: ...wer Step 3 Remove the metal clip on the Flash Descriptor Security Override jumper to its default setting Step 4 Restart the system The system will reboot 2 3 times to complete the ME firmware update S...

Страница 69: ...0 18 bit S 0110 1280x1024 24 bit D 0111 1366x768 18 bit S 1000 1366x768 24 bit S 1001 1440x960 24 bit D 1010 1400x1050 24 bit D 1011 1600x900 24 bit D 1100 1680x1050 24 bit D 1101 1600x1200 24 bit D 1...

Страница 70: ...itor to select the correct voltage Jumper Label JP1 Jumper Type 3 pin header p 2 mm Jumper Settings See Table 4 4 Jumper Location See Figure 4 12 The LVDS voltage selection jumper allows setting the v...

Страница 71: ...r the correspondent serial port SW2 1 SW2 2 Description Signal Mode ON ON RS 422 ON OFF RS 232 Default OFF ON RS 485 Table 4 5 Signal Mode Settings for Serial Port 1 SW2 3 SW2 4 Description Signal Mod...

Страница 72: ...VGA mode or iDP mode since the iDP connector DP1 is co lay with the VGA connector The VGA iDP selection switch settings are shown in Table 4 7 Setting Description Short A B VGA mode Default Short B C...

Страница 73: ...4 do not put the WAFER ULT3 ULT4 directly on a surface that can not dissipate system heat especially the wooden or plastic surface It is highly recommended to run the WAFER ULT3 ULT4 on a heat dissipa...

Страница 74: ...LT4 to be mounted into a chassis please refer to Figure 1 4 for the detailed dimensions The user can design or select a chassis that has screw holes matching up with the holes on the heat sink enclosu...

Страница 75: ...o an AT or ATX power supply WARNING Disconnect the power supply power cord from its AC power source to prevent a sudden power surge to the WAFER ULT3 ULT4 Step 1 Locate the power cable The power cable...

Страница 76: ...4 3 5 SBC Page 63 Step 3 Connect Power Cable to Power Supply Connect one of the 4 pin 1x4 Molex type power cable connectors to an AT ATX power supply See Figure 4 18 Figure 4 18 Connect Power Cable to...

Страница 77: ...tors are shown in Chapter 3 Step 2 Insert the cable connectors Insert the cable connectors into the on board SATA drive connector and the SATA power connector See Figure 4 19 Figure 4 19 SATA Drive Ca...

Страница 78: ...k Step 1 Prepare a USB flash drive installer On a working computer use your Windows 7 DVD or ISO image to create a bootable USB flash drive Step 2 Download the Windows 7 USB 3 0 Creator Utility from h...

Страница 79: ...drive containing the Windows 7 image Figure 4 20 Windows 7 USB 3 0 Creator Utility Step 7 Click Create Image to start the update process Step 8 Wait for the process to finish It may take up to 15 min...

Страница 80: ...be enabled Step 4 Properly install the Intel Management Engine Components drivers from the iAMT Driver Utility directory in the driver CD Step 5 Configure the Intel Management Engine BIOS extension ME...

Страница 81: ...nd is subject to change without prior notice Visit the IEI website or contact technical support for the latest updates Step 1 Insert the CD into a CD drive connected to the system NOTE If the installa...

Страница 82: ...WAFER ULT3 ULT4 3 5 SBC Page 69 Chapter 5 5 BIOS...

Страница 83: ...ystem enters the OS environment before the DEL or F2 key is pressed restart the computer and try again 5 1 2 Using Setup Use the arrow keys to highlight items press ENTER to select use the PageUp and...

Страница 84: ...guration Changes If the computer cannot boot after changes to the system configuration is made CMOS defaults Use the clear CMOS button described in Chapter 4 5 1 5 BIOS Menu Bar The menu bar on top of...

Страница 85: ...ber of Processors 2Core s 4Thread s Microcode Revision BA GT Info GT2 0x1916 IGFX VBIOS Version 1049 Memory RC Version 2 0 0 6 Total Memory 4096 MB Memory Frequency 1600 MHz PCH Information Name SKL P...

Страница 86: ...values in the sections below may cause the system to malfunction Make sure that the settings made are compatible with the hardware Aptio Setup Utility Copyright C 2017 American Megatrends Inc Main Ad...

Страница 87: ...bled a VMM can utilize the additional hardware capabilities provided by Vanderpool Technology Select Screen Select Item Enter Select Change Opt F1 General Help F2 Previous Values F3 Optimized Defaults...

Страница 88: ...Disables the Intel Hyper Threading Technology Enabled DEFAULT Enables the Intel Hyper Threading Technology Intel SpeedStep Enabled Use the Intel SpeedStep option to enable or disable the Intel SpeedSt...

Страница 89: ...geability Features in FW Select Screen Select Item Enter Select Change Opt F1 General Help F2 Previous Values F3 Optimized Defaults F4 Save Exit ESC Exit Version 2 18 1263 Copyright C 2017 American Me...

Страница 90: ...D button is pressed Select Screen Select Item Enter Select Change Opt F1 General Help F2 Previous Values F3 Optimized Defaults F4 Save Exit ESC Exit Version 2 18 1263 Copyright C 2017 American Megatre...

Страница 91: ...s F4 Save Exit ESC Exit Version 2 18 1263 Copyright C 2017 American Megatrends Inc BIOS Menu 6 F81866 Super IO Configuration 5 3 4 1 Serial Port n Configuration Use the Serial Port n Configuration men...

Страница 92: ...ss are automatically detected IO 3F8h IRQ 4 Serial Port I O port address is 3F8h and the interrupt address is IRQ4 IO 3F8h IRQ 3 4 5 6 7 9 10 11 12 Serial Port I O port address is 3F8h and the interru...

Страница 93: ...le the serial port Enabled DEFAULT Enable the serial port Change Settings Auto Use the Change Settings option to change the serial port IO port address and interrupt address Auto DEFAULT The serial po...

Страница 94: ...485 Serial Port 2 signaling mode is RS 485 5 3 5 iWDD H W Monitor The iWDD H W Monitor menu BIOS Menu 8 contains the fan configuration submenu and displays the system temperatures and voltages Aptio S...

Страница 95: ...F4 Save Exit ESC Exit Version 2 18 1263 Copyright C 2017 American Megatrends Inc BIOS Menu 9 Smart Fan Mode Configuration CPU_FAN1 Smart Fan Control Auto Mode Use the CPU_FAN1 Smart Fan Control option...

Страница 96: ...General Help F2 Previous Values F3 Optimized Defaults F4 Save Exit ESC Exit Version 2 18 1263 Copyright C 2017 American Megatrends Inc BIOS Menu 10 RTC Wake Settings Wake system with Fixed Time Disab...

Страница 97: ...Disabled Console Redirection Settings COM2 Console Redirection Disabled Console Redirection Settings iAMT SOL COM3 Pci Bus0 Dev22 Func3 Console Redirection Disabled Console Redirection Settings Legacy...

Страница 98: ...d ASCII char set VT100 ASCII char set VT100 Extends VT100 to support color function keys etc VT UTF8 Uses UTF8 encoding to map Unicode chars onto 1 or more bytes Select Screen Select Item Enter Select...

Страница 99: ...d at 115200 Data Bits 8 Use the Data Bits option to specify the number of data bits 7 Sets the data bits at 7 8 DEFAULT Sets the data bits at 8 Parity None Use the Parity option to specify the parity...

Страница 100: ...Aptio Setup Utility Copyright C 2017 American Megatrends Inc Advanced Legacy Serial Redirection Port COM1 Select a COM port to display redirection of Legacy OS and Legacy OPROM Messages Select Screen...

Страница 101: ...Enter Select Change Opt F1 General Help F2 Previous Values F3 Optimized Defaults F4 Save Exit ESC Exit Version 2 18 1263 Copyright C 2017 American Megatrends Inc BIOS Menu 14 USB Configuration USB Dev...

Страница 102: ...unction Reboot and recover system automatically within 10 min when OS crashes Please install Auto Recovery API service before enabling this function Select Screen Select Item Enter Select Change Opt F...

Страница 103: ...Exit ESC Exit Version 2 18 1263 Copyright C 2017 American Megatrends Inc BIOS Menu 16 Chipset 5 4 1 System Agent SA Configuration Use the System Agent SA Configuration menu BIOS Menu 17 to display the...

Страница 104: ...o view memory information Aptio Setup Utility Copyright C 2017 American Megatrends Inc Chipset Memory Configuration DIMM2 Populated Enabled Size 4096 MB DDR4 Number of Ranks 1 Manufacturer UnKnown DIM...

Страница 105: ...for Switchable Gfx Select Screen Select Item Enter Select Change Opt F1 General Help F2 Previous Values F3 Optimized Defaults F4 Save Exit ESC Exit Version 2 18 1263 Copyright C 2017 American Megatre...

Страница 106: ...unt of system memory allocated to the integrated graphics processor when the system boots The system memory allocated can then only be used as graphics memory and is no longer available to application...

Страница 107: ...Screen Select Item Enter Select Change Opt F1 General Help F2 Previous Values F3 Optimized Defaults F4 Save Exit ESC Exit Version 2 18 1263 Copyright C 2017 American Megatrends Inc BIOS Menu 20 LCD Co...

Страница 108: ...3 3V 5 4 2 PCH IO Configuration Use the PCH IO Configuration menu BIOS Menu 21 to configure the PCH parameters Aptio Setup Utility Copyright C 2017 American Megatrends Inc Chipset PCH IO Configuratio...

Страница 109: ...enable or disable the power saving function Disabled DEFAULT Power saving function is disabled Enabled Power saving function is enabled It will reduce power consumption when the system is off 5 4 2 1...

Страница 110: ...18 1263 Copyright C 2017 American Megatrends Inc BIOS Menu 23 M_PCIE2 Configuration Menu PCIe Speed Auto Use this option to select the support type of the PCIe Mini slot The following options are avai...

Страница 111: ...F1 General Help F2 Previous Values F3 Optimized Defaults F4 Save Exit ESC Exit Version 2 18 1263 Copyright C 2017 American Megatrends Inc BIOS Menu 24 SATA Configuration STAT Controller s Enabled Use...

Страница 112: ...onally disabled Enabled HDA will be unconditionally enabled Select Screen Select Item Enter Select Change Opt F1 General Help F2 Previous Values F3 Optimized Defaults F4 Save Exit ESC Exit Version 2 1...

Страница 113: ...assword and must be entered to boot or enter Setup In Setup the User will have Administrator rights The password length must be in the following range Minimum length 3 Maximum length 20 Administrator...

Страница 114: ...ESC Exit Version 2 18 1263 Copyright C 2017 American Megatrends Inc BIOS Menu 27 Boot Bootup NumLock State On Use the Bootup NumLock State BIOS option to specify if the number lock setting must be mod...

Страница 115: ...es is disabled Launch PXE OpROM Disabled Use the Launch PXE OpROM option to enable or disable boot option for legacy network devices Disabled DEFAULT Ignore all PXE Option ROMs Enabled Load PXE Option...

Страница 116: ...Version 2 18 1263 Copyright C 2017 American Megatrends Inc BIOS Menu 28 Save Exit Save Changes and Reset Use the Save Changes and Reset option to save the changes made to the BIOS options and reset t...

Страница 117: ...WAFER ULT3 ULT4 3 5 SBC Page 104 Appendix A A Regulatory Compliance...

Страница 118: ...rference that may cause undesired operation This equipment has been tested and found to comply with the limits for a Class A digital device pursuant to part 15 of the FCC Rules These limits are design...

Страница 119: ...WAFER ULT3 ULT4 3 5 SBC Page 106 Appendix B B BIOS Options...

Страница 120: ...Serial Port Enabled 79 Change Settings Auto 79 Device Mode RS232 80 Serial Port Enabled 80 Change Settings Auto 80 Device Mode RS232 81 CPU_FAN1 Smart Fan Control Auto Mode 82 Auto mode fan start off...

Страница 121: ...P Disabled 96 PCIe Speed Auto 97 Detect Non Compliance Device Disabled 97 STAT Controller s Enabled 98 SATA Mode Selection AHCI 98 Hot Plug Disabled 98 HD Audio Enabled 99 Administrator Password 100 U...

Страница 122: ...WAFER ULT3 ULT4 3 5 SBC Page 109 Appendix C C Terminology...

Страница 123: ...w amplitude signal represents a binary 0 while a high amplitude signal represents a binary 1 BIOS The Basic Input Output System BIOS is firmware that is first run when the computer is turned on and ca...

Страница 124: ...on software changes the bus to core frequency ratio and the processor core voltage FSB The Front Side Bus FSB is the bi directional communication channel between the processor and the Northbridge chip...

Страница 125: ...has transfer speeds up to 1 5 Gbps and the SATA II bus has data transfer speeds of up to 3 0 Gbps S M A R T Self Monitoring Analysis and Reporting Technology S M A R T refers to automatic status check...

Страница 126: ...WAFER ULT3 ULT4 3 5 SBC Page 113 Appendix D D Digital I O Interface...

Страница 127: ...control signals that control the on off circuit of external devices or TTL devices Data can be read or written to the selected address to enable the DIO functions NOTE For further information please...

Страница 128: ...ing the digital port as input INT 15H AL low byte value AH 6FH Sub function AL 9 Set the digital port as OUTPUT BL Digital I O input value D 3 Assembly Language Sample 2 MOV AX 6F09H setting the digit...

Страница 129: ...WAFER ULT3 ULT4 3 5 SBC Page 116 Appendix E E Watchdog Timer...

Страница 130: ...T 15H is used to control the Watchdog Timer INT 15H AH 6FH Sub function AL 2 Sets the Watchdog Timer s period BL Time out value Its unit second is dependent on the item Watchdog Timer unit select in C...

Страница 131: ...system resets EXAMPLE PROGRAM INITIAL TIMER PERIOD COUNTER W_LOOP MOV AX 6F02H setting the time out value MOV BL 30 time out value is 48 seconds INT 15H ADD THE APPLICATION PROGRAM HERE CMP EXIT_AP 1...

Страница 132: ...WAFER ULT3 ULT4 3 5 SBC Page 119 Appendix F F Hazardous Materials Disclosure...

Страница 133: ...d lamps These components will be separately marked Please refer to below table Toxic or Hazardous Substances and Elements Part Name Lead Pb Mercury Hg Cadmium Cd Hexavalent Chromium CR VI Polybrominat...

Страница 134: ...4 3 5 SBC Page 121 RoHS RoHS Pb Hg Cd CR VI PBB PBDE O O O O O O O O O O O O O O O O O O O O O O O O O O O O O O O O O O O O O O O O O O O O O O O O O SJ T11363 2006 GB T 26572 2011 X SJ T11363 2006 G...

Отзывы: