7
6.
Click on “OK” and restart the VioGate server.
7.
Start the web-browser and enter the VioGate’s IP address in the location field.
Notice: If you wish to connect to the VioGate server remotely via Internet, your
VioGate server needs to have a public IP.
ADSL Connection (Dynamic IP)
1.
If your VioGate server connects to the Internet through ADSL (i.e. uses dynamic
IP), then you will need to utilize the Dynamic DNS service in order to connect to
the VioGate server remotely. Please register for an account name on
www.dyndns.org please to obtain a username, password and a domain name.
(For a detail step-by-step tutorial, please refer to Appendix B)
2.
Please refer to “Connect a Personal Computer with the VioGate” section to
connect the VioGate server to the personal computer.
3.
Please click on the setting icon located on the left of the screen. Within the setup
page, choose the “Network Settings” and select the “Use broadband connection
to the Internet (PPPoE)” option, and enters the user name and password used to
connect to the ADSL.
4.
Check the “Enable Dynamic DNS Service” box, and enter the user name,
password, and host name information. Select the “dynamic IP address” option.
5.
Click on the “OK” button. Note that after you click on the “OK” button, you
have to wait a few seconds before the VioGate server restarts the networking
configuration.
6.
Please restart the VioGate server.
7.
Please restore your personal computer’s network settings, and use a network
cable to connect the VioGate server and the modem.
8.
Enter the host name you have registered at
www.dyndns.org
in the web browser.
If you can connect to the VioGate server administration page, it means that you
have completed the VioGate server’s network settings successfully.
Содержание VioGate
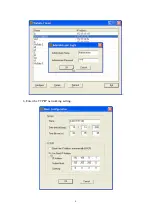
Страница 6: ...6 6 Enter the TCP IP networking setting...


