Mustang-V100-MX4
Page 14
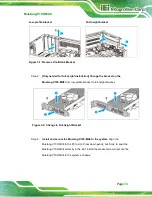
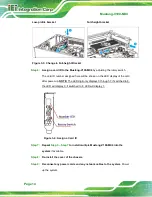
Low-profile bracket
Full-height bracket
Figure 3-3: Change to Full-height Bracket
Step 6:
Assign a card ID to the Mustang-V100-MX4
by adjusting the rotary switch.
The card ID number assigned here will be shown on the LED display of the card
after power-up.
NOTE:
The LED digit only displays 0 through 7; if switched to 8,
the LED will display 0; if switched to F, LED will display 7.
Figure 3-4: Assign a Card ID
Step 7:
Repeat
Step 3 ~ Step 7
to install multiple Mustang-V100-MX4 into the
system
if available.
Step 8:
Re-install the cover of the chassis
.
Step 9:
Reconnect any power cords and any network cables to the system.
Power
up the system.
Step 0:
Содержание Mustang-V100-MX4
Страница 2: ...Mustang V100 MX4 Page II Revision Date Version Changes July 22 2019 1 00 Initial release ...
Страница 9: ...Mustang V100 MX4 Page 1 Chapter 1 1 Introduction ...
Страница 12: ...Mustang V100 MX4 Page 4 1 3 Dimensions The dimensions of the board are listed below Figure 1 2 Dimensions mm ...
Страница 14: ...Mustang V100 MX4 Page 6 Chapter 2 2 Unpacking ...
Страница 17: ...Mustang V100 MX4 Page 9 Chapter 3 3 Hardware Installation ...
Страница 23: ...Mustang V100 MX4 Page 15 Chapter 4 4 OpenVINO Toolkit Installation Linux ...
Страница 52: ...Mustang V100 MX4 Page 44 Chapter 5 5 OpenVINO Toolkit Installation Windows 10 ...
Страница 93: ...Mustang V100 MX4 Page 85 Appendix A A Performance Test ...
Страница 95: ...Mustang V100 MX4 Page 87 Appendix B B Regulatory Compliance ...
Страница 97: ...Mustang V100 MX4 Page 89 C Product Disposal Appendix C ...
Страница 99: ...Mustang V100 MX4 Page 91 Appendix D D Hazardous Materials Disclosure ...


