background image


iSignager-LCD-S Series Digital Signage Display

Page 24 


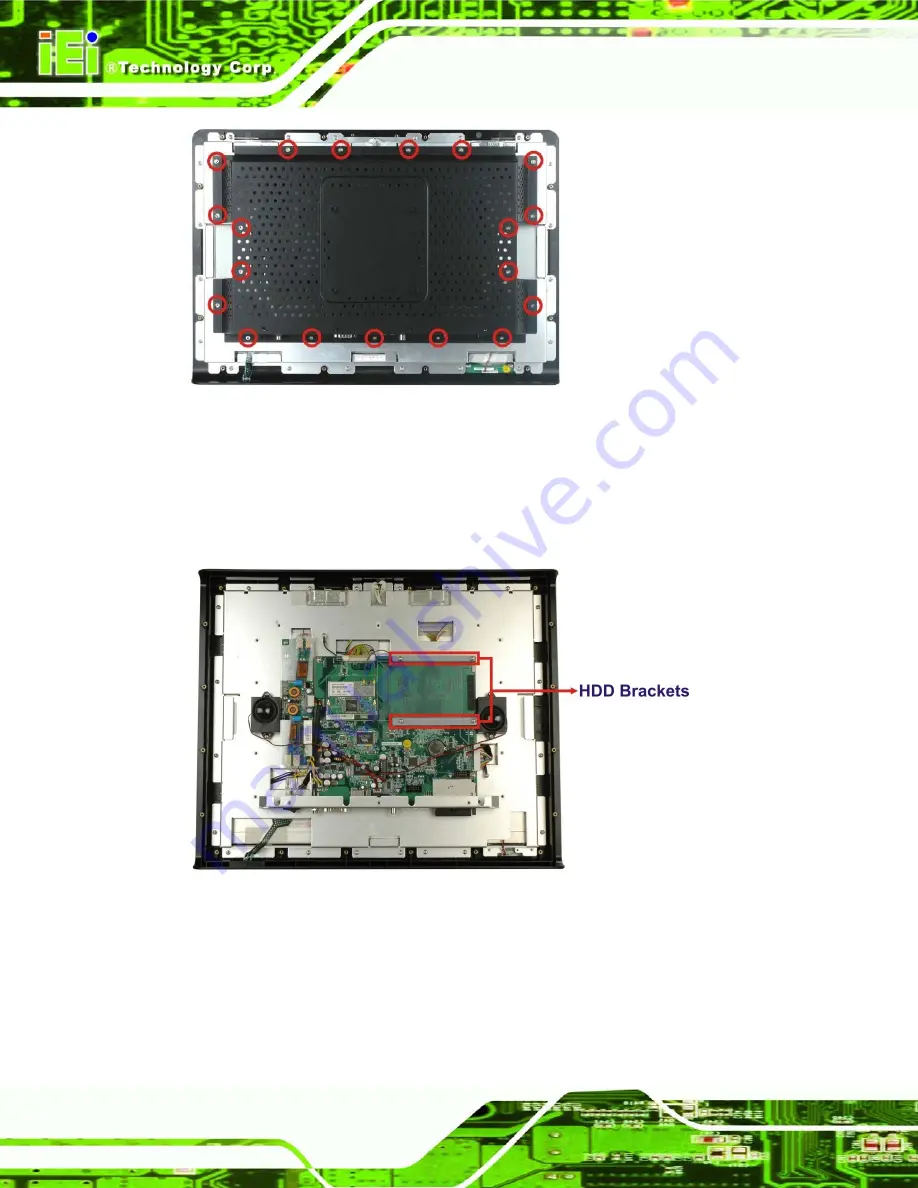
Figure 2-6: iSignager-LCD-W19S Aluminum Back Cover Retention Screws 


Step 5: 

Remove the HDD brackets

 (

Figure 2-7

) by removing the four HDD bracket 

retention screws. 


Figure 2-7: HDD Brackets 


Содержание iSignager-LCD-15S

Страница 1: ...y Corp User Manual Hardware iSignager LCD S Series iSignager LCD S Series User Manuall MODEL 15 17 19 iSignager LCD with Audio Input Output Video Input LAN USB 2 0 IP 64 Compliant Front Panel Optional Wireless LAN Module Rev 1 01 23 June 2009 ...

Страница 2: ...iSignager LCD S Series Digital Signage Display Page ii Revision Date Version Changes 23 June 2009 1 01 Added iSignager LCD W19S series information 15 September 2008 1 00 Initial Release ...

Страница 3: ...ential damages arising out of the use or inability to use the product or documentation even if advised of the possibility of such damages This document contains proprietary information protected by copyright All rights are reserved No part of this manual may be reproduced by any mechanical electronic or other means in any form without prior written permission of the manufacturer TRADEMARKS All reg...

Страница 4: ... Physical Dimensions 8 1 6 4 iSignager LCD 19S Physical Dimensions 9 1 6 5 iSignager LCD W19S Physical Dimensions 10 1 7 SPECIFICATIONS 11 1 8 LCD SPECIFICATIONS 12 1 8 1 iSignager LCD 15S LCD Specifications 12 1 8 2 iSignager LCD 17S LCD Specifications 13 1 8 3 iSignager LCD 19S LCD Specifications 14 1 8 4 iSignager LCD W19S LCD Specifications 15 1 9 POWER ADAPTERS 16 1 10 PACKING LIST 17 1 11 BE...

Страница 5: ...ns 32 3 2 USING THE OSD 33 3 3 REMOTE CONTROL 34 A VIDEO AUDIO AND GRAPHIC FORMATS 35 A 1 OVERVIEW OF VIDEO FORMATS 36 A 1 1 MPEG 1 36 A 1 2 MPEG 2 36 A 1 3 MPEG 4 36 A 1 4 DivX and XviD 36 A 1 5 DVD ISO 37 A 1 6 DVD VOB and IFO 37 A 1 7 TS 37 A 2 OVERVIEW OF AUDIO FORMATS 38 A 2 1 Dolby Digital 38 A 2 2 MP3 38 A 2 3 AAC 38 A 2 4 WAV or WAVE 38 A 2 5 WMA 38 A 3 OVERVIEW OF GRAPHIC FORMATS 39 A 3 1...

Страница 6: ... B 1 CHECK AND MODIFY THE ISIGNAGER LCD S SERIES STATUS BY SERIAL PORT 43 B 1 1 Successful Message LAN Connection 50 B 1 2 Successful Message Wifi Connection 51 B 2 CHECKING CONNECTION 53 B 2 1 Check the LED 53 B 2 2 Ping in DOS Environment or Hyper Terminal Session 53 B 2 2 1 PC 53 B 2 2 2 iSignager LCD S Series 53 B 2 3 Check the Status in the Player Manager 54 B 3 ISIGNAGER LCD S SERIES NETWORK...

Страница 7: ... IDE USB Cable 22 Figure 2 2 iSignager LCD S Series Back Cover Retention Screws 22 Figure 2 3 iSignager LCD 15S Aluminum Back Cover Retention Screws 23 Figure 2 4 iSignager LCD 17S Aluminum Back Cover Retention Screws 23 Figure 2 5 iSignager LCD 19S Aluminum Back Cover Retention Screws 23 Figure 2 6 iSignager LCD W19S Aluminum Back Cover Retention Screws 24 Figure 2 7 HDD Brackets 24 Figure 2 8 Se...

Страница 8: ...Specifications 12 Table 1 4 iSignager LCD 15S LCD Specifications 12 Table 1 5 iSignager LCD 17S LCD Specifications 13 Table 1 6 iSignager LCD 19S LCD Specifications 14 Table 1 7 iSignager LCD W19S LCD Specifications 15 Table 1 8 Power Adapter Specifications 16 Table 1 9 iSignager LCD S Series Supported Formats 19 Table 2 1 iSignager LCD S Series Mounting Kits 26 Table 3 1 OSD Menu Description 33 ...

Страница 9: ...ISignager LCD S Series Digital Signage Display Page 1 1 Introduction Chapter 1 ...

Страница 10: ...r LCD S Series comes with an application software the iSignager AdDesign to help users to design schedule and transfer dynamic contents for iSignager LCD S Series to display With the iSignager LCD S Series an advertising station is easily established and promotes the product and services in the simplest way 1 3 iSignager LCD S Series Model Variations All the IEI iSignager LCD S Series models are l...

Страница 11: ...within on large screen High resolution displays HDTV to produce the best advertising results Contents can be stored in CompactFlash disk USB 2 0 flash drive or IDE USB hard disk drive Uploading content from remote to the iSignager LCD S Series through Network management function Optional 802 11b g wireless module and PIFA antenna IP 64 compliant front panel RoHS compliant 1 5 System Overview 1 5 1...

Страница 12: ...s is located horizontally on the bottom of the front frame of iSignager LCD S Series Menu Right Down Up Left Refer to Chapter 3 for the detailed descriptions of each OSD function 1 5 2 Bottom Panel All peripheral device connectors are located on the bottom panel of the iSignager LCD S Series The following is a list of the bottom panel peripheral device connectors used on the iSignager LCD S Series...

Страница 13: ...CompactFlash slot Figure 1 2 shows the bottom panel of the iSignager LCD 19S digital signage display Figure 1 2 iSignager LCD S Series Bottom Panel View 1 5 3 Rear View The rear panel features fan ventilation holes and four retention screw holes that support a VESA FDMI MIS D 100 wall mounting bracket a stand or an arm Figure 1 3 shows the retention screw holes of the iSignager LCD S Series ...

Страница 14: ...ons for the iSignager LCD S Series 1 6 1 General Physical Dimensions General physical dimensions for the iSignager LCD S Series are shown in Table 1 2 Model Width mm Height mm Depth mm iSignager LCD 15S 393 04 308 06 61 00 iSignager LCD 17S 428 00 350 00 65 00 iSignager LCD 19S 469 94 382 46 66 85 iSignager LCD W19S 474 60 331 67 65 00 Table 1 2 General Physical Dimensions ...

Страница 15: ... Series Digital Signage Display Page 7 1 6 2 iSignager LCD 15S Physical Dimensions The physical dimensions of the iSignager LCD 15S are shown in Figure 1 4 Figure 1 4 iSignager LCD 15S Physical Dimensions millimeters ...

Страница 16: ... Series Digital Signage Display Page 8 1 6 3 iSignager LCD 17S Physical Dimensions The physical dimensions of the iSignager LCD 17S are shown in Figure 1 5 Figure 1 5 iSignager LCD 17S Physical Dimensions millimeters ...

Страница 17: ... Series Digital Signage Display Page 9 1 6 4 iSignager LCD 19S Physical Dimensions The physical dimensions of the iSignager LCD 19S are shown in Figure 1 6 Figure 1 6 iSignager LCD 19S Physical Dimensions millimeters ...

Страница 18: ...eries Digital Signage Display Page 10 1 6 5 iSignager LCD W19S Physical Dimensions The physical dimensions of the iSignager LCD W19S are shown in Figure 1 7 Figure 1 7 iSignager LCD W19S Physical Dimensions millimeters ...

Страница 19: ...ack 1 x Audio jack Audio Out 2 x AMP 1 5W speakers 1 x Audio jack 2 x AMP 2W speakers 1 x Audio jack 2 x AMP 3W speakers 1 x Audio jack USB 1 x USB 2 0 port 1 x USB 2 0 port 1 x USB 2 0 port Serial Port 1 x RS 232 1 x RS 232 1 x RS 232 Ethernet 1 x 10 100BASE T 1 x 10 100BASE T 1 x 10 100BASE T 802 11b g Wireless Optional Optional Optional Storage 1 x CF Type II 1 x 2 5 HDD internal 1 x CF Type II...

Страница 20: ...el iSignager LCD 15 Size 15 MFR Model AUO G150XG01 Resolution XGA 1024 x 768 Active Area mm 304 1 x 228 1 Pixel Pitch mm 0 297 Number of Colors 262K View Angle H V 130 120 Brightness cd m2 350 Contrast Ratio 400 1 Response Time ms at 25C 16 Tr Tf Power Consumption W 11 5 Interface LVDS Supply Voltage V 3 3 Backlight 2 CCFL Lamp Life hrs 50000 Operating Temperature 0 50 Operating Humidity 20 85 RH ...

Страница 21: ...64 Number of Colors 16 7M View Angle H V 160 160 Brightness cd m2 300 Contrast Ratio 800 1 Response Time ms at 25C 5 Tr Tf Power Consumption W 25 8 Interface 2ch LVDS Supply Voltage V 5 Backlight 4 CCFL Lamp Life hrs 50 000 Operating Temperature 0 50 Operating Humidity 5 90 RH Storage Temperature 20 60 Storage Humidity 5 90 RH Shock Non Operating 50G 20ms Half sine wave Vibration Non Operating 1 5...

Страница 22: ...4 Number of Colors 16 7M View Angle H V 160 160 Brightness cd m2 300 Contrast Ratio 800 1 Response Time ms at 25C 5 Tr Tf Power Consumption W 24 71 Interface 2ch LVDS Supply Voltage V 5 Backlight 2 CCFL Lamp Life hrs 50 000 Operating Temperature 0 50 Operating Humidity 5 90 RH Storage Temperature 20 60 Storage Humidity 5 90 RH Shock Non Operating 50G 20ms Half sine wave Vibration Non Operating 1 5...

Страница 23: ...esolution WXGA 1440 x 900 Active Area mm 408 24 x 255 15 Pixel Pitch mm 0 285 Number of Colors 16 7M View Angle H V 170 160 Brightness cd m2 300 Contrast Ratio 1000 1 Response Time ms at 25C 5 Tr Tf Power Consumption W 20 Interface 2ch LVDS Supply Voltage V 5 Backlight 4 CCFL Lamp Life hrs 40 000 Operating Temperature 0 50 Operating Humidity 5 90 RH Storage Temperature 20 60 Storage Humidity 5 95 ...

Страница 24: ... Power 60 Watt AC DC Adapter Output Voltage 12 V Input Voltage Range 90 264 V AC Input Frequency 47 63 Hz Inrush Current 220 V 100 A Hold up Time 8 mS Leakage Current 0 75 mA max at 240 Vac 60 Hz Short Circuit Protection Continuous Over voltage Protection Yes MTBF 60000 hrs Efficiency 80 Operating Temperature 0 C 40 C Storage Temperature 20 C 65 C Table 1 8 Power Adapter Specifications ...

Страница 25: ...llowing components Should there be any missing parts or defects in the package please contact IEI immediately Quantity Item Image 1 iSignager LCD S Series 1 AC power adaptor 1 Power cord 1 1GB demo CompactFlash card 1 OSD remote control 1 Screw set 1 RCA video cable 1 Audio cable 1 iSignager AdDesign software companion CD ...

Страница 26: ...are the layout and the sequence The following descriptions help the user to understand the concepts of the iSignager AdDesign For more information please refer to iSignager AdDesign user manual Layout To design a layout is to arrange what and where the content is displayed A layout can contain several display items Multiple files can be added into each display item The display item may include Pic...

Страница 27: ...Series Supported Formats Video MPEG 1 VCD format 1 15 Mbps CBR mpg mpe mpeg dat m1v SD and HD MPEG 2 up to 15 Mbps mpg mpe mpeg m2v vob vro SD and HD MPEG 4 OpenDivX XviD RMP4 avi divx mp4 AVI audio codec MP3 AC3 PCM WMA Audio MPEG 1 Layer 1 MP1 mp1 mpa MPEG 1 Layer 2 MP2 mp2 MPEG 1 Layer 3 MP3 mp3 Microsoft PCM Wave WAV wav Advanced Audio Coding AAC ADIF ADTS aac Apple MPEG 4 AAC Audio M4A m4a Mi...

Страница 28: ...iSignager LCD S Series Digital Signage Display Page 20 2 Installation Chapter 2 ...

Страница 29: ...CF card HDD with display content and player settings generated by iSignager AdDesign has to be installed in the iSignager LCD S Series for broadcasting 2 1 2 HDD Installation Optional A hard drive disk HDD can be used as the storage device on the iSignager LCD S Series instead of the CF card The HDD provides larger data storage capacity Before installing the HDD please install the iSignager AdDesi...

Страница 30: ...e player settings and the sequence to the HDD Disconnect the HDD from the computer Step 3 Remove the plastic back cover of the iSignager LCD S Series The plastic back cover is secured to the chassis with few retention screws Remove the retention screws Figure 2 2 and lift the back cover off the iSignager LCD S Series Figure 2 2 iSignager LCD S Series Back Cover Retention Screws Step 4 Remove the a...

Страница 31: ...gital Signage Display Page 23 Figure 2 3 iSignager LCD 15S Aluminum Back Cover Retention Screws Figure 2 4 iSignager LCD 17S Aluminum Back Cover Retention Screws Figure 2 5 iSignager LCD 19S Aluminum Back Cover Retention Screws ...

Страница 32: ...ries Digital Signage Display Page 24 Figure 2 6 iSignager LCD W19S Aluminum Back Cover Retention Screws Step 5 Remove the HDD brackets Figure 2 7 by removing the four HDD bracket retention screws Figure 2 7 HDD Brackets ...

Страница 33: ...ntion screw holes on the sides of the HDD Figure 2 8 Figure 2 8 Secure HDD to the Brackets Step 7 Install the HDD into the iSignager LCD S Series Insert the HDD to the IDE connector on the board and secure the HDD to the board with four retention screws Figure 2 9 Figure 2 9 IDE HDD Installation Step 8 Replace the aluminum cover and the plastic back cover Step 0 ...

Страница 34: ...ting kits available for each model of the iSignager LCD S Series Model iSignager LCD 15S iSignager LCD 17S iSignager LCD 19S Wall Mounting Kit AFLWK 15 AFLWK 17 AFLWK 19 Stand STAND A19 STAND B19 Table 2 1 iSignager LCD S Series Mounting Kits 2 2 2 Wall Mounting The iSignager LCD S Series has Video Electronics Standards Association VESA standard mounting holes tapped into the rear panel The standa...

Страница 35: ... tightening them Figure 2 10 Figure 2 10 Wall mounting Bracket Step 6 Insert the four monitor mounting screws provided in the wall mounting kit into the four screw holes on the real panel of the monitor and tighten until the screw shank is secured against the rear panel Figure 2 11 Step 7 Align the mounting screws on the monitor rear panel with the mounting holes on the bracket Step 8 Carefully in...

Страница 36: ...assis Support Screws 2 2 3 Stand Installation The iSignager LCD S Series has Video Electronics Standards Association VESA standard mounting holes tapped into the rear panel The stand mounting plate has a matching VESA hole pattern To mount the iSignager LCD S Series onto a stand please follow the steps below Step 1 Line up the threaded holes on the iSignager LCD S Series rear panel with the screw ...

Страница 37: ...on an arm please follow the steps below Step 1 The arm is a separately purchased item Please correctly mount the arm onto the surface it uses as a base To do this refer to the installation documentation that came with the mounting arm NOTE When purchasing the arm please ensure that it is VESA compliant and that the arm has a 100 mm interface pad If the mounting arm is not VESA compliant it cannot ...

Страница 38: ... the iSignager LCD S Series The iSignager LCD S Series arm mount retention screw holes are shown in Figure 2 13 Figure 2 13 Arm Mounting Retention Screw Holes Step 4 Secure the iSignager LCD S Series to the interface pad by inserting four retention screws through the bottom of the mounting arm interface pad and into the iSignager LCD S Series Step 0 ...

Страница 39: ...ISignager LCD S Series Digital Signage Display Page 31 3 On Screen Display OSD Controls Chapter 3 ...

Страница 40: ...el Figure 3 1 shows a typical arrangement of OSD controls Figure 3 1 OSD Control Buttons Up Button Press this button to scroll up or to switch from one selected item to another Down Button Press this button to scroll down or to switch from one selected item to another Left Button Press this button to decrease the value Right Button Press this button to increase the value Menu Button Press this but...

Страница 41: ...re described below Figure 3 2 OSD Menu Option Description Value Volume Adjust the volume of the iSignager LCD S Series 0 8 Brightness Adjusts the brightness of screen This function adjusts the offset value of ADC Setting this value too high or too low will affect the quality of image 0 8 Exit Exit the OSD menu Table 3 1 OSD Menu Description ...

Страница 42: ...r off Mute Press this button to turn off the audio OK Press this button to confirm a setting or an adjustment made Brightness Use these control buttons to adjust the brightness of the LCD screen Volume Press these buttons to adjust the audio volume level Up Press this button to scroll up or to switch from one selected item to another Down Press this button to scroll down or to switch from one sele...

Страница 43: ...ISignager LCD S Series Digital Signage Display Page 35 A Video Audio and Graphic Formats Appendix A ...

Страница 44: ... published as the ISO IEC 13818 international standard MPEG 2 is typically used to encode audio and video for broadcast signals including direct broadcast satellite and Cable TV MPEG 2 with some modifications is also the coding format used by standard commercial DVD movies A 1 3 MPEG 4 MPEG 4 is a standard used primarily to compress audio and video AV digital data It is the designation for a group...

Страница 45: ...t is a file type contained in DVD Video media It contains the actual Video Audio Subtitle and Menu contents in stream form VOB files are encoded very much like standard MPEG 2 files When the extension is renamed from vob to MPG or MPEG the file is still readable and continues to hold all information although most players supporting MPEG 2 don t support subtitle tracks IFO file is a DVD information...

Страница 46: ...ression formats defined by the MPEG 2 standard AAC is a higher quality codec than the MP3 therefore requiring less data for the same audio reproduction As a result an AAC file encoded at 96kbps bit rate may actually sound better than an MP3 encoded at 128kbps bit rate A 2 4 WAV or WAVE WAV or WAVE short for Waveform audio format is a Microsoft and IBM audio file format standard for storing audio o...

Страница 47: ...at on that platform Images are generally stored with a color depth of 2 1 bit 16 4 bit 256 8 bit 65 536 16 bit or 16 7 million 24 bit referred to as true color colors the bits represent the bits per pixel 8 bit images can also be gray scale instead of indexed color 24 bit BMP files are lossless but are much larger in file size than JPEGs A 3 3 GIF GIF Graphics Interchange Format is a bitmap image ...

Страница 48: ... if the reception is poor the user may encounter various other artifacts such as blockiness and stuttering Standards that can broadcast digital SDTV include DVB ATSC and ISDB The latter two were originally developed for HDTV but they have proved to be more often used for their ability to deliver multiple SD video and audio streams via multiplexing than to use the entire bitstream for one HD channe...

Страница 49: ...ution For example 24p means 24 progressive frames per second and 50i means 50 interlaced frames per second A 5 2 Progressive Scan vs Interlaced Scan Interlaced scan is the way a television decodes an image a frame is broken into two fields odd 1 3 5 7 and even 2 4 6 8 A television scans 60 fields per second with 30 odd and 30 even fields created By combining the two fields every 1 30 of a second a...

Страница 50: ...iSignager LCD S Series Digital Signage Display Page 42 B Check and Modify the Player Status by Serial Port Appendix B ...

Страница 51: ...ing steps and command to check and modify the iSignager LCD S Series status by RS 232 serial port Step 1 In Windows XP Windows 2000 OS create a HyperTerminal session and prepare a null modem cable to connect the PC and the iSignager LCD S Series NOTE All these settings can be done in the iSignager AdDesign Step 2 Modify COM1 Settings as below ...

Страница 52: ...tion vick bin playerinfo BINFMT_FLAT Loading file playerinfo Usage playerinfo i To display all information playerinfo sh hostname To change PC host name playerinfo ch hostname To change client host name playerinfo ddev val To change device type playerinfo si ip To change PC IP playerinfo ci ip To change client IP playerinfo d 1 0 To enable DHCP 1 or to disable DHCP 0 ...

Страница 53: ... BINFMT_FLAT Loading file new part1 bin playerinfo Information Romfs Version 107 Client Hostname Glob1 Client Ip eth0 10 10 19 253 Server Hostname RD VICKWU NB Server Ip 10 10 18 37 Display Device VGA 1024x768 60 Apps Version 106 WIFI BINFMT_FLAT Loading file new part1 bin playerinfo no wireless extensions Example 1 1 Use command playerinfo i and show the information of the player is connected via...

Страница 54: ...stname to client system vick bin playerinfo sh RD VICKWU NB BINFMT_FLAT Loading file playerinfo Changing server hostname Done Example 3 Set client hostname to client system vick bin playerinfo ch vick BINFMT_FLAT Loading file playerinfo Changing client hostname Example 4 Set device display mode type vick bin playerinfo ddev VGA 1360x768 60 BINFMT_FLAT Loading file playerinfo Display Device VGA 136...

Страница 55: ...is up and running the systems IP address is 10 10 10 74 connecting to windows server windows server ip address is 10 10 10 58 windows server hostname is RD VICKWU NB connection Y CONNECTED TO WINDOWS SERVER gateway Unable to read gateway from interface Mac address of the board is 00 0b 6a 36 a3 10 Default gateway of the board is 0 0 0 0 Subnet mask is 255 255 254 0 Host name is vick DNS of the boa...

Страница 56: ... 1811 play_animate 17e02000 munmap of non mmaped memory by process 1812 play_animate 17e02000 killall play_rotate no process killed killall nano X no process killed killall audioplayer no process killed killall audio no process killed killall saver no process killed munmap of non mmaped memory by process 1806 banner 17e02000 munmap of non mmaped memory by process 1807 banner 17e02000 munmap of non...

Страница 57: ...unning the systems ip address is 10 10 10 74 connecting to windows server windows server ip address is 10 10 10 58 windows server hostname is RD VICKWU NB connection Y CONNECTED TO WINDOWS SERVER Mac address of the board is 00 0b 6a 36 a3 10 Default gateway of the board is 10 10 10 1 Subnet mask is 255 255 254 0 Host name is vick DNS of the board is 172 16 2 6 00 0b 6a 36 a3 10 10 10 10 74 172 16 ...

Страница 58: ...lient broadcast e g ifconfig eth0 broadcast 255 255 255 0 Step 7 Use the following command to modify Wifi settings Step 0 ifconfig ra0 IP set client IP value ifconfig ra0 netmask set client mask e g ifconfig ra0 netmask 192 168 1 255 ifconfig ra0 broadcast set client broadcast e g ifconfig ra0 broadcast 255 255 255 0 B 1 1 Successful Message LAN Connection If LAN is successfully connected the foll...

Страница 59: ... 1 0x05 0x02 Mac address of the board is 00 9b 6b 36 a8 70 Default gateway of the board is 192 168 1 1 Subnet mask is 255 255 255 0 Host name is vick DNS of the board is 127 0 0 1 00 9b 6b 36 a8 70 192 168 1 10 127 0 0 1 vick 192 168 1 1 255 255 255 0 0 0 0 read returned 20 B 1 2 Successful Message Wifi Connection If Wifi is successfully connected the following messages are shown eth0 link down ra...

Страница 60: ...work Type Command iwpriv ra0 set NetworkType infra Setting Authenticaion Mode Command iwpriv ra0 set AuthMode open Setting Encryption Type Command iwpriv ra0 set EncrypType WEP Setting Default Key ID Command iwpriv ra0 set DefaultKeyID 1 Setting Key Command iwpriv ra0 set Key1 1234567890abc 31 32 33 34 35 36 37 38 39 30 61 62 63 00 00 00 Setting SSID Command iwpriv ra0 set SSID iei_sw2 interface e...

Страница 61: ...ng followed by the LAN IP or WLAN IP e g ping 10 10 12 82 Press Enter If the reply message is shown the connection exists e g Reply from 10 10 12 82 bytes 32 time 10ms TTL 128 Reply from 10 10 12 82 bytes 32 time 10ms TTL 128 Reply from 10 10 12 82 bytes 32 time 10ms TTL 128 B 2 2 2 iSignager LCD S Series To check if the specific IP connection exists in the client side check in a Hyper Terminal se...

Страница 62: ...f the player is either On Line Off Line or Playing B 3 iSignager LCD S Series Network Behavior The user can setup LAN and Wifi settings in the iSignager LCD S Series at the same time However the iSignager LCD S Series takes LAN as the first priority by default when booting up If the LAN is successfully activated the iSignager LCD S Series does not activate the Wifi settings The Wifi settings is ac...

Отзывы: