background image


ICEFIRE-T10A Mobile Clinic Assistant 

Page 49

4.3 Realtek LAN Driver 

To install the Realtek LAN driver, please follow the steps below. 

Step 1: 

Select 

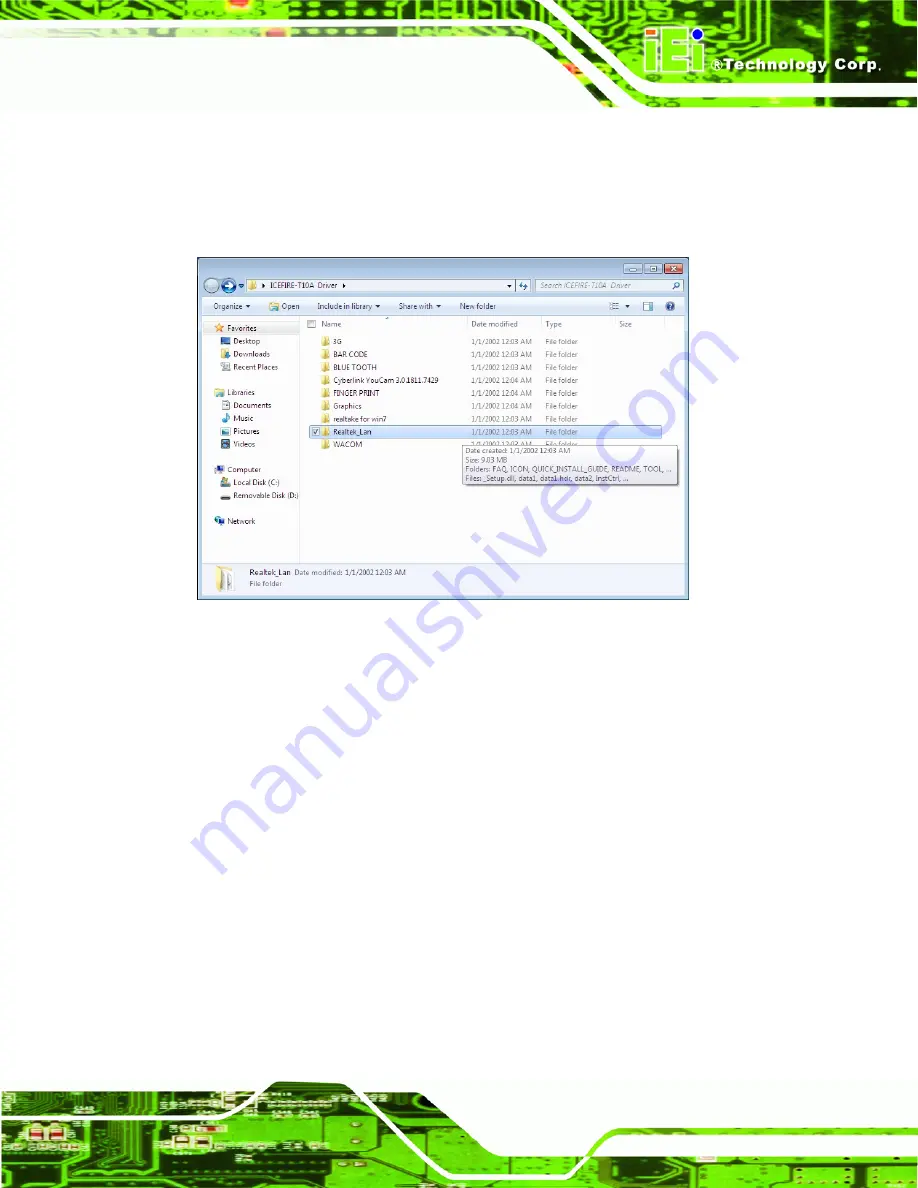
Realtek_Lan

 from the list in 

45

Figure 4-3. 


Figure 4-3: Realtek LAN Driver Location 


Step 2: 

Double click the setup file in the folder. The InstallShield Wizard screen appears 

(

45

Figure 4-4).   

Содержание ICEFIRE-T10A

Страница 1: ...rp User Manual 10 4 Mobile Clinic Assistant with Intel Atom D525 CPU 2 GB DDR3 SDRAM 802 11a b g n Wireless Bluetooth Mobile 3 5G LAN USB Barcode scanner Fingerprint Reader RoHS Compliant IP64 Complia...

Страница 2: ...lation Optional Added Section 3 8 Using RFID Reader Added Section 3 9 Using Barcode Scanner Added Chapter 2 5 2 ICEFIRE Control Center Modified 2 Table 1 1 Model Variations Modified Section 3 3 2 Moun...

Страница 3: ...f the possibility of such damages This document contains proprietary information protected by copyright All rights are reserved No part of this manual may be reproduced by any mechanical electronic or...

Страница 4: ...G 12 2 1 UNPACK THE TABLET PC 13 2 2 PACKING LIST 14 3 HARDWARE INSTALLATION 16 3 1 BATTERY INSTALLATION 17 3 1 1 Charge the Battery 19 3 1 1 1 Through the ICEFIRE T10A 19 3 1 1 2 Through Optional Doc...

Страница 5: ...NTEL GRAPHICS DRIVER 47 4 3 REALTEK LAN DRIVER 49 4 4 GOBI 2000 WWAN DATACARD DRIVER 50 4 5 SPEAKER AND MICROPHONE DRIVER 52 4 6 FINGERPRINT READER DRIVER 53 4 7 BARCODE SCANNER DRIVER 55 4 8 BLUETOOT...

Страница 6: ...E INTRODUCTION 88 7 2 MOTHERBOARD REPLACEMENT 88 A SAFETY PRECAUTIONS 89 A 1 SAFETY PRECAUTIONS 90 A 1 1 General Safety Precautions 90 A 1 2 Anti static Precautions 91 A 1 3 Product Disposal 92 A 2 MA...

Страница 7: ...116 B 4 3 Restore Your Last Backup 117 B 4 4 Manual 118 B 5 OTHER INFORMATION 119 B 5 1 Using AHCI Mode or ALi M5283 VIA VT6421A Controller 119 B 5 2 System Memory Requirement 121 C BIOS OPTIONS 122 D...

Страница 8: ...e 3 6 Insert Batteries to Docking Station 21 Figure 3 7 SIM Card Slot Location 22 Figure 3 8 SIM Card Installation 22 Figure 3 9 Release the Stand 24 Figure 3 10 Lock the Stand 24 Figure 3 11 Place th...

Страница 9: ...43 Figure 3 39 Operating Settings 43 Figure 3 40 Scanning Triggering 44 Figure 3 41 Beeps Green Indicator LED 44 Figure 4 1 Graphics Driver Location 48 Figure 4 2 Graphics Media Accelerator Driver 48...

Страница 10: ...ecovery Mode 105 Figure B 11 Recovery Tool Menu 105 Figure B 12 About Symantec Ghost Window 106 Figure B 13 Symantec Ghost Path 106 Figure B 14 Select a Local Source Drive 107 Figure B 15 Select a Sou...

Страница 11: ...ICEFIRE T10A Mobile Clinic Assistant Page xi Figure B 31 Restore Backup 117 Figure B 32 Restore System Backup Complete Window 117 Figure B 33 Symantec Ghost Window 118...

Страница 12: ...Table 1 1 Model Variations 3 Table 1 2 Technical Specifications 10 Table 2 1 Packing List 15 Table 2 2 Optional Items 15 Table 3 1 Supported Frequency Range 23 Table 3 2 Serial Port Pinouts 32 Table...

Страница 13: ...nu 5 USB Configuration 73 BIOS Menu 6 Hardware Health Configuration 74 BIOS Menu 7 Hardware Health Configuration 75 BIOS Menu 8 IEI Feature 77 BIOS Menu 9 Chipset 78 BIOS Menu 10 Host Bridge Chipset C...

Страница 14: ......

Страница 15: ...ICEFIRE T10A Mobile Clinic Assistant Page 1 Chapter 1 1 Introduction...

Страница 16: ...erating system Wireless networking is enabled through an 802 11a b g n wireless adapter A Bluetooth 2 1 EDR Class 2 module provides a connection to Bluetooth devices An optional mobile WWAN module pro...

Страница 17: ...nt front panel protection Windows 7 Embedded OS RoHS compliant 1 3 Model Variations There are six models of the ICEFIRE T10A series All of the models support wireless and Bluetooth connection and are...

Страница 18: ...the ICEFIRE T10A has a 10 4 TFT XGA LCD that supports dual mode input digitizer and resistive touch The ICEFIRE T10A detects and switches the input mode automatically The digitizer input mode is the p...

Страница 19: ...h on off button to enable or disable Bluetooth connection o SAS Secure Attention Sequence button CTRL ALT DEL o Camera shutter button to take a picture Function Key Press the function key and a key to...

Страница 20: ...en light blinking Wi Fi is enabled o Bluetooth LED Blue light shows Bluetooth is enabled o Battery 1 status LED Orange light shows the Battery 1 is being charged o Battery 2 status LED Orange light sh...

Страница 21: ...nectors button and readers as shown in 45Figure 1 5 Figure 1 5 Side Panels CAUTION DO NOT shine the light from the flashlight and the barcode scanner in eyes 1 7 Top Panel The top panel has three butt...

Страница 22: ...cations The technical specifications for the ICEFIRE T10A systems are listed in the table below System ICEFIRE T10A CPU 1 8 GHz Intel Atom D525 Chipset Intel ICH8M Memory 2 0 GB 1333 MHz DDR3 SDRAM pr...

Страница 23: ...DR Class 2 WWAN W CDMA HSUPA RFID 13 56 MHz RFID compliant with ISO15693 and 14443A Power Power Input 12 V DC input Power Adapter 60 W Power Adapter Input 100 V AC 240 V AC 50 60Hz Output 12 V DC 5 A...

Страница 24: ...switch 1 x Barcode scanner on off switch 1 x Flashlight on off switch 1 x Power button with LED Front Panel Buttons and LED Indicators 1 x Five way navigation button 1 x Wi Fi on off button 1 x Bluet...

Страница 25: ...ICEFIRE T10A Mobile Clinic Assistant Page 11 1 10 Dimensions Figure 1 8 Dimensions units in mm...

Страница 26: ...ICEFIRE T10A Mobile Clinic Assistant Page 12 Chapter 2 2 Unpacking...

Страница 27: ...ic wristband or similar device The installation steps below should be followed in order Step 1 Unpack the tablet PC Step 2 Check all the required parts are included Step 3 Install and charge the batte...

Страница 28: ...table PC out of the boxes Step 6 Remove the peripheral parts box from the main box S t e p 0 2 2 Packing List The ICEFIRE T10A tablet PC is shipped with the following components Quantity Item Image 1...

Страница 29: ...7B000 000478 RS Table 2 1 Packing List These optional items are also available Quantity Item Image 1 Docking station with Medical grade power adapter P N ICEFIRE T10A DS01 R10 1 Docking station P N IC...

Страница 30: ...ICEFIRE T10A Mobile Clinic Assistant Page 16 Chapter 3 3 Hardware Installation...

Страница 31: ...nstallation This section covers the installation of the battery pack Step 1 Make sure the battery latches are released If not unlock them by sliding latches to the top Figure 3 1 Release Battery Latch...

Страница 32: ...tant Page 18 Figure 3 2 Battery Installation Step 3 Lock the battery by sliding the battery latches down to the battery Figure 3 3 Lock the Battery Step 4 To view the battery capacity push the battery...

Страница 33: ...battery with a fully charged battery without turning off the system 3 1 1 Charge the Battery The battery packs can be charged through the ICEFIRE T10A or the optional docking station 3 1 1 1 Through t...

Страница 34: ...tery packs The battery capacity can be checked via the capacity indicators on the battery 45Figure 3 4 or via the Windows 7 power management screen 5Figure 3 5 Figure 3 5 Windows 7 Power Management Sc...

Страница 35: ...g station starts to charge the batteries 3 2 SIM Card Installation Optional The ICEFIRE T10A HU model is preinstalled a Gobi 2000 HSUPA module To be able to use the 3G network connection a SIM card mu...

Страница 36: ...stallation 3 2 1 Supported Frequency Range Lists the frequency range supported by the optional Gobi 2000 WWLAN datacard Radio Mode Band UL Frequency MHz DL Frequency MHz 1 1920 1980 2110 2170 2 1850 1...

Страница 37: ...3 1 Supported Frequency Range 3 3 Mounting the System Optional The following installation options are available Docking Station Wall mounting with optional Docking Station The installation instructio...

Страница 38: ...Assistant Page 24 Figure 3 9 Release the Stand Step 2 Move the stand downward Slide the two latches again to lock the stand into place Figure 3 10 Lock the Stand Step 3 Insert the ICEFIRE T10A into t...

Страница 39: ...he optional docking station of the ICEFIRE T10A can be installed on any VESA compliant mounting device The VESA mount retention screw holes of the docking station are shown in 5Figure 3 12 Follow the...

Страница 40: ...over Step 3 Align the connectors Align the RJ 45 connector on the LAN cable with one of the RJ 45 connectors on the bottom panel See 45Figure 3 13 Figure 3 13 LAN Connection Step 4 Insert the LAN cabl...

Страница 41: ...14 USB Device Connection Step 4 Insert the device connector Once aligned gently insert the USB device connector into the on board connector Step 0 3 5 Smart Card Reader Installation Optional To instal...

Страница 42: ...ic Assistant Page 28 Figure 3 15 Smart Card Reader Installation Step 3 Turn on the ICEFIRE T10A refer to Section 53 7 Step 4 Right click Computer from the start menu and select Manage Figure 3 16 Smar...

Страница 43: ...5 The Computer Management window appears Select Service from the left panel Look for Smart Card in the service list Figure 3 17 Smart Card Reader Setting 2 Step 6 Right click Smart Card and select Pr...

Страница 44: ...obile Clinic Assistant Page 30 Step 7 The Smart Card Properties window appears Change the Startup type to Automatic Click Apply Click OK to exit the properties window Step 0 Figure 3 19 Smart Card Rea...

Страница 45: ...3 6 1 Serial Device Connection The ICEFIRE T10A Docking Station has a male DB 9 serial device connector on the bottom panel The serial device connector is for connecting a RS 232 serial device Follow...

Страница 46: ...nnector to the external interface by tightening the two retention screws on either side of the connector Step 0 3 6 1 1 RS 232 Serial Port Pinouts Following are the RS 232 serial port pinouts Pin Desc...

Страница 47: ...15 connector is shown in 45Figure 3 20 Step 2 Align the VGA connector Align the male DB 15 connector on the VGA screen cable with the female DB 15 connector on the external peripheral interface Step...

Страница 48: ...cable are required for operation of the ICEFIRE T10A Step 1 Connect the power adapter to the ICEFIRE T10A Step 2 Connect the power cable to the included power adapter Step 3 Connect the power cable to...

Страница 49: ...power button for 2 3 seconds to shut down the system The green LED turns off 3 8 Using RFID Reader There is a RFID reader on the side panel Figure 1 5 To enable the RFID reader follow the steps below...

Страница 50: ...CEFIRE T10A Mobile Clinic Assistant Page 36 Figure 3 26 IRFR 110 Icon Step 3 The IRFR 110 window appears Step 4 Select USB and click the Ser Device Type button Figure 3 27 Figure 3 27 IRFR Device Type...

Страница 51: ...ce Type button is disabled grayed out to indicate that the RFID reader is connected Figure 3 28 Figure 3 28 Ser Device Type Button Grayed Out Step 6 Select the Find tags tab and click the Run button t...

Страница 52: ...ode Scanner There is a barcode scanner on the side panel Figure 1 5 To use the barcode scanner follow the steps below Step 1 Push the barcode scanner button on the top panel to turn on the barcode sca...

Страница 53: ...e 3 32 EasySet Window Step 3 Click Communication on the tool bar and select Connect from the drop down menu Figure 3 33 Figure 3 33 EasySet Communication Step 4 The Connection parameters window appear...

Страница 54: ...ted to the EasySet click Communication again and see if the original option Connect has been changed to Disconnect Figure 3 35 Communication Disconnect Step 6 To read the barcode information scanned b...

Страница 55: ...barcode parameters can be modified through EasySet To be able to modify the parameters please make sure to connect the EasySet with the barcode scanner refer to Section 3 9 Follow the steps below to m...

Страница 56: ...mat that can be read by the barcode scanner EA15 In the default setting only the PDF417 format of 2 D barcodes is enabled If other formats are needed the user must enable them here Take Aztec as an ex...

Страница 57: ...s Step 3 Use the Operating settings section to configure barcode triggering modes decoding security and beeps etc Figure 3 39 Operating Settings Step 4 In the Scanning Triggering section of operating...

Страница 58: ...Assistant Page 44 Figure 3 40 Scanning Triggering Step 5 In the Beeps green indicator LED section of operating settings the user can configure the beep sound of the barcode scanner Step 0 Figure 3 41...

Страница 59: ...ICEFIRE T10A Mobile Clinic Assistant Page 45 NOTE If no beep sound please check if the rtkhdaud dat file is in C windows system32 drivers...

Страница 60: ...ICEFIRE T10A Mobile Clinic Assistant Page 46 Chapter 4 4 Driver Installation...

Страница 61: ...technical support for the latest updates The following drivers can be installed on the system Graphics driver LAN driver HSUPA driver Audio driver Fingerprint reader driver Barcode scanner driver Blu...

Страница 62: ...ation Step 2 Double click the setup file in the folder The Graphics Media Accelerator Driver welcome screen appears 45Figure 4 2 Figure 4 2 Graphics Media Accelerator Driver Step 3 Follow the step by...

Страница 63: ...ver To install the Realtek LAN driver please follow the steps below Step 1 Select Realtek_Lan from the list in 45Figure 4 3 Figure 4 3 Realtek LAN Driver Location Step 2 Double click the setup file in...

Страница 64: ...f the installation wizard to install the LAN driver 4 4 Gobi 2000 WWAN Datacard Driver There two drivers need to be installed for the Gobi 2000 module module driver and connection manager To install t...

Страница 65: ...tion Step 2 Double click the setup file in the folder Follow the step by step instruction of the installation wizard to install the module driver Step 3 Select ConnectionManager folder from the 3G fol...

Страница 66: ...l the Connection Manager driver 4 5 Speaker and Microphone Driver To install the driver for the speaker and the microphone please follow the steps below Step 1 Select realtake for win7 from the list i...

Страница 67: ...InstallShield Wizard Step 3 Follow the step by step instruction of the installation wizard to install the HD Audio driver 4 6 Fingerprint Reader Driver To install the fingerprint reader driver please...

Страница 68: ...inic Assistant Page 54 Figure 4 9 Fingerprint Reader Driver Location Step 2 Double click the setup file in the folder The InstallShield Wizard screen appears 55Figure 4 4 Figure 4 10 Fingerprint Reade...

Страница 69: ...p 1 Select BAR CODE from the list in 55Figure 4 3 Figure 4 11 Barcode Scanner Driver Location Step 2 Double click the setup file in the folder The InstallShield Wizard screen appears Follow the step b...

Страница 70: ...20090721 from the BLUE TOOTH folder as shown in 55Figure 4 3 Figure 4 12 Bluetooth Driver Location Step 3 Double click the setup file in the folder The InstallShield Wizard screen appears Follow the s...

Страница 71: ...ICEFIRE T10A Mobile Clinic Assistant Page 57 Chapter 5 5 ICEFIRE Control Center...

Страница 72: ...r puts many tasks and common settings in a single window To launch Control Center click the icon on the desktop The Control Center interface is shown below Figure 5 1 Control Center 5 2 Features The C...

Страница 73: ...Wi Fi Take Bluetooth as an example the following section describes how to turn on or turn off the Bluetooth The indicator shows Bluetooth is off Click the indicator to switch on Bluetooth The indicato...

Страница 74: ...IRE T10A is more frequent than using a mouse and keyboard The user should calibrate the digitizer and touch for the first time using the system and whenever the touch point does not align properly To...

Страница 75: ...Tablet PC Settings window appears Click the Calibrate button Figure 5 4 Tablet PC Settings Step 3 Select the input type to calibrate Figure 5 5 Calibrate Pen or Touch Input Screens Step 4 Follow the i...

Страница 76: ...n keys on the front panel are disabled when the Control Center is launched by the user To configure the front panel buttons follow the steps below Step 1 Launch the Control Center In the Button Action...

Страница 77: ...ings are completed click the Done button to save the settings Other actions are described in the table below Step 0 Action Description Open Process Execute process specified by user see Section 55 5 1...

Страница 78: ...RFID reading Enable Flashlight Execute flashlight Windows Key Action Execute windows key actions see Section 55 5 2 Table 5 1 Action Description 5 5 1 Action Open Process If Open Process action is se...

Страница 79: ...ted the user has to select any one of windows key from Key Selection list 5Figure 5 9 Figure 5 9 Action Windows Key Action NOTE After changing the settings please click the Done button to perform all...

Страница 80: ...ICEFIRE T10A Mobile Clinic Assistant Page 66 Chapter 6 6 BIOS Setup...

Страница 81: ...ter SETUP message appears on the screen 0 If the message disappears before the DELETE key is pressed restart the computer and try again 6 1 2 Using Setup Use the arrow keys to highlight items press EN...

Страница 82: ...appropriate keys to use and the possible selections for the highlighted item appears To exit the Help Window press ESC or the F1 key again 6 1 4 BIOS Menu Bar The menu bar on top of the BIOS screen h...

Страница 83: ...ccess Level Administrator Set the Time Use Tab to switch between Time elements Select Screen Select Item EnterSelect F1 General Help F2 Previous Values F3 Optimized Defaults F4 Save ESC Exit Version 2...

Страница 84: ...e that the settings made are compatible with the hardware Aptio Setup Utility Copyright C 2011 American Megatrends Inc Main Advanced Chipset Boot Security Save Exit CPU Configuration IDE Configuration...

Страница 85: ...Inc BIOS Menu 3 CPU Configuration The CPU Configuration menu 55BIOS Menu 3 lists the following CPU details Processor Type Lists the brand name of the CPU being used EMT64 Indicates if the EM64T is sup...

Страница 86: ...Mode 2 AHCI Mode 3 RAID Mode Select Screen Select Item EnterSelect F1 General Help F2 Previous Values F3 Optimized Defaults F4 Save ESC Exit Version 2 11 1210 Copyright C 2011 American Megatrends Inc...

Страница 87: ...board 2 Hubs Legacy USB Support Enabled Enables Legacy USB support AUTO option disables legacy support if no USB devices are connected DISABLE option will keep USB devices available only for EFI appli...

Страница 88: ...The H W Monitor menu 55BIOS Menu 6 shows the operating temperature fan speeds and system voltages Aptio Setup Utility Copyright C 2011 American Megatrends Inc Advanced CPU Temperature 66 C Accuracy 1...

Страница 89: ...e of Off 60 Start PWM 100 Slope PWM 1 PWM Select Screen Select Item EnterSelect F1 General Help F2 Previous Values F3 Optimized Defaults F4 Save ESC Exit Version 2 11 1210 Copyright C 2011 American Me...

Страница 90: ...mperature of Off 060 WARNING CPU failure can result if this value is set too high The fan will turn off if the temperature falls below this value Minimum Value 0 C Maximum Value 100 C Start PWM 100 Th...

Страница 91: ...Feature Auto Recovery Function Disabled Select Screen Select Item Enter Go to SubScreen F1 General Help F10 Save and Exit ESC Exit v02 61 Copyright 1985 2006 American Megatrends Inc BIOS Menu 8 IEI Fe...

Страница 92: ...in Advanced Chipset Boot Security Save Exit RTL8102 PXE Boot Disabled Host Bridge South Bridge Intel IGD SWSCI OpRegion North Bridge Parameters Select Screen Select Item EnterSelect F1 General Help F2...

Страница 93: ...011 American Megatrends Inc Chipset Memory Information Memory Frequency 800 Mhz Total Memory 2048 MB DIMM 0 2048 MB Select which graphics controller to use as the primary boot device Select Screen Sel...

Страница 94: ...F2 Previous Values F3 Optimized Defaults F4 Save ESC Exit Version 2 11 1210 Copyright C 2011 American Megatrends Inc BIOS Menu 11 South Bridge Chipset Configuration HD Audio Controller Enabled Use th...

Страница 95: ...the Intel IGD SWSCI OpRegion menu to configure the video device connected to the system Aptio Setup Utility Copyright C 2011 American Megatrends Inc Advanced Intel IGD SWSCI OpRegion Configuration DVM...

Страница 96: ...MT FIXED Memory Maximum Use the DVMT FIXED Memory option to specify the maximum amount of memory that can be allocated as graphics memory Configuration options are listed below 128 MB 256 MB Maximum D...

Страница 97: ...210 Copyright C 2011 American Megatrends Inc BIOS Menu 13 Boot Bootup NumLock State On Use the Bootup NumLock State BIOS option to specify if the number lock setting must be modified during boot up On...

Страница 98: ...BIOS Menu 14 to set system and user passwords Aptio Setup Utility Copyright C 2011 American Megatrends Inc Main Advanced Chipset Boot Security Save Exit Password Description If ONLY the Administrator...

Страница 99: ...Changes and Reset Discard Changes and Reset Restore Defaults Save as User Defaults Restore User Defaults Exit system setup after saving the changes Select Screen Select Item EnterSelect F1 General Hel...

Страница 100: ...ault values for each of the parameters on the Setup menus F3 key can be used for this operation Save as User Defaults Use the Save as User Defaults option to save the changes done so far as user defau...

Страница 101: ...ICEFIRE T10A Mobile Clinic Assistant Page 87 Chapter 7 7 System Maintenance...

Страница 102: ...be replaced such as the wireless LAN module or the motherboard Please contact the system reseller or vendor to purchase the replacement parts 7 2 Motherboard Replacement In the case of motherboard fa...

Страница 103: ...ICEFIRE T10A Mobile Clinic Assistant Page 89 Appendix A A Safety Precautions...

Страница 104: ...ected whenever the ICEFIRE T10A is being installed moved or modified Do not apply voltage levels that exceed the specified voltage range Doing so may cause fire and or an electrical shock Electric sho...

Страница 105: ...d the following anti static precautions are strictly adhered to Wear an anti static wristband Wearing a simple anti static wristband can help to prevent ESD from damaging any electrical component Self...

Страница 106: ...ectrical and electronic products carrying the mark left must be disposed of separately from normal household waste This includes monitors and electrical accessories such as signal cables or power cord...

Страница 107: ...nly be cleaned using a product specifically designed for the purpose In such case the product will be explicitly mentioned in the cleaning tips Below is a list of items to use when cleaning the ICEFIR...

Страница 108: ...ICEFIRE T10A Mobile Clinic Assistant Page 94 Appendix B B One Key Recovery...

Страница 109: ...s shown in 7455Figure B 1 to backup or restore Windows system five setup procedures are required 1 Hardware and BIOS setup see Section 7455B 2 1 2 Create partitions see Section 7455B 2 2 3 Install ope...

Страница 110: ...e for the operating system while the second partition will be invisible to the operating system and contain the backup made by the one key recovery software The partition created for recovery images m...

Страница 111: ...supported OS versions are listed below Microsoft Windows o Windows XP Service Pack 2 or 3 required o Windows Vista o Windows 7 o Windows CE 5 0 o Windows CE 6 0 o Windows XP Embedded Linux o Fedora Co...

Страница 112: ...ery partition see Section 7455B 2 4 Step 5 Create factory default image see Section 7455B 2 5 S t e p 0 The detailed descriptions are described in the following sections NOTE The setup procedures desc...

Страница 113: ...t e p 0 B 2 2 Create Partitions To create the system backup the main storage device must be split into two partitions three partitions for Linux The first partition will be for the operating system w...

Страница 114: ...following commands marked in red to create two partitions One is for the OS installation the other is for saving recovery files and images which will be an invisible partition Press Enter after enteri...

Страница 115: ...ICEFIRE T10A Mobile Clinic Assistant Page 101 system32 format F fs ntfs q v Recovery y system32 exit Figure B 5 Partition Creation Commands...

Страница 116: ...ng system onto the unlabelled partition The partition labeled as Recovery is for use by the system recovery tool and should not be used for installing the operating system or any applications NOTE The...

Страница 117: ...ny key to boot from the recovery CD It will take a while to launch the recovery tool Please be patient Figure B 6 Launching the Recovery Tool Step 4 When the recovery tool setup menu appears press 2 t...

Страница 118: ...is hidden and the recovery tool is saved in this partition Figure B 8 Build up Recovery Partition Step 6 After completing the system configuration press any key in the following window to reboot the s...

Страница 119: ...llow the steps below Step 1 Turn on the system When the following screen displays 7455Figure B 10 press the F3 key to access the recovery tool The message will display for 10 seconds please press F3 b...

Страница 120: ...age 106 Figure B 12 About Symantec Ghost Window Step 4 Use mouse to navigate to the option shown below 7455Figure B 13 Figure B 13 Symantec Ghost Path Step 5 Select the local source drive Drive 1 as s...

Страница 121: ...wn in 7455Figure B 15 Then click OK Figure B 15 Select a Source Partition from Basic Drive Step 7 Select 1 2 Recovery NTFS drive and enter a file name called iei 7456Figure B 16 Click Save The factory...

Страница 122: ...10A Mobile Clinic Assistant Page 108 Figure B 16 File Name to Copy Image to Step 8 When the Compress Image screen in 7456Figure B 17 prompts click High to make the image file smaller Figure B 17 Compr...

Страница 123: ...B 18 Image Creation Confirmation Step 10 The Symantec Ghost starts to create the factory default image 7456Figure B 19 Figure B 19 Image Creation Process Step 11 When the image creation completes a sc...

Страница 124: ...ndows Please follow the steps below to setup recovery tool for Linux OS Step 1 Hardware and BIOS setup Refer to Section 7456B 2 1 Step 2 Install Linux operating system Make sure to install GRUB v0 97...

Страница 125: ...art DISKPART list vol DISKPART sel disk 0 DISKPART create part pri size ___ DISKPART assign letter N DISKPART exit system32 format N fs ntfs q v Recovery y system32 exit Step 4 Build up recovery parti...

Страница 126: ...e recovery tool main menu by modifying the menu lst To first access the recovery tool main menu the menu lst must be modified In Linux system enter Administrator root When prompt appears type cd boot...

Страница 127: ...Create a factory default image Follow Step 2 Step 12 described in Section 7456B 2 5 to create a factory default image B 4 Recovery Tool Functions After completing the initial setup procedures as descr...

Страница 128: ...ill be saved in the hidden partition 3 Restore your last backup Restore the last system backup image 4 Manual Enter the Symantec Ghost window to configure manually 5 Quit Exit the recovery tool and re...

Страница 129: ...nter in the main menu Step 2 The Symantec Ghost window appears and starts to restore the factory default A factory default image called iei GHO is created in the hidden Recovery partition Figure B 27...

Страница 130: ...the main menu Step 2 The Symantec Ghost window appears and starts to backup the system A backup image called iei_user GHO is created in the hidden Recovery partition Figure B 29 Backup System Step 3 T...

Страница 131: ...Step 1 Type 3 and press Enter in the main menu Step 2 The Symantec Ghost window appears and starts to restore the last backup image iei_user GHO Figure B 31 Restore Backup Step 3 The screen is shown...

Страница 132: ...e follow the steps below Step 1 Type 4 and press Enter in the main menu Step 2 The Symantec Ghost window appears Use the Ghost program to backup or recover the system manually Figure B 33 Symantec Gho...

Страница 133: ...sing one key recovery Please follow the steps below to install the SATA RAID AHCI driver Step 1 Copy the SATA RAID AHCI driver to a floppy disk and insert the floppy disk into a USB floppy disk drive...

Страница 134: ...t Page 120 Step 5 When the following window appears press S to select Specify Additional Device Step 6 In the following window select a SATA controller mode used in the system Then press Enter The use...

Страница 135: ...Step 4 in Section 7456B 2 2 Create Partitions to finish the whole setup process S t e p 0 B 5 2 System Memory Requirement To be able to access the recovery tool by pressing F3 while booting up the sy...

Страница 136: ...ICEFIRE T10A Mobile Clinic Assistant Page 122 Appendix C C BIOS Options...

Страница 137: ...erature of Off 060 76 Start PWM 100 76 Slope PWM 1 PWM 76 Auto Recovery Function Disabled 77 RTL8102 PXE Boot Disabled 78 HD Audio Controller Enabled 80 USB Function Enabled 80 USB 2 0 EHCI Support En...

Страница 138: ...ICEFIRE T10A Mobile Clinic Assistant Page 124 Restore User Defaults 86...

Страница 139: ...ICEFIRE T10A Mobile Clinic Assistant Page 125 Appendix D D Terminology...

Страница 140: ...esents a binary 0 while a high amplitude signal represents a binary 1 BIOS The Basic Input Output System BIOS is firmware that is first run when the computer is turned on and can be configured by the...

Страница 141: ...l SpeedStep Technology EIST allows users to modify the power consumption levels and processor performance through application software The application software changes the bus to core frequency ratio...

Страница 142: ...data transfers between storage devices and the computer chipsets The SATA bus has transfer speeds up to 1 5 Gbps and the SATA II bus has data transfer speeds of up to 3 0 Gbps S M A R T Self Monitori...

Страница 143: ...ICEFIRE T10A Mobile Clinic Assistant Page 129 Appendix E E Watchdog Timer...

Страница 144: ...tate A BIOS function call INT 15H is used to control the Watchdog Timer INT 15H AH 6FH Sub function AL 2 Sets the Watchdog Timer s period BL Time out value Its unit second is dependent on the item Wat...

Страница 145: ...se the system resets Example program INITIAL TIMER PERIOD COUNTER W_LOOP MOV AX 6F02H setting the time out value MOV BL 30 time out value is 48 seconds INT 15H ADD THE APPLICATION PROGRAM HERE CMP EXI...

Страница 146: ...ICEFIRE T10A Mobile Clinic Assistant Page 132 Appendix F F Hazardous Materials Disclosure...

Страница 147: ...ges the presences of small quantities of certain materials in the product and is applicable to China RoHS only A label will be placed on each product to indicate the estimated Environmentally Friendly...

Страница 148: ...Circuit Board X O O O O X Metal Fasteners X O O O O O Cable Assembly X O O O O X Fan Assembly X O O O O X Power Supply Assemblies X O O O O X Battery O O O O O O O This toxic or hazardous substance i...

Страница 149: ...RE T10A Mobile Clinic Assistant Page 135 RoHS RoHS Pb Hg Cd CR VI PBB PBDE X O O O O X X O O O O X X O O O O X X O O O O O X O O O O X X O O O O X X O O O O X O O O O O O O SJ T11363 2006 X SJ T11363...

Отзывы: