AFL-AM2 Panel PC
Page 39
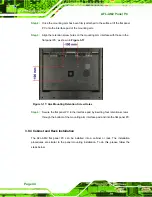
Step 8:
Carefully insert the screws through the holes and gently pull the monitor
downwards until the monitor rests securely in the slotted holes (
Ensure that all four of the mounting screws fit snuggly into their respective
slotted holes.
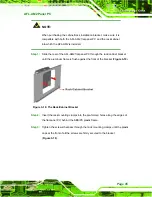
Figure 3-11: Chassis Support Screws
NOTE:
In the diagram below the bracket is already installed on the wall.
Step 9:
Secure the panel PC by fastening the retention screw of the wall-mounting
bracket. (
).
Step 0:
Содержание Afolux AFL-15B-AM2
Страница 1: ...AFL AM2 Panel PC Page i...
Страница 2: ...AFL AM2 Panel PC Page ii Revision Date Version Changes June 2008 1 00 Initial release...
Страница 17: ...AFL AM2 Panel PC Page 1 Chapter 1 1 Introduction...
Страница 24: ...AFL AM2 Panel PC Page 8 Figure 1 5 Internal Overview...
Страница 25: ...AFL AM2 Panel PC Page 9 Chapter 2 2 Specifications...
Страница 29: ...AFL AM2 Panel PC Page 13 Figure 2 2 AFL 15B AM2 Rear Dimensions units in mm...
Страница 31: ...AFL AM2 Panel PC Page 15 Figure 2 4 AFL 17B AM2 Rear Dimensions units in mm...
Страница 43: ...AFL AM2 Panel PC Page 27 Chapter 3 3 Installation...
Страница 67: ...AFL AM2 Panel PC Page 51 Chapter 4 4 System Maintenance...
Страница 80: ...AFL AM2 Panel PC Page 64 J4 Description 3 4 SENSE Table 4 13 LCD Type Selection...
Страница 81: ...AFL AM2 Panel PC Page 65 Chapter 5 5 BIOS Setup...
Страница 86: ...AFL AM2 Panel PC Page 70 BIOS Menu 2 Advanced...
Страница 131: ...AFL AM2 Panel PC Page 115 Chapter 6 6 Software Drivers...
Страница 149: ...AFL AM2 Panel PC Page 133 Appendix A A Safety Precautions...
Страница 153: ...AFL AM2 Panel PC Page 137 Appendix B B BIOS Configuration Options...
Страница 157: ...AFL AM2 Panel PC Page 141 Appendix C C Terminology...
Страница 161: ...AFL AM2 Panel PC Page 145 Appendix D D Software Drivers...
Страница 167: ...AFL AM2 Panel PC Page 151 Appendix E E Watchdog Timer...
Страница 170: ...AFL AM2 Panel PC Page 154 Appendix F F Hazardous Materials Disclosure...
Страница 174: ...AFL AM2 Panel PC Page 158 Index...


