background image


AFL4-W10/W12/12/W13-EHL Panel PC 


Page  92 

5.4.2.1.1


PCIe Root Port Setting 

Use the 

M.2 Slot (M2_M1), PCIE7 Slot (x1), PCIE6 Slot (x4), PCIE1 Slot (x4)

 submenu 

(

BIOS Menu 26

) to configure the PCIe Root Port Setting. 


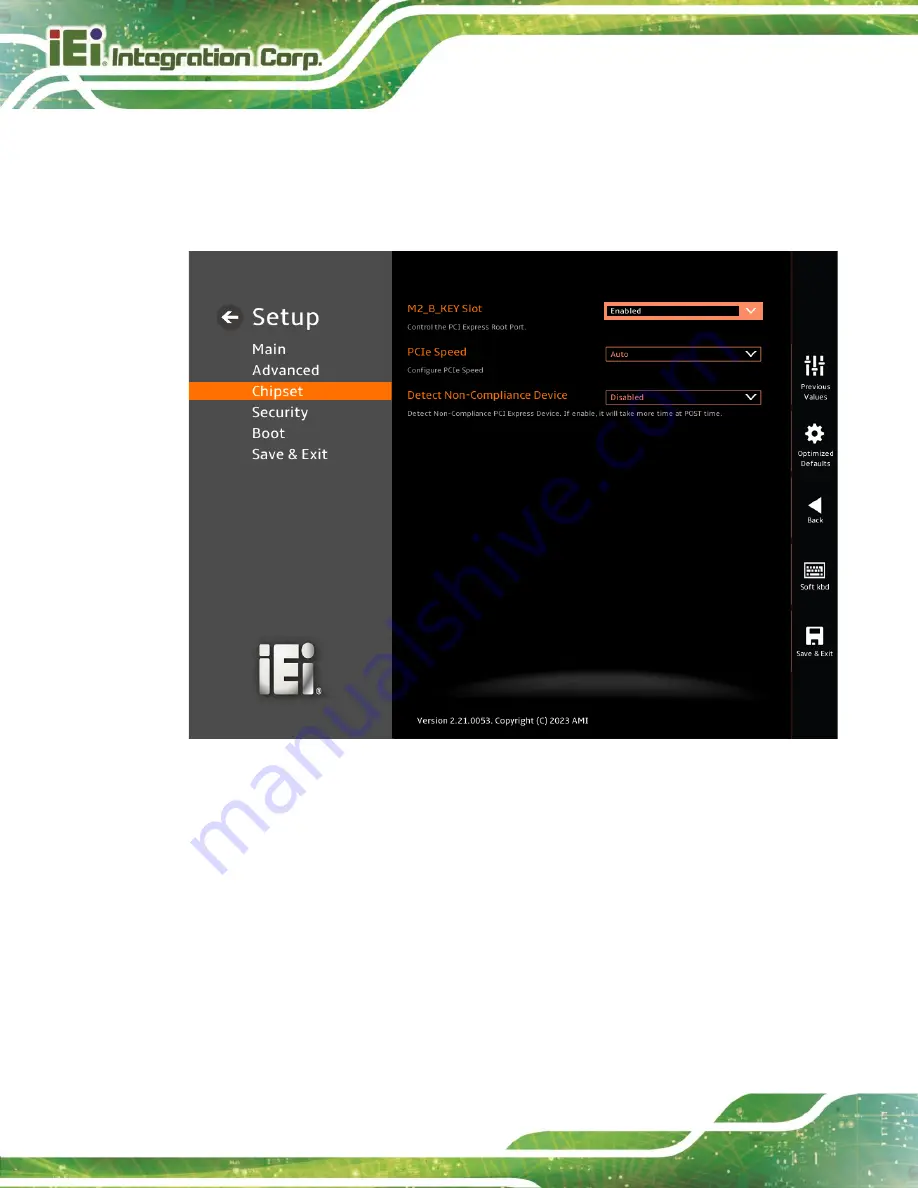
BIOS Menu 26: PCIe Slot Configuration Submenu 


PCIe Speed [Auto] 

Use the 

PCIe Speed

 option to specify the PCI Express port speed. Configuration options 

are listed below. 


Auto 

D

EFAULT


Auto mode. 


Gen1 


Configure PCIe Speed to Gen1. 


Gen2 


Configure PCIe Speed to Gen2. 


Gen3 


Configure PCIe Speed to Gen3. 

Содержание AFL4-W10-EHL

Страница 1: ...ftp emacinc com Tech_Info About_EMAC_Products_and_Services pdf Authorized Distributor Integrator and Value Added Reseller Manual downloaded from ftp emacinc com For purchase information please contact...

Страница 2: ...FL4 W10 W12 12 W13 EHL MODEL Panel PC equips Intel Celeron J6412 on board processor 8GB LPDDR4X on board IEEE 802 11 a b g n ax Bluetooth V5 2 one M 2 2242 M key Slot one M 2 2242 M key Slot MODEL AFL...

Страница 3: ...AFL4 W10 W12 12 W13 EHL Panel PC Page 2 Revision Date Version Changes May 29 2023 1 00 Initial release...

Страница 4: ...verheating do not operate it in an area that exceeds the maximum operating temperature described in the user manual Vorsicht Um eine berhitzung des Systems zu vermeiden betreiben Sie es ausschlie lich...

Страница 5: ...L uso di un altro tipo di adattatore pu causare rischio d incendio o esplosione Si prega di fare riferimento al manuale utente per le specifiche sull alimentazione Atenci n Utilice solamente el adapta...

Страница 6: ...mages arising out of the use or inability to use the product or documentation even if advised of the possibility of such damages This document contains proprietary information protected by copyright A...

Страница 7: ...AUTION Cautionary messages should be heeded to help reduce the chance of losing data or damaging the product NOTE These messages inform the reader of essential but non critical information These messa...

Страница 8: ...0 EHL Dimensions 22 1 8 2 AFL4 W12 EHL Dimensions 23 1 8 3 AFL4 12 EHL Dimensions 24 1 8 4 AFL4 W13 EHL Dimensions 25 2 UNPACKING 26 2 1 UNPACKING 27 2 2 PACKING LIST 28 2 3 OPTIONAL ITEMS 29 3 INSTAL...

Страница 9: ...48 4 3 TURN OFF THE POWER 49 4 4 WLAN CARD REPLACEMENT 49 4 5 REINSTALLING THE COVER 51 5 BIOS 52 5 1 INTRODUCTION 53 5 1 1 Starting Setup 53 5 1 2 Using Setup 54 5 1 3 Getting Help 56 5 1 4 Unable to...

Страница 10: ...106 6 2 8 SMBus Connector SMB1 106 6 2 9 Battery Connector BAT1 106 6 2 10 M 2 A Key Slot M2_AE1 106 6 2 11 M 2 M Key Slot M2_M1 108 6 2 12 M 2 M Key Slot M2_M2 109 6 2 13 eDP Connector EDP1 110 6 2...

Страница 11: ...AFL4 W10 W12 12 W13 EHL Panel PC Page 10 6 4 2 USB 2 0 Connectors USB2_CON1 2 3 115 6 4 3 USB 3 2 Gen 2 Connectors USB3_CON12 115 6 4 4 Power Button PWR_SW1 116 6 4 5 DC Jack 116...

Страница 12: ...odule Slot Location 34 Figure 3 4 M 2 Module Installation 34 Figure 3 5 Clear CMOS Button Location 35 Figure 3 6 AT ATX Switch Location 35 Figure 3 7 Wall mounting Bracket 37 Figure 3 8 Chassis Suppor...

Страница 13: ...W12 12 W13 EHL Panel PC Page 12 Figure 4 3 Removing the WLAN Module 50 Figure 5 1 BIOS Starting Menu 53 Figure 5 1 Main Board Layout Diagram Front Side 103 Figure 5 2 Main Board Layout Diagram Solder...

Страница 14: ...e 5 7 Digital MIC Connector DMIC1 Pinouts 106 Table 5 8 I C Connector I2C1 Pinouts 106 Table 5 9 SMBus Connector SMB1 Pinouts 106 Table 5 10 Battery Connector BAT1 Pinouts 106 Table 5 11 M 2 A Key Slo...

Страница 15: ...Pinouts 114 Table 5 26 LAN Connector J_LAN1 2 Pinouts 114 Table 5 27 HDMI1 Connector HDMI1 Pinouts 115 Table 5 28 USB 2 0 Connectors USB2_CON1 2 3 Pinouts 115 Table 5 29 USB 3 2 Gen 2 Connectors USB3_...

Страница 16: ...AFL4 W10 W12 12 W13 EHL Panel PC Page 15 1 Introduction Chapter 1...

Страница 17: ...stem comes with 8GB on board dual channel LPDDR4x RAM ensuring smooth data throughputs with reduced bottlenecks and fast system access Two serial ports and two external USB 3 2 Gen 2 ports ensure simp...

Страница 18: ...display with optical bonding IP 64 compliant front panel One M 2 M key 2280 One M 2 M key 2242 Two 2 5 GbE Ethernet port Two USB 3 2 Gen 2 Two RS 232 422 485 by DB9 1 4 Front Panel The front side of t...

Страница 19: ...2 W13 EHL Panel PC Page 18 Figure 1 3 Rear View 1 6 Bottom Panel The bottom panel of the AFL4 W10 W12 12 W13 EHL has the following connectors and switches Figure 1 4 Front Bottom Panel Figure 1 5 Left...

Страница 20: ...W13 EHL systems are listed in Table 1 2 Specification AFL4 W10 EHL AFL4 W12 EHL AFL4 12 EHL AFL4 W13 EHL LCD Size 10 1 16 10 12 1 16 10 12 4 3 13 3 16 10 Max Resolution 1280 x 800 1280 x 800 1024 x 76...

Страница 21: ...x M 2 M key 2242 2280 PCIe Gen3 x1 SATA Audio Realtek ALC888S Internal Speaker AMP 1 2 W Wireless Bluetooth IEEE 802 11ax 2T2R module Wi Fi 6E with BT v5 2 M 2 2230 A key Construction Aluminum die cas...

Страница 22: ...set button 1 x 12V DC input jack Table 1 2 System Specifications 1 7 1 WLAN Bluetooth Frequency Range and Power Technology Frequency range MHz Max E I R P dBm WLAN 2 4GHz 2400 2483 5 20 WLAN 5GHz 5150...

Страница 23: ...AFL4 W10 W12 12 W13 EHL Panel PC Page 22 1 8 Dimensions The AFL4 W10 W12 12 W13 EHL dimensions are shown below 1 8 1 AFL4 W10 EHL Dimensions Figure 1 7 AFL4 W10 EHL Dimensions mm...

Страница 24: ...AFL4 W10 W12 12 W13 EHL Panel PC Page 23 1 8 2 AFL4 W12 EHL Dimensions Figure 1 8 AFL4 W12 EHL Dimensions mm...

Страница 25: ...AFL4 W10 W12 12 W13 EHL Panel PC Page 24 1 8 3 AFL4 12 EHL Dimensions Figure 1 9 AFL4 12 EHL Dimensions mm...

Страница 26: ...AFL4 W10 W12 12 W13 EHL Panel PC Page 25 1 8 4 AFL4 W13 EHL Dimensions Figure 1 10 AFL4 W13 EHL Dimensions mm...

Страница 27: ...AFL4 W10 W12 12 W13 EHL Panel PC Page 26 2 Unpacking Chapter 2...

Страница 28: ...Only remove the plastic cover after the panel PC has been properly installed This ensures the screen is protected during the installation process Step 1 Open the box Step 2 Lift the monitor out of th...

Страница 29: ...ontact the IEI reseller or vendor the AFL4 W10 W12 12 W13 EHL was purchased from or contact an IEI sales representative directly by sending an email to 326H378Hsales ieiworld com The AFL4 W10 W12 12 W...

Страница 30: ...urchased Item and Part Number Image VESA 75 100 wall mount kit P N AFLWK 19B Arm P N ARM 11 RS Stand for VESA 75 100 P N STAND C12 R10 LCD monitor stand with adjustable hinge P N VSTAND A10 R11 Table...

Страница 31: ...AFL4 W10 W12 12 W13 EHL Panel PC Page 30 3 Installation Chapter 3...

Страница 32: ...board Self grounding Before handling the board touch any grounded conducting material During the time the board is handled frequently touch any conducting materials that are connected to the ground Us...

Страница 33: ...he system Step 4 Connect peripheral devices to the panel PC Step 5 Mount the panel PC 3 4 Removing the Back Cover WARNING Before any internal installation procedures are carried out on the system make...

Страница 34: ...lift the back cover off the chassis See Figure 3 2 Figure 3 2 Remove the Back Cover 3 5 M 2 Module Installation To install a M 2 module into the AFL4 W10 W12 12 W13 EHL please follow the steps below...

Страница 35: ...ide the M 2 module into the socket at an angle of about 20 Step 4 Secure the M 2 module with the retention screw Push the other end of the M 2 module down and secure the module with the previously rem...

Страница 36: ...ation 3 7 AT ATX Mode Selection AT or ATX power mode can be used on the AFL4 W10 W12 12 W13 EHL The selection is made through an AT ATX switch located on the bottom panel Figure 3 6 Figure 3 6 AT ATX...

Страница 37: ...e set individually and controlled remotely Other possible application includes Security surveillance Point of Sale POS Advertising terminal 3 8 Mounting the System The methods of mounting the AFL4 W10...

Страница 38: ...Figure 3 7 Figure 3 7 Wall mounting Bracket Step 6 Insert the four monitor mounting screws provided in the wall mount kit into the four screw holes on the real panel of the panel PC and tighten until...

Страница 39: ...ts securely in the slotted holes Figure 3 8 Ensure that all four of the mounting screws fit snugly into their respective slotted holes Always keep the AFL4 W10 W12 12 W13 EHL in landscape orientation...

Страница 40: ...a separately purchased item Please correctly mount the arm onto the surface it uses as a base To do this refer to the installation documentation that came with the mounting arm NOTE When purchasing t...

Страница 41: ...rm interface with those in the panel PC Figure 3 10 Figure 3 10 Arm Mounting Retention Screw Holes Step 4 Secure the AFL4 W10 W12 12 W13 EHL to the interface pad by inserting four retention screws thr...

Страница 42: ...bracket with the screw holes Step 3 To secure the bracket to the AFL4 W10 W12 12 W13 EHL insert the retention screws into the screw holes and tighten them Figure 3 12 Stand Mounting Stand Cxx 3 8 4 V...

Страница 43: ...e four VESA mount screws into the four screw holes on the system rear panel Adjust the V Stand to a proper position Step 4 Tighten until the screw shank is secured against the rear panel Figure 3 14 S...

Страница 44: ...ased as an accessory from IEI should be used with the product To power on the system follow the steps below Step 1 Connect the power cord to the power adapter Connect the other end of the power cord t...

Страница 45: ...t button location is shown in Figure 3 17 Press the reset button to reboot the system Figure 3 17 Reset Button Location 3 11 Software Installation All the drivers for the AFL4 W10 W12 12 W13 EHL are a...

Страница 46: ...ad ieiworld com Type AFL4 W10 W12 12 W13 EHL and press Enter Step 2 All product related software utilities and documentation will be listed You can choose Driver to filter the result Step 3 Click the...

Страница 47: ...ht Among the AFL4 series products AFL4 W10 EHL AFL4 W12 EHL and AFL4 12 EHL can use the Adjust Brightlight software to adjust the brightness Users can download the software from the IEI official websi...

Страница 48: ...AFL4 W10 W12 12 W13 EHL Panel PC Page 47 4 System Maintenance Chapter 4...

Страница 49: ...W10 W12 12 W13 EHL Dry climates are especially susceptible to ESD It is therefore critical that whenever the AFL4 W10 W12 12 W13 EHL is accessed internally or any other electrical component is handle...

Страница 50: ...maintenance procedures are carried out on the system make sure the system is turned off 4 4 WLAN Card Replacement The AFL4 W10 W12 12 W13 EHL has one WLAN card slot To replace the WLAN card follow th...

Страница 51: ...e the retention screw to release the WLAN card Figure 4 2 Figure 4 2 Releasing the WLAN Module Step 6 Grasp the WLAN module by the edges and carefully pull it out of the socket Figure 4 3 Figure 4 3 R...

Страница 52: ...tenna cables Step 10 Replace the back cover and secure it using the previously removed retention screws 4 5 Reinstalling the Cover WARNING Failing to reinstall the cover may result in permanent damage...

Страница 53: ...AFL4 W10 W12 12 W13 EHL Panel PC Page 52 5 BIOS Chapter 5...

Страница 54: ...rior notice 5 1 1 Starting Setup The UEFI BIOS is activated when the computer is turned on The setup program can be activated in one of two ways 1 Using keyboard Press the DEL or F2 as soon as the sys...

Страница 55: ...o the item on the right hand side Increase the numeric value or make changes Decrease the numeric value or make changes Page Up Move to the previous page Page Dn Move to the next page Esc Main Menu Qu...

Страница 56: ...reen Button Function Previous Values Load the last value you set Optimized Defaults Load the factory default values in order to achieve the best performance Back Return to the previous menu Soft kbd D...

Страница 57: ...ade CMOS defaults Use the clear CMOS button described in Chapter 3 5 1 5 BIOS Menu Bar The menu bar on top of the BIOS screen has the following main items Main Changes the basic system configuration A...

Страница 58: ...AFL4 W10 W12 12 W13 EHL Panel PC Page 57 5 2 Main The Main BIOS menu appears when the BIOS Setup program is entered The Main menu gives an overview of the basic system information BIOS Menu 1 Main 1 3...

Страница 59: ...AFL4 W10 W12 12 W13 EHL Panel PC Page 58 BIOS Menu 2 Main 2 3 BIOS Menu 3 Main 3 3...

Страница 60: ...n Processor Information cannot be changed The items shown in the system overview include Name Displays the Processor Details Type Displays the Processor Type Speed Displays the Processor Speed ID Disp...

Страница 61: ...U Displays the ME Firmware SKU System Date xx xx xx Use the System Date option to set the system date Manually enter the day month and year System Time xx xx xx Use the System Time option to set the s...

Страница 62: ...anced menu to configure the CPU and peripheral devices through the following sub menus WARNING Setting the wrong values in the sections below may cause the system to malfunction Make sure that the set...

Страница 63: ...10 W12 12 W13 EHL Panel PC Page 62 5 3 1 CPU Configuration Use the CPU Configuration menu to view detailed CPU specifications or enable the Intel Virtualization Technology BIOS Menu 5 CPU Configuratio...

Страница 64: ...party software Intel Virtualization technology allows several OSs to run on the same system at the same time Disabled Disables Intel Virtualization Technology Enabled DEFAULT Enables Intel Virtualiza...

Страница 65: ...option to set Tcc activation temperature at which the Thermal Control Circuit must be activated Tcc will be activated at Tcc Activation Temp Tcc Activation Offset Tcc Activation Offset range is 0 to...

Страница 66: ...l program this value as 1 25 TDP For 12 50W enter 12500 Processor applies control policies such that the package power does not exceed this limit Turbo Mode Enabled Use the Turbo Mode option to enable...

Страница 67: ...omputing Group TCG Trusted Platform Module TPM BIOS Menu 7 PCH FW Configuration TPM Support Enable Use the TPM Support option to enable or disable BIOS support for security device Disable TPM support...

Страница 68: ...TPM information is previous S TPM Clear TPM information is cleared 5 3 3 F81966 Super IO Configuration Use the F81966 Super IO Configuration menu BIOS Menu 8 to set or change the configurations for s...

Страница 69: ...o configure the serial port BIOS Menu 9 Serial Port 1 Configuration Menu Serial Port Enabled Use the Serial Port option to enable or disable the serial port Disabled Disable the serial port Enabled DE...

Страница 70: ...t address is 3F8h and the interrupt address is IRQ4 Device Mode RS232 Use the Device Mode option to change the serial port mode RS232 RS422 with Register RS485 with Register DEFAULT The serial port mo...

Страница 71: ...o configure the serial port BIOS Menu 10 Serial Port 2 Configuration Menu Serial Port Enabled Use the Serial Port option to enable or disable the serial port Disabled Disable the serial port Enabled D...

Страница 72: ...t address is 2F8h and the interrupt address is IRQ3 Device Mode RS232 Use the Device Mode option to change the serial port mode RS232 RS422 with Register RS485 with Register DEFAULT The serial port mo...

Страница 73: ...o configure the serial port BIOS Menu 11 Serial Port 3 Configuration Menu Serial Port Enabled Use the Serial Port option to enable or disable the serial port Disabled Disable the serial port Enabled D...

Страница 74: ...Q10 5 3 3 4 Serial Port 4 Configuration Use the Serial Port 4 Configuration menu BIOS Menu 12 to configure the serial port BIOS Menu 12 Serial Port 4 Configuration Menu Serial Port Enabled Use the Ser...

Страница 75: ...ress IO 2E8h IRQ 10 Serial Port I O port address is 2E8h and the interrupt address is IRQ10 5 3 4 EC KB9068 H W Monitor The EC KB9068 H W Monitor menu BIOS Menu 13 contains the smart fan mode configur...

Страница 76: ...ollowing system parameters and values are shown The system parameters that are monitored are System Temperatures o CPU Temperature o System Temperature1 Fan Speeds o CPU_Fan1 Speed o SYS_Fan1 Speed Vo...

Страница 77: ...e the CPU system fan start off temperature and control mode BIOS Menu 14 Smart Fan Mode Configuration CPU_FAN1 Smart Fan Control Auto Mode Use the CPU_FAN1 Smart Fan Control option to configure the CP...

Страница 78: ...e or key to change the value or enter a decimal number between 1 and 100 SYS_FAN1 Smart Fan Control Auto Mode Use the SYS_FAN1 Smart Fan Control option to configure the System Smart Fan Manual Mode Th...

Страница 79: ...a decimal number between 1 and 100 5 3 5 Serial Port Console Redirection The Serial Port Console Redirection menu BIOS Menu 15 allows the console redirection options to be configured Console Redirecti...

Страница 80: ...bled DEFAULT Disabled the console redirection function Enabled Enabled the console redirection function The Console Redirection Settings submenu will be available when the Console Redirection option i...

Страница 81: ...nal type VT100 The target terminal type is VT100 VT100 The target terminal type is VT100 VT UTF8 The target terminal type is VT UTF8 ANSI DEFAULT The target terminal type is ANSI Bits per second 11520...

Страница 82: ...n to specify the parity bit that can be sent with the data bits for detecting the transmission errors None DEFAULT No parity bit is sent with the data bits Even The parity bit is 0 if the number of on...

Страница 83: ...W13 EHL Panel PC Page 82 2 Sets the number of stop bits at 2 5 3 6 NVMe Configuration Use the NVMe Configuration BIOS Menu 18 menu to display the NVMe controller and device information BIOS Menu 18 NV...

Страница 84: ...ipset Use the Chipset menu BIOS Menu 19 to access the PCH IO and System Agent SA configuration menus WARNING Setting the wrong values for the Chipset BIOS selections in the Chipset BIOS menu may cause...

Страница 85: ...stem Agent SA Configuration menu BIOS Menu 20 to configure the System Agent SA parameters BIOS Menu 20 System Agent SA Configuration VT d Enabled Use the VT d option to enable or disable the VT d capa...

Страница 86: ...onfiguration Use the Memory Configuration submenu BIOS Menu 21 to view memory information BIOS Menu 21 Memory Configuration 5 4 1 2 Graphics Configuration Use the Graphics Configuration BIOS Menu 22 m...

Страница 87: ...tion to select the primary graphics controller the system uses The following options are available Auto Default IGFX PEG PCI SG Internal Graphics Enabled Use the Internal Graphics option to configure...

Страница 88: ...mount of system memory allocated to the integrated graphics processor when the system boots The system memory allocated can then only be used as graphics memory and is no longer available to applicati...

Страница 89: ...LVDS option to select LVDS Enabled or Disabled Enabled DEFAULT Enabled on board LVDS Disabled Disabled on board LVDS LVDS Backlight PWM mode Invert Use the LVDS Backlight PWM Mode option to specify a...

Страница 90: ...configure the PCH parameters BIOS Menu 24 PCH IO Configuration Auto Power Button Function Disabled AT Use the Auto Power Button Function BIOS option to show the power mode state Use the J_ATX_AT1 to...

Страница 91: ...e the power saving function Disabled DEFAULT Power saving function is disabled Enabled Power saving function is enabled It will reduce power consumption when the system is off USB Power state S0 S3 S4...

Страница 92: ...L4 W10 W12 12 W13 EHL Panel PC Page 91 5 4 2 1 PCI Express Configuration Use the PCI Express Configuration submenu BIOS Menu 25 to configure the PCI Express slots BIOS Menu 25 PCI Express Configuratio...

Страница 93: ...nu BIOS Menu 26 to configure the PCIe Root Port Setting BIOS Menu 26 PCIe Slot Configuration Submenu PCIe Speed Auto Use the PCIe Speed option to specify the PCI Express port speed Configuration optio...

Страница 94: ...e option to configure whether to detect if a non compliance PCI Express device is connected to the PCI Express port Disabled DEFAULT Do not detect if a non compliance PCI Express device is connected t...

Страница 95: ...stalled in the system BIOS Menu 27 SATA Configuration SATA Mode Selection AHCI Use the SATA Mode Selection option to determine how the SATA devices operate AHCI DEFAULT Configures SATA devices as AHCI...

Страница 96: ...he hot pluggable function of the SATA port Enabled Designates the SATA port as hot pluggable 5 4 2 3 HD Audio Configuration Use the HD Audio Configuration menu BIOS Menu 28 to configure the PCH Azalia...

Страница 97: ...sabled The onboard High Definition Audio controller is disabled Enabled DEFAULT The onboard High Definition Audio controller is enabled 5 5 Security Use the Security menu BIOS Menu 30 to set system an...

Страница 98: ...W13 EHL Panel PC Page 97 BIOS Menu 30 Security 2 2 Administrator Password Use the Administrator Password to set or change an administrator password User Password Use the User Password to set or change...

Страница 99: ...1 to configure system boot options BIOS Menu 31 Boot 5 6 1 Boot Configuration Quiet Boot Enabled Use the Quiet Boot BIOS option to select the screen display when the system boots Disabled Normal POST...

Страница 100: ...E Option ROMs 5 6 2 Boot Option Priorities Use the Boot Option N to choose the system boots from the peripherals you selected The following Boot Options are listed as an example Boot Option 1 Sets the...

Страница 101: ...and to save configuration changes BIOS Menu 32 Save Exit Save Changes and Reset Use the Save Changes and Reset option to save the changes made to the BIOS options and reset the system Discard Changes...

Страница 102: ...ult values for each of the parameters on the Setup menus F3 key can be used for this operation Save as User Defaults Use the Save as User Defaults option to save the changes done so far as user defaul...

Страница 103: ...AFL4 W10 W12 12 W13 EHL Panel PC Page 102 6 Connectors Chapter 6...

Страница 104: ...rd comes with a number of peripheral interface connectors and configuration jumpers The connector locations are shown in Figure 6 1 and Figure 6 2 The connector pinouts for these connectors are listed...

Страница 105: ...OS1 EC Debug Port Connector 6 pin wafer EC_DEBUG1 Speaker Connector 2 pin wafer SPK_L1 RFID Connector 4 pin wafer RFID_USB1 Digital MIC Connector 4 pin wafer DMIC1 I C Connector 4 pin wafer I2C1 SMBus...

Страница 106: ...bug Port Connector EC_DEBUG1 PIN NO DESCRIPTION PIN NO DESCRIPTION 1 NC 4 EDICLK 2 EDICS 5 EDIDI 3 EDIDO 6 GND Table 6 4 EC Debug Port Connector EC_DEBUG1 Pinouts 6 2 4 Speaker Connector SPK_L1 PIN NO...

Страница 107: ...DESCRIPTION 1 GND 3 SMB_CLK_LIGHT 2 SMB_DATA_LIGHT 4 5V Table 6 8 I C Connector I2C1 Pinouts 6 2 8 SMBus Connector SMB1 PIN NO DESCRIPTION 1 GND 2 SMB_DATA 3 SMB_CLK 4 5V Table 6 9 SMBus Connector SM...

Страница 108: ...22 NC 23 GND 24 GND 25 NC 26 NC 27 NC 28 NC 29 GND 30 GND 31 NC 32 NC 33 GND 34 NC 35 PETP0 36 GND 37 PETN0 38 NC 39 GND 40 NC 41 PERP0 42 NC 43 PERN0 44 NC 45 GND 46 NC 47 PCIE_CLK 48 NC 49 PCIE_CLK...

Страница 109: ...PTION PIN NO DESCRIPTION 1 GND 2 3 3V 3 GND 4 3 3V 5 PERN3 6 NC 7 PERP3 8 NC 9 GND 10 DAS DSS 11 PETN3 12 3 3V 13 PETP3 14 3 3V 15 GND 16 3 3V 17 PERN2 18 3 3V 19 PERP2 20 NC 21 GND 22 NC 23 PETN2 24...

Страница 110: ...67 NC 68 NC 69 PEDET 70 3 3V 71 GND 72 3 3V 73 GND 74 3 3V 75 GND 3 3V Table 6 12 M 2 M Key Slot M2_M1 Pinouts 6 2 12 M 2 M Key Slot M2_M2 PIN NO DESCRIPTION PIN NO DESCRIPTION 1 GND 2 3 3V 3 GND 4 3...

Страница 111: ...PERST 51 GND 52 CLKREQ 53 PCIECLKN 54 PEWAKE 55 PCIECLKP 56 NC Table 6 13 M 2 M Key Slot M2_M2 Pinouts 6 2 13 eDP Connector EDP1 PIN NO DESCRIPTION PIN NO DESCRIPTION 1 NC 21 VCC_LCD 2 GND 22 NC 3 eDP...

Страница 112: ...1 PIN NO DESCRIPTION PIN NO DESCRIPTION 1 GND 2 GND 3 A0P_L 4 A0M_L 5 A1P_L 6 A1M_L 7 A2P_L 8 A2M_L 9 CLK1P_L 10 CLK1M_L 11 A3P_L 12 A3M_L 13 GND 14 GND 15 A4P_L 16 A4M_L 17 A5P_L 18 A5M_L 19 A6P_L 20...

Страница 113: ...LABEL PWM Power Selection 3 pin header J_PWM1 Backlight Enable Selection 3 pin header J_BL_EN Backlight VCC Selection 3 pin header J_BL_VCC LVDS Power Selection 3 pin header J_VLVDS Flash Mode Header...

Страница 114: ...3 Enabled Table 6 23 Flash Descriptor Security Override 6 4 External Interface Panel Connectors The table below lists the rear panel connectors on the AFL4 W10 W12 12 W13 EHL motherboard Pinouts of t...

Страница 115: ...R RI1 2 Table 6 25 External Serial Port Connector COM1 2 3 4 Pinouts 6 4 2 RJ45 LAN Connector J_LAN1 2 PIN NO DESCRIPTION PIN NO DESCRIPTION R1 GND R7 TRD1P2 R2 TRD1P0 R8 TRD1N2 R3 TRD1N0 R9 TRD1P3 R4...

Страница 116: ...I_GND Table 6 27 HDMI1 Connector HDMI1 Pinouts 6 4 2 USB 2 0 Connectors USB2_CON1 2 3 PIN NO DESCRIPTION 1 5V 2 USB_PN 3 USB_PP 4 GND Table 6 28 USB 2 0 Connectors USB2_CON1 2 3 Pinouts 6 4 3 USB 3 2...

Страница 117: ...W13 EHL Panel PC Page 116 6 4 4 Power Button PWR_SW1 PIN NO DESCRIPTION PIN NO DESCRIPTION 1 3V 2 GND Table 6 30 Power Button PWR_SW1 Pinouts 6 4 5 DC Jack PIN NO DESCRIPTION 1 GND 2 12V Table 6 31 DC...

Страница 118: ...AFL4 W10 W12 12 W13 EHL Panel PC Page 117 Appendix A B Regulatory Compliance...

Страница 119: ...ies and install other devices in the equipment the CE conformity declaration may no longer apply If this equipment has telecommunications functionality it also complies with the requirements of the Ra...

Страница 120: ...con los requisitos esenciales y cualesquiera otras disposiciones aplicables o exigibles de la Directiva 2014 53 EU Greek IEI Integration Corp 2014 53 EU Fran ais French IEI Integration Corp d clare q...

Страница 121: ...es da Directiva 2014 53 EU Rom na Romanian IEI Integration Corp declar c acest echipament este in conformitate cu cerin ele esen iale i cu celelalte prevederi relevante ale Directivei 2014 53 EU Slove...

Страница 122: ...oncentration limits on hazardous materials used in electrical and electronic equipment UKCA WARNING Hereby IEI INTEGRATION CORP declares that the radio equipment type AFL4 W10 EHL AFL4 W12 EHL AFL4 12...

Страница 123: ...armful interference to radio communications Operation of this equipment in a residential area is likely to cause harmful interference in which case the user will be required to correct the interferenc...

Страница 124: ...AFL4 W10 W12 12 W13 EHL Panel PC Page 123 B Safety Precautions Appendix B...

Страница 125: ...prevent the risk of electric shock make sure power cord is unplugged from wall socket To fully disengage the power to the unit please disconnect the power cord from the AC outlet Refer servicing to q...

Страница 126: ...ult in an explosion or the leakage of flammable liquid or gas DO NOT o Drop the device against a hard surface o Strike or exert excessive force onto the LCD panel o Touch any of the LCD panels with a...

Страница 127: ...CAUTION Risk of explosion if battery is replaced by an incorrect type Only certified engineers should replace the on board battery Dispose of used batteries according to instructions and local regulat...

Страница 128: ...ning unplug the power cable immediately and contact your dealer or the nearest service center Always make sure your hands are dry when unplugging the power cable B 2 1 Maintenance and Cleaning Prior t...

Страница 129: ...device Water or rubbing alcohol A cloth moistened with water or rubbing alcohol can be used to clean the device Using solvents The use of solvents is not recommended when cleaning the device as they...

Страница 130: ...AFL4 W10 W12 12 W13 EHL Panel PC Page 129 C Watchdog Timer Appendix C...

Страница 131: ...INT 15H AH 6FH Sub function AL 2 Sets the Watchdog Timer s period BL Time out value Its unit second is dependent on the item Watchdog Timer unit select in CMOS setup Table C 1 AH 6FH Sub function Call...

Страница 132: ...mer is not deactivated the system will automatically restart after the Timer has finished its countdown EXAMPLE PROGRAM INITIAL TIMER PERIOD COUNTER W_LOOP MOV AX 6F02H setting the time out value MOV...

Страница 133: ...AFL4 W10 W12 12 W13 EHL Panel PC Page 132 Appendix D D Hazardous Materials Disclosure...

Страница 134: ...nyls PBB Polybrominated Diphenyl Ethers PBDE Bis 2 ethylhexyl phthalate DEHP Butyl benzyl phthalate BBP Dibutyl phthalate DBP Diisobutyl phthalate DIBP Housing O O O O O O O O O O Printed Circuit Boar...

Страница 135: ...EHL Panel PC Page 134 D 1 2 China RoHS RoHS RoHS Pb Hg Cd CR VI PBB PBDE O O O O O O O O O O O O O O O O O O O O O O O O O O O O O O O O O O O O O O O O O O O SJ T11364 2014 GB T26572 2011 X SJ T11364...

Отзывы: