background image

iMOVE 3pro User Manual

4

2. Setup

2.1 Battery Pack

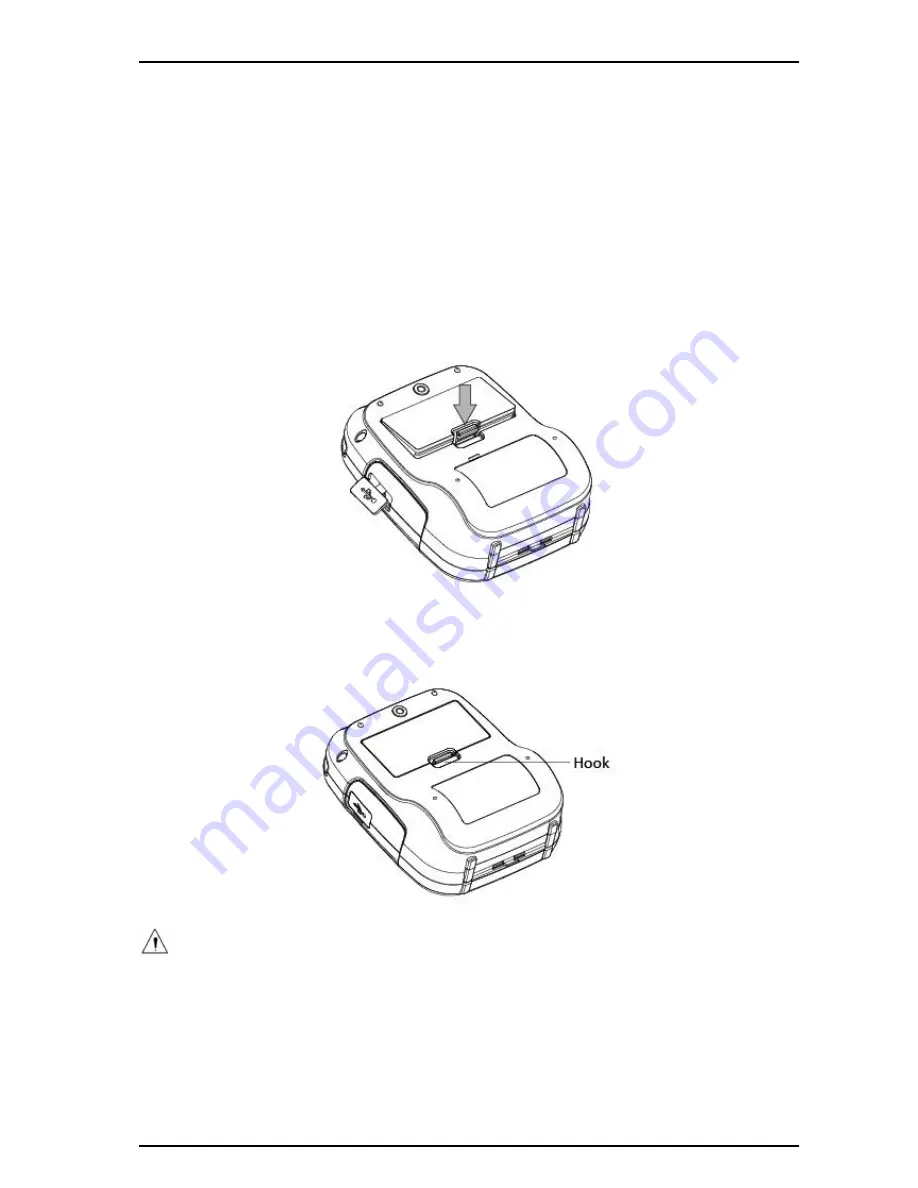
2.1.1 Inserting into the Printer

1. Make sure that the printer has been turned off before you insert or remove the battery pack.
2. Insert the battery pack into the back of the printer as in the figure shown below, following the

direction of the arrow. Press down on the battery pack until the hook click into place.

3. To remove the battery back, pull back the hook, and use the opposite procedure from the one you

used to insert the battery pack.

NOTES:

This printer can only use the company's original equipment or approved special battery, otherwise, it may
cause damage to the product, battery leakage, fire or explosion.

Содержание iMOVE 3Pro

Страница 1: ...Mobile Printer iMOVE 3pro USER MANUAL Rev 1 0 ...

Страница 2: ...rinter could result in a fire Never attempt to repair the printer yourself Also do not disassemble or modify the product Doing so could lead to injury fire or electric shock Do not touch the tear bar There is a tear bar inside the paper outlet slot Neither put your hand in the paper outlet slot while printing is in progress or put your hand into the outlet even when printing is not in progress The...

Страница 3: ... Printing quality may suffer if the thermal head heating element becomes soiled by being touched with your hands Do not touch the thermal head heating element There is a risk of damage to the driver IC of the thermal head from static electricity Never directly touch the IC Do not operate the printer if there is moisture on the front surface of the head from condensation etc Thermal Paper Handling ...

Страница 4: ...ice that produces a strong electromagnetic field Keep the printer sufficiently removed from heaters and other sources of heat Use the printer in a clean low humidity environment that is free from dust Avoid using the printer in high humidity rooms Printer Maintenance Please perform the following maintenance every 6 months Thermal head Dip a cotton swab in an alcohol solvent ethanol methanol or iso...

Страница 5: ...3 1 1 Button 18 3 1 2 Panel Lamp 19 3 1 3 LCD Indication 19 3 1 4 Buzzer Description 20 3 2 Self Test 21 3 3 Instruction for Standby Sleep Mode 21 4 General Specification 22 5 Detailed Specification 24 6 Interface 25 6 1 USB for Battery Charge 25 6 2 Bluetooth 26 7 Specifications of Accessories 27 7 1 Battery Pack 27 7 2 Belt Clip 27 8 Troubleshooting Procedure 28 8 1 Troubleshooting Guide 29 8 1 ...

Страница 6: ...rts the following firmware version Firmware Version Ver 1 0 Refer to the appropriate manual which supports the firmware version of you printer The firmware version can be confirmed by the self test Refer to 3 2 Self test ...

Страница 7: ...d mobile 630g including Battery pack Very silent printing thru direct thermal printing method Print speed 60mm s Support Bluetooth Ver3 0 4 0 BLE Dual Mode Belt Clip as a standard accessory Support text and graphic printing Drop in design that makes it easy to load paper A printer cover that can be opened with the touch of a button Printer cover open sensor Paper out sensor Black mark sensor Volta...

Страница 8: ...inter is packaged with the following accessories If any of these accessories is broken or missing please contact the dealer that you bought the product Note 1 The AC adapter vary by local or region 2 The packing materials are actually dependent on the order ...

Страница 9: ...iMOVE 3pro User Manual 3 1 2 Appearance and Components ...

Страница 10: ...er as in the figure shown below following the direction of the arrow Press down on the battery pack until the hook click into place 3 To remove the battery back pull back the hook and use the opposite procedure from the one you used to insert the battery pack NOTES This printer can only use the company s original equipment or approved special battery otherwise it may cause damage to the product ba...

Страница 11: ...ed turn off the printer and let the battery charge until the POWER lamp goes off for fully charge Notes about the Battery Pack General Battery Characteristics The battery is a consumable and its performance over time gradually decreases While not in use the battery will slowly discharge itself Prepare a battery pack that has been charged relatively recently 1 to 2 days earlier To ensure that the b...

Страница 12: ...use a USB cable other than the designated USB cable Do not throw the battery into a fire place it near a flame or heating device or leave it in a hot environment under direct sunlight in a car etc Do not use a battery pack that has been dropped or subjected to a shock in some other way Do not disassemble or modify the battery pack Do not short the terminals of the battery pack or get it wet Do not...

Страница 13: ...andating the disposal method of the country in which this device is used If battery pack is not in use for a long time please remove it after fully charged And it should be recharged every 3 months When power is low battery should be charged in time If the printer automatically power down because of low power be sure to charge the battery in 15 days Otherwise it will cause permanent damage to the ...

Страница 14: ...efault XXXXX is the last digits of the Product Serial Number Notes 1 iMOVE 3pro has two Bluetooth modes a One is Bluetooth Ver3 0 with PIN for Android or Windows system PIN and Device name can be changed through Star Utility To obtain this utility please contact with your dealer b Another is Bluetooth 4 0 BLE without PIN for iOS system 2 iMOVE 3pro changes the Bluetooth mode automatically by host ...

Страница 15: ...iMOVE 3pro User Manual 9 2 3 Loading Paper 1 Press the cover open button to open the paper cover 2 Load the roll paper in the orientation shown in the figure below ...

Страница 16: ...s 4 Use the tear bar to cut the extra paper CAUTION When ERROR lamp is flashing please make sure the cover is closed correctly If it s not open the cover and close it correctly When the paper is jammed be sure to open the printer cover before removing the jammed paper Do not under any circumstances try to pull out the jammed paper forcefully while the printer cover is closed doing so may damage pa...

Страница 17: ...h the tear bar There is a tear bar inside the paper outlet slot You could neither put your hand in the paper outlet slot while printing is in progress nor put your hand into the outlet even when printing is not in progress The paper cover can be opened when replacing the paper be careful not to place your face or hands too close to the tear bar 2 During and immediately after printing the area arou...

Страница 18: ...nter Menu Mode then you can configure the settings 3 To switch the Menu and option parameter or return to the previous menu press MODE button 4 To move the cursor _ entry the printer mode or confirm the new setting press FEED button CAUTION Before changing the menu setting make sure that the communication with a host device is disconnected When the printer is under the Bluetooth communication with...

Страница 19: ...nu Mode in the LCD Press the MODE button once to switch the menu item Display 1 Self Test 2 System Setting Press the FEED button to get into the menu Display 1 Density 2 Standby Time 3 Auto Off Time 4 Paper Type 5 Set Language 6 Factory Reset 7 Previous Menu You can press MODE button to switch the menu item press the FEED button once to enter the menu Press the FEED button once to get into the Den...

Страница 20: ... 0060 Sec 0080 Sec When set the parameter to 0000 the standby time becomes invalid If set the parameter to 0001 0009 it will return to the previous setting so do not set it Press the MODE button twice to switch the menu item Auto Off Time Press the FEED button once to get into the menu Display Auto Off Time 0000 9999 Min 0120 Press the MODE button once to input the number on 1 then press and hold ...

Страница 21: ...the menu Display 0 Cancel 1 Factory Reset 0 When the setting does not need to be reset press and hold FEED button to return to the previous menu Press the MODE button 6 times to switch the menu item Previous Menu Press the FEED button once to return to the previous menu Display 1 Self Test 2 System Setting 3 Exit Menu Press the FEED button once to enter the menu item Self Test Display 1 Print 2 Ca...

Страница 22: ...ate 3 Hex Dump Mode Hex Dump Mode 4 Previous Menu 2 System Setting 1 Density 0 Medium 1 Low 2 High 3 Special Medium 2 Standby Time Standby Time 0010 9999 Sec 60 Sec 3 Power Off Time Auto Off Time 0000 9999 Min 120 Min 4 Paper Type 0 Receipt 1 BM 3inch 2 BM 2inch 3 BM Center 4 Label 4 Label 5 Language 0 EN 1 CH 0 6 Factory Reset 0 Cancel 1 Factory Reset Cancel 7 Previous Menu 3 Exit Menu ...

Страница 23: ...elt clip in the right orientation then screw the screw that comes with the belt clip into the designated screw hole to attach the belt clip to the printer 2 Use a coin to firmly screw in the screw 2 5 2 Using the Belt Clip When the printer is attached to your belt you can use it like the picture below Note Be careful not to drop when use a belt clip Velcro be securely fixed ...

Страница 24: ...ut the printer into Menu Setting mode The MODE button can now be used to change Printer MODE status visible on the LCD screen for fast configuration Refer to 2 4 Memory Switch Settings for details about mode conversion 2 FEED Button When the printer is on paper can be fed manually by pressing and holding the FEED button for more than one second In Menu Setting mode the FEED button can be used to m...

Страница 25: ...nter status Content Mode Status Indicates the currently specified printer mode or error status Remaining battery power There is sufficient remaining battery power The remaining battery power is low Please charge the battery pack Flashing The remaining battery power is extremely low Stop using the printer immediately and charge the battery pack Note If you continue printing at the low remaining bat...

Страница 26: ...l 20 Paper type Receipt Black mark Front Black mark Back Out of paper 3 1 4 Buzzer Description Buzzer Status No ring Low battery Once Begin charging Press button Cover close Twice Paper out Cover open Three USB disconnected ...

Страница 27: ...lf test will finish automatically The printer will be ready to receive data after the self test finishes Note Please subject to the catual self test page this self test page is only for reference 3 3 Instruction for Standby Sleep Mode The printer in the Standby Sleep Mode will recover to the Print Ready Mode when receiving print data or button operations Press the FEED button or the MODE button an...

Страница 28: ... Temperature detection Label gap detection Power Output 5V 1A Battery 2000mAh 7 4V rechargeable Li ion battery Paper Paper type Thermal paper or Label paper Paper width 55mm to 80mm at center basis 2mm pitch Paper thickness 0 053mm X 0 15mm Roll paper diameter Ø55mm Recommended paper Thermal paper P220AG PD450 FD200 Alpha 400 2 1 Label paper RICHO 150PSMW UPM DT80W Physical characteristics Operati...

Страница 29: ...uence the printing quality and decrease the thermal print head life Please use at a room temperature if you want to set the print density to Special Some types of the paper are not suitable for use in low temperature environment Dimensions External Dimension 150mm W x 70mm D x 120mm H Weight 630g including battery pack ...

Страница 30: ... 24 5 Detailed Specification Item Specification Hardware specification MCU 32bits RISC FLASH 256K bytes RAM 48K Bytes Bluetooth highest frequencies 2 4 GHz Bluetooth module basic clocking 26MHz Bluetooth output 2 34mW 3 7dBm ...

Страница 31: ...attery Charge iMOVE 3pro printer has a USB interface for Battery charging and is connected by means of 5pin micro USB socket In the following table the signals present on the micro USB socket are listed Pin No SIGNAL 1 VBUS 2 D 3 D 4 NC 5 GND USB cable ...

Страница 32: ...4 0 BLE Dual Mode Frequency Range 2 4GHz ISM band Data Transmission Rate 115200bps adjustable Data Bit 8 data bit fixed Parity Bit No parity fixed Stop Bit 1 stop bit fixed SSP Compatible PIN code 1234 as default Device Name iMOVE 3pro XXXXX XXXXX is the last 5 digits of the Product Serial Number ...

Страница 33: ...iMOVE 3pro User Manual 27 7 Specifications of Accessories 7 1 Battery Pack 7 4V 2000mAh Rechargeable Lithium ion Safety Approvals PSE 7 2 Belt Clip ...

Страница 34: ...ke all the corresponding items into consideration This allows you to specify a hidden defective part Cause Lists as many possible causes as possible Guess a trouble cause out of them and take its check method to specify the trouble cause Check Method Describes a check method to specify a trouble cause Remedy Troubleshoot by taking a remedy described in this column By troubleshooting in accordance ...

Страница 35: ...f the thermal head connector Check connection of the thermal head connector Connect the thermal head cable to connector properly Printer cover one side close Close printer cover correctly Faulty thermal head Replace the Mechanism Unit Faint printout or uneven printout Level of battery voltage is low Check the battery lamp on the LCD Charge the battery Printer cover one side close Close printer cov...

Страница 36: ...ed or feed irregularly The printer cover is not closed properly Close the printer cover properly Faulty connection of the motor connector Check connection of the motor connector Connect the motor cable to connector correctly Defective motor Replace the Mechanism Unit Battery voltage drop Check the battery display of the LCD Charge the battery Faulty Main Logic Board Unit Replace the Main Logic Boa...

Страница 37: ... the LCD Message Description of failure message Remark Cover Open Printer cover is not closed properly Close printer cover properly Out of Paper Empty paper Replace the roll paper High Temperature Thermal Head is overheat Is recovered with the automatic which comes to be cool ...

Отзывы: