background image

Removing the chassis cover

iDOT Explora User’s Handbook

18

Installing and Upgrading iDOT Explora Hardware

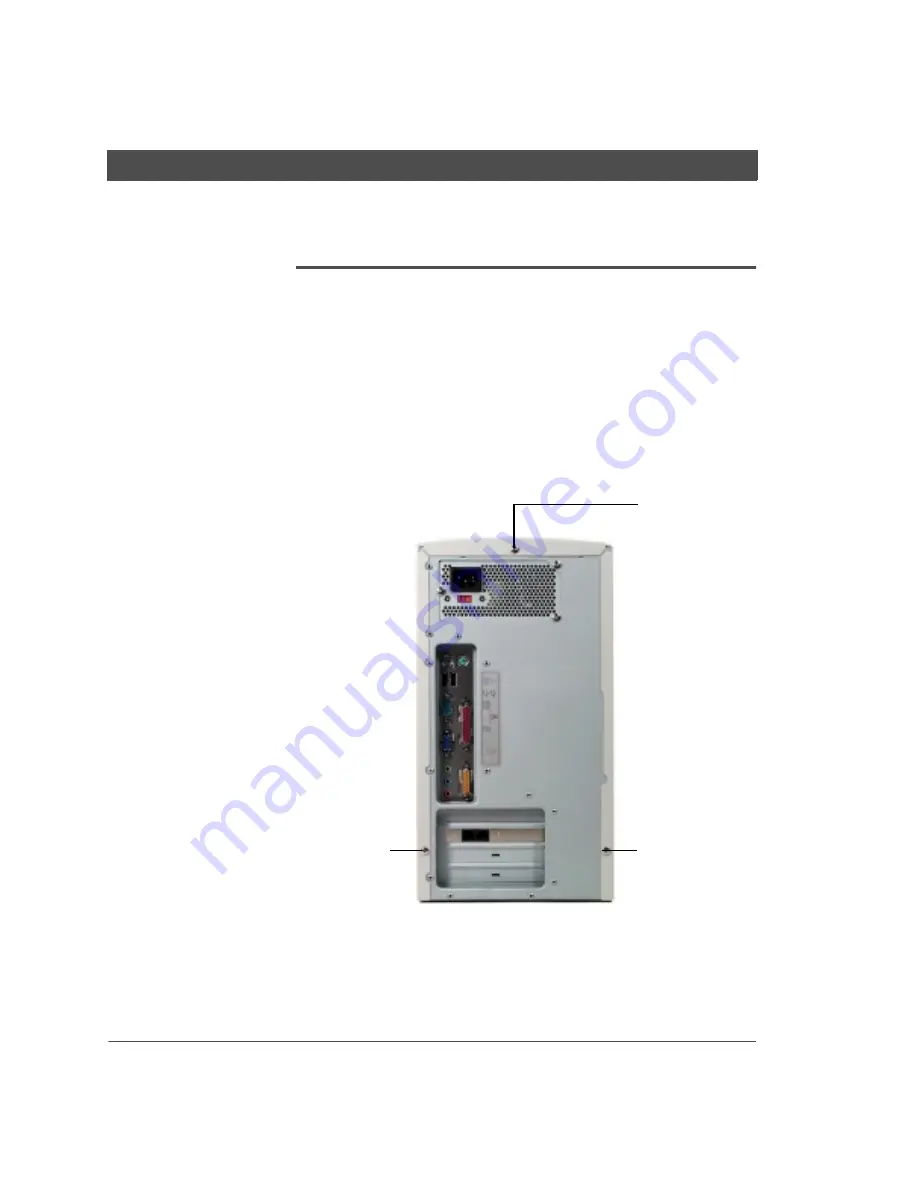
Removing the chassis cover

1.

Shut down the computer and all peripheral devices connected to 
the computer. 

2.

Disconnect the keyboard, mouse, and any other peripheral 
devices connected to the computer. 

3.

Disconnect the power cord from the back of the computer.

4.

On the back of the computer, remove the three chassis cover 
screws.

chassis cover
screw

chassis cover
screw

chassis cover

screw

Содержание Explora

Страница 1: ......

Страница 2: ...ications However there is no guarantee that interference will not occur in a particular installation If this equipment does cause harmful interference to radio or television reception which can be det...

Страница 3: ...p quickstart 7 Completing iDOT Explora setup 8 Protecting your iDOT Explora system 10 Troubleshooting setup problems 11 Turning on the computer 13 Turning off the computer 14 Installing and Upgrading...

Страница 4: ...iDOT Explora User s Handbook 4 Contents Using the Recovery CD 25 Reformatting the hard drive and reinstalling software 26...

Страница 5: ...keyboard power cable speaker cable if you ordered speakers phone cord for modem monitor if you ordered a monitor Recovery CD Microsoft Windows 98 documentation and Software Certificate of Authenticit...

Страница 6: ...available for your iDOT Explora system see the iDOT com Web site www idot com Contacting iDOT com For the most up to date information about your iDOT Explora system and for sales or technical support...

Страница 7: ...phone wall jack unplug the phone from the wall jack and plug it into the modem TELEPHONE jack Connect the modem cable to the PHONE LINE jack Connect the other end to the telephone wall jack 9 If you h...

Страница 8: ...Setting Up Your iDOT Explora System Completing iDOT Explora setup computer power on off button CD ROM drive tray CD ROM tray open close button floppy disk drive door floppy disk eject button power ind...

Страница 9: ...ine problems are not covered by your iDOT com warranty 2 If your system includes a printer turn on the printer 3 Turn on the monitor 4 If your system includes speakers turn on the speakers The speaker...

Страница 10: ...oduct ID number the first time you run Windows 98 or after re installing Windows 98 Protecting your iDOT Explora system When you set up your system keep these important points in mind to protect the s...

Страница 11: ...is plugged securely into the video port on the back of the computer See page 7 Adjust the monitor s Brightness and Contrast by using the controls located on the front of the monitor My mouse and or k...

Страница 12: ...reconnect the modem cable to the telephone wall jack and to the modem s Phone Line jack see page 7 making sure the cable is securely plugged into both jacks If this still doesn t work try using a diff...

Страница 13: ...ach time you turn on the computer 1 Turn on the printer if your system includes a printer 2 Turn on the monitor 3 Turn on the computer as follows a Make sure no diskettes or CDs are in the computer b...

Страница 14: ...the computer 1 Click the Windows Start button located in the lower left corner of the screen on the Windows taskbar 2 Place the cursor over the Shut Down option to select it then click the left mouse...

Страница 15: ...ortunity to save any of that application s files you haven t yet saved The computer then shuts down and the green power indicator light goes out Note If the computer does not shut down after you ve pe...

Страница 16: ...iDOT Explora User s Handbook 16...

Страница 17: ...ody Before you handle computer components or install any upgrades touch a metal part of the computer s chassis When you work with components or upgrades touch the chassis frequently to eliminate stati...

Страница 18: ...the computer and all peripheral devices connected to the computer 2 Disconnect the keyboard mouse and any other peripheral devices connected to the computer 3 Disconnect the power cord from the back...

Страница 19: ...iDOT Explora User s Handbook Removing the chassis cover Installing and Upgrading iDOT Explora Hardware 19 5 Slide the chassis cover back and pull it up and off the chassis...

Страница 20: ...static electricity precautions See the warnings on page 17 1 Remove the chassis cover as described in Removing the chassis cover on page 18 2 Select an empty expansion slot 3 Remove the expansion slot...

Страница 21: ...dge connector with the expansion slot 5 Push the card firmly into the slot by pushing down on one end of the card then the other Use this rocking motion until the card is firmly seated in the slot 6 S...

Страница 22: ...can install SDRAM modules in any DIMM bank in any combination no memory configuration table is necessary The iDOT Explora uses one of two motherboard designs depending on what processor you ordered wi...

Страница 23: ...iDOT Explora User s Handbook Installing and removing RAM Installing and Upgrading iDOT Explora Hardware 23 motherboard for Intel Celeron processor...

Страница 24: ...serve static electricity precautions See the warnings on page 17 1 Locate the DIMM slots on the mainboard See page 22 2 Use both hands to press the DIMM straight down into the DIMM socket 3 When the D...

Страница 25: ...stalled any additional applications such as word processors games or drivers for equipment such as scanners or printers you must reinstall them individually from the original CDs or diskettes Using th...

Страница 26: ...the system turns off Release the button 4 Restart the computer by pressing the power on off button on the front of the computer The CD ROM drawer closes and the computer boots up from the Restore CD...

Страница 27: ...detects the drivers for the original iDOT com hardware Windows 98 prompts you to install drivers for any third party hardware you may have added to the system If you ve installed any third party hardw...

Страница 28: ...iDOT Explora User s Handbook 28...

Отзывы: