background image

7

Network Camera

Подсоедините внешние устройства, сетевой 
кабель и блок питания.

Отрегулируйте угол. Подробнее см. раздел 

Регулирование угла

.

DC-D4213WRX

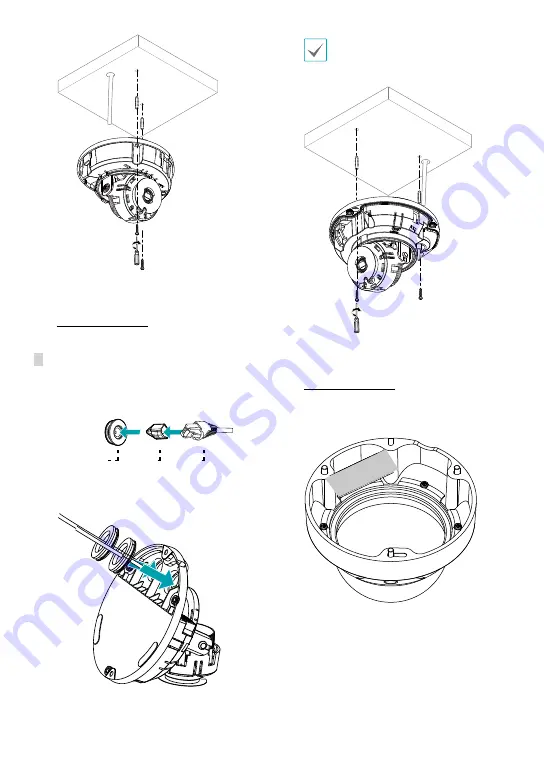
Протяните сетевой кабель через кабельную 
резину с помощью защитного провода из 
комплекта поставки.

Кабельная 
резина

Защитный 
соединительный провод

Кабель

Прикрепите кабельную резину к нижней крышке. 

Закрепите заднюю крышку на стене или 
потолке с помощью винтов и дюбелей, которые 
поставляются вместе с камерой.

Используйте поставляемый шаблон для 
ориентира, чтобы проверить расстояние 
между отверстиями под винты.


Подсоедините внешние устройства, сетевой 
кабель и блок питания.

Отрегулируйте угол. Подробнее см. раздел 

Регулирование угла

.

Закрепите прилагаемый осушитель в указанном 
месте внутри купольной крышки с помощью 
двустороннего скотча, как показано ниже.

Содержание DC-D4213WRX

Страница 1: ...Network Camera Quick Guide Powered by DC D4213RX DC D4213WRX...

Страница 2: ...urges If thunder or lightning is common where the equipment is installed use a surge protection device 10 Overloading Do not overload wall outlets and extension cords as this can result in the risk of...

Страница 3: ...ecycle it responsibly to promote the sustainable reuse of material resources Household users should contact either the retailer where they purchased this product or their local government office for d...

Страница 4: ...ch Desiccant Allen wrench protect connector and desiccant are included with DC D4213WRX model only Please download software IDIS Discovery IDIS Center IDIS Solution Suite Compact and product manual fr...

Страница 5: ...6 8 7 9 0 DC D4213WRX 2 1 4 5 6 8 7 9 0 1 IR LED 7 SD Memory Card Slot 2 Lens 8 Cable Access Hole 3 Built in Microphone 9 Alarm I O Audio I O 4 Factory Reset Button 0 Wall Ceiling Installation Hole 5...

Страница 6: ...ting a SD Memory Card Insert a SD memory card into the SD memory card slot with the microSD printed facing upward m ic r o S D Push the SD memory card until it disengages from the slot and then pull i...

Страница 7: ...2 Assemble the cable rubber to the bottom cover 3 Use the screws anchor provided with the camera to secure the bottom cover on a wall or a ceiling Use the provided guide pattern to check the distance...

Страница 8: ...cover Turn the dome cover clockwise to fasten the dome cover DC D4213WRX Fasten the screws for the dome cover clockwise using the Allen wrench provided with the camera Remove the protective film outsi...

Страница 9: ...D4213RX 0 C 50 C 32 F 122 F DC D4213WRX 0 C 55 C 32 F 131 F Operating Humidity 0 90 Power Source PoE IEEE 802 3af Class 2 Power Consumption Max 4 8W Approval FCC CE External Dimensions x H DC D4213RX...

Страница 10: ...DC D4213RX DC D4213WRX...

Страница 11: ...2 Quick Guide 1 2 3 4 5 6 7 8 TNT 9 10 11 12 13 A B C D E F 14 15 16 17 Tmra...

Страница 12: ...3 Network Camera FCC 15 FCC IEC 60417 5031 2019 IDIS Co Ltd IDIS Ltd IDIS Ltd IDIS IDIS Ltd OpenSSL OpenSSL http www openssl org eay cryptsoft com...

Страница 13: ...DC D4213RX DC D4213WRX 2 DC D4213WRX IDIS Discovery IDIS Center IDIS Solution Suite Compact https www idisglobal com support csdownload IDIS www idisglobal com IDIS Discovery IDIS Center IDIS Solution...

Страница 14: ...5 Network Camera DC D4213RX 2 1 3 4 5 6 8 7 9 0 DC D4213WRX 2 1 4 5 6 8 7 9 0 1 7 SD 2 8 3 9 4 0 5 6...

Страница 15: ...6 Quick Guide DC D4213RX 1 2 DC D4213WRX 1 2 SD SD micro SD m ic r o S D SD microSD Logo SD 3C LLC DC D4213RX 1...

Страница 16: ...7 Network Camera 2 3 DC D4213WRX 1 2 3 4 5 6...

Страница 17: ...8 Quick Guide DC D4213RX DC D4213WRX 2 3 1 1 3 2...

Страница 18: ...C 50 C 32 F 122 F DC D4213WRX 0 C 55 C 32 F 131 F 0 90 PoE IEEE 802 3af 2 4 8 FCC CE x DC D4213RX 110 x 88 4 33 x 3 46 DC D4213WRX 120 x 92 9 4 72 x 3 65 DC D4213RX 0 25 0 55 DC D4213WRX 0 46 1 01 IDI...

Страница 19: ...IDIS Co Ltd For more information please visit www idisglobal com...

Отзывы: