Idis DC-D Series Скачать руководство пользователя страница 11

Part 1 – Introduction

11

Factory Reset

Only use the factory reset button to restore the camera 
to its factory default settings.

A factory reset will clear all camera settings configured 
by the user.

 Shut off the power supply.

 Remove the dome cover.

 Press and hold the reset button down

 Hold the button down and apply the power.

 Once the device turns back on, wait 5 seconds and 
then release the reset button.

 The device will go through the resetting process and 
reboot. All camera settings will be restored to their 
factory defaults after the reboot. 

It's also possible to do a factory reset by pressing and 
releasing the reset button while the camera is turned 
on or using the IDIS Discovery program from a remote 
location. A factory reset will reboot the system. For more 
information on factory reset, refer to the 

IDIS Discovery 

operation manual

Installation

Installation of this product does not require the use of 
special tools. 
For more information on other devices comprising the 
overall system, refer to their respective 

installation 

manuals

.

Product color and design may vary depending on the 
model.

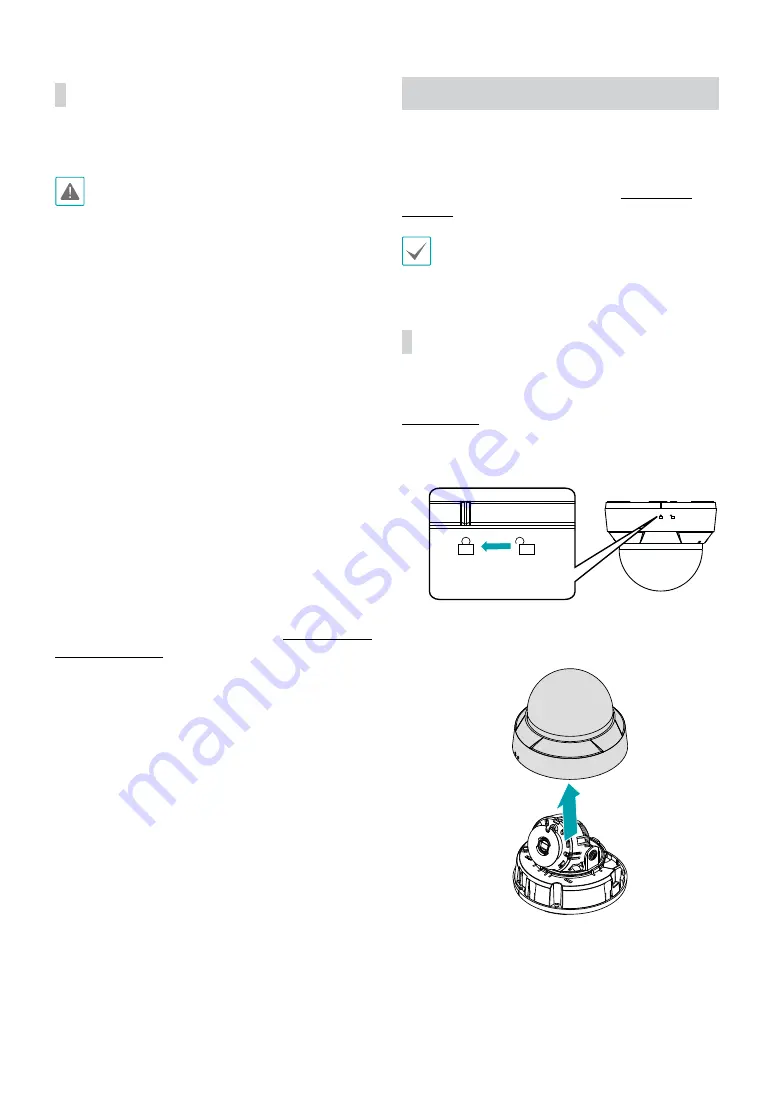
Removing the Dome Cover

DC-D4513RX

 Turn the dome cover counterclockwise.

 Remove the dome cover.

Содержание DC-D Series

Страница 1: ...Powered by DC D Series Installation Manual DC D4513RX DC D4513WRX...

Страница 2: ...h explanation about some functions may not be incorporated The manufacturer is not responsible for any problems resulting from the use thereof The information contained herein is subject to change wit...

Страница 3: ...ng storm or when it is left unattended and unused for long periods of time unplug it from the wall outlet and disconnect the antenna or cable system This will prevent damage to the equipment due to li...

Страница 4: ...from other types of wastes and recycle it responsibly to promote the sustainable reuse of material resources Household users should contact either the retailer where they purchased this product or th...

Страница 5: ...ory Reset 11 Installation 11 Removing the Dome Cover 11 Inserting a SD Memory Card 12 Installation 12 Angle Adjustment 14 Closing the Dome Cover 14 Dimension 15 Part 2 Camera Connection 17 With Direct...

Страница 6: ...b browser or remote software Automatic web casting code HTML generation Up to 10 simultaneous remote monitoring connections IP filtering HTTPS SSL IEEE 802 1X and configurable user authority levels fo...

Страница 7: ...ncluded External appearances and colors of the accessories may vary depending on the model DC D4513RX DC D4513WRX Guide Pattern Network Camera Quick Guide Screws and Anchors each 2 ea Protect Connecto...

Страница 8: ...Part 1 Introduction 8 Overview Product color and design may vary depending on the model Dome Cover DC D4513RX DC D4513WRX Body DC D4513RX 2 1 3 4 5 6 8 7 9 0...

Страница 9: ...s operation manual You can configure manage and upgrade this camera and monitor its images from a remote computer over the network For more information on network connection setup refer to the IDIS D...

Страница 10: ...al inductive load e g relay a diode must be connected in parallel with the load for protection Otherwise the product could be damaged I In Connect an alarm in device to this port Mechanism Choose betw...

Страница 11: ...restored to their factory defaults after the reboot It s also possible to do a factory reset by pressing and releasing the reset button while the camera is turned on or using the IDIS Discovery progra...

Страница 12: ...ages from the slot and then pull it out Installation Check the wall or ceiling to see if it needs to be reinforced The camera may fall off if the wall or ceiling is not strong enough to support its we...

Страница 13: ...gh the cable rubber using the protective connector provided Cable rubber Cable Protect connector 2 Assemble the cable rubber to the bottom cover 3 Use the screws anchors provided with the camera to se...

Страница 14: ...on 2 Vertical Rotation Lens Rotation Used to adjust the lens rotation angle Turn the rotator in clockwise or counterclockwise direction Vertical Rotation Used to adjust the lens vertical angle Turn th...

Страница 15: ...Part 1 Introduction 15 DC D4513WRX Fasten the screws for the dome cover clockwise using the Allen wrench provided with the camera Remove the protective film outside Dimension DC D4513RX 110mm 88mm...

Страница 16: ...Part 1 Introduction 16 DC D4513WRX 120mm 92 9mm...

Страница 17: ...rk Alarm Out Alarm In Audio In Audio Out DirectIP NVR makes it easy to use cameras without extra network configurations Each camera can be controlled via the DirectIP NVR setup menu without any PC For...

Страница 18: ...ite Compact microSD Memory Card Audio Out Audio In Alarm In Alarm Out Control the camera over the network from software installed on a computer Ideal for using the camera over the network from a remot...

Страница 19: ...picking up an overly bright light source adjust the camera s position angle accordingly Video color appears incorrect Check the white balance settings If using the Auto option it may take some time f...

Страница 20: ...Speed Auto Manual 1 30 1 8 000 Anti Flicker Slow Shutter 1 1 5 1 7 5 1 15 Day Night IR cut filter with auto switch IR Distance LEDs DC D4513RX 2 8mm 30m 4ea DC D4513RX 4 0mm 20m 2ea DC D4513WRX 30m 4e...

Страница 21: ...In 1 TTL NC NO Programmable 4 3V NC or 0 3V NO threshold 5V DC Alarm Out 1 TTL open collector Max load 30mA Max voltage 5VDC General Operating Temperature DC D4513RX 10 C 50 C 14 F 122 F DC D4513WRX 3...

Страница 22: ...IDIS Co Ltd For more information please visit at www idisglobal com...

Отзывы: