Idis AR-2104 Скачать руководство пользователя страница 12

12

English

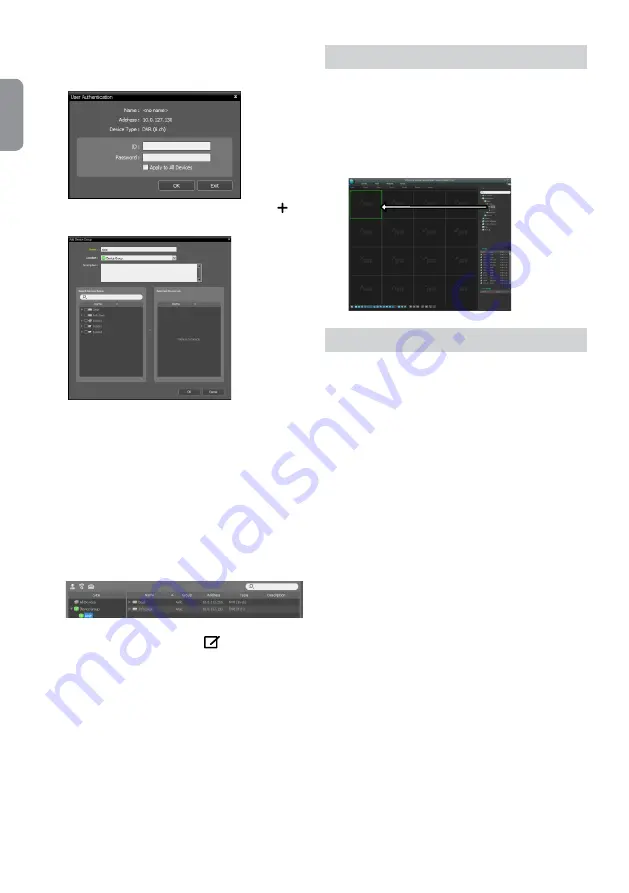
When user authentication window appears, enter the 

User ID and Password set up on each device, and then 

select OK for remote access.

Click 

Device Group

 on the 

Sites

 panel and click 

E

 at 

the bottom. 

Add Device Group

 window will appear.


Name

: Enter a name for the device group.


Location

: Select an location for the subject device 

group.

When you select a device from the device List on the 
left, it will be added to the 

Selected Device List

 on 

the right. Click 

OK

 to register the device group.

Make sure that the device has been added to the 

device group correctly. Click 

Device Group

 on the 

Sites

 panel and click on  next to 

Device Group

. When 

you click on a registered device group, a list of devices 

added the selected device group will be displayed on 

the right.

To modify a device group that has been registered, 
select a device group and click 

E

 on the bottom of 

the 

Sites

 panel. 

Modify Device Group

 window will 

appear. You can modify the selected device group 
from this window.

Live Video Mode

In the Site List, make sure that the device has been 
added to the device group.

In the panel tabs, click the 

Live

 tab. In the 

Site

 list, 

select a zone you wish to connect to. Then, drag & 

drop the selected site on the Live screen using your 

mouse. The live video of the selected site will be 

displayed on the screen. 

Recorded Video Playback

In the 

Site

 List, make sure that the device has been 

added to the device group.

In the panel tabs, click on the 

Play

 tab. In the 

Site

 list, 

select a site you wish to connect to. Then, drag & drop 
the selected site on the playback screen using your 
mouse. The recorded video of the selected site will be 
displayed on the screen. 

Содержание AR-2104

Страница 1: ...AR 2104 AR 2108 Digital Video Recorder Quick Guide...

Страница 2: ...g this equipment from the wall outlet and refer servicing to qualified service personnel under the following conditions A When the power supply cord or the plug has been damaged B If liquid is spilled...

Страница 3: ...SMEETSALLREQUIREMENTSOFTHECANADIANINTERFERENCECAUSINGEQUIPMENT REGULATIONS WEEE WasteElectrical ElectronicEquipment Correct Disposal of This Product Applicable in the European Union and other European...

Страница 4: ...nel 1 1 2 3 4 5 6 7 8 1 Camera Buttons 2 Arrow and Playback Control Buttons 3 LEDs 4 Menu Button 5 PTZ ZOOM Button 6 Panic Recording Button 7 Search Mode Button 8 USB Ports For more details on front p...

Страница 5: ...5 English Connections on the Rear Panel Microphone Speaker VGA Monitor HDMI Monitor Sensor Keyboard Power Alarm POS IDIS Center Remote Monitoring Analog Camera Network Sensor...

Страница 6: ...press the Setup button on the remote control or click on Log in using the mouse 2 Select a user enter the password and then select OK If you do not know the password click the button for guidance Ther...

Страница 7: ...Method Setup Record Video Quality Setup Higher recording quality uses up more disk space Finish the Quick Setup Wizard Network Setup Wizard After exiting from Quick Wizard you can click Go to Network...

Страница 8: ...Panic Recording icon or press the Panic Recording button again If the Panic Recording Time option under Record Setup General has been configured Panic Recording will automatically terminate after the...

Страница 9: ...er the following information in the address bar http IP Address Port Number DVR system s IP address and IDIS Web port number configured under Network General Default Value 12088 Or http fen idisglobal...

Страница 10: ...ver 1 Please enter the software installation CD into the PC 2 Browse to the Setup folder in the CD and run setup exe On Microsoft Windows Vista or User Account Control window may pop up Click Allow an...

Страница 11: ...er ID is admin without a password You can change User ID and Password in the User menu Device Registration To use the functions provided by IDIS Center you must first register a device and add the dev...

Страница 12: ...ce group will be displayed on the right To modify a device group that has been registered select a device group and click E on the bottom of the Sites panel Modify Device Group window will appear You...

Страница 13: ...contact your FEN server administrator Address Monitoring Port Search Port Audio Port Enter the FEN name used to register the device to FEN If FEN feature is not enabled on the device deselect FEN chec...

Страница 14: ...960H Basic Quality 4 ch Model Playback Speed IPS Full Duplex 240ips NTSC 200ips PAL CIF 8 ch Model 120ips NTSC 100ips PAL D1 4 ch Model Maximum recording speed will decrease about 30 with Standard or...

Страница 15: ...IDIS Co Ltd For more information please visit at www idisglobal com...

Отзывы: