•
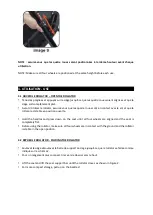
Do not sit down when the rollator is on an inclined or uneven surface.
•
Do not exceed the maximum weight
•
This rollator is not a wheelchair. It is not designed to carry a person sitting in it. Doing so could
damage the wheels and structure of the rollator. The rollator could be weakened and no longer
meet its mechanical characteristics in future use.
4.7 UTILISATION DES FREINS - USE OF BRAKES
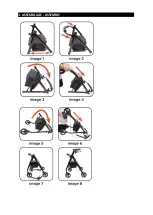
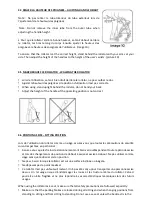
Pour ralentir, tirez vers le haut les deux poignées.
Pour activer les freins de stationnement (verrouillage), poussez fermement vers le bas les deux
poignées jusqu'à ce qu'elles s'enclenchent. Un clic distinct indique que les freins sont verrouillés. Tirer
vers le haut les deux poignées pour libérer les freins de stationnement (déverrouillage).
To slow down, pull up on both handles.
To activate the parking brakes (lock), push both handles firmly down until they engage. A distinct click
indicates that the brakes are locked. Pull up on both handles to release the parking brakes (unlock).
4.8
REGLAGE DE FREINS
–
BRAKE ADJUSTMENT
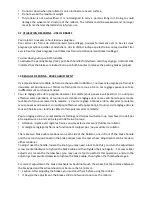
Il y a deux tendeurs de câble de frein de chaque côté du Rollator, l'un devant la poignée de frein et le
deuxième est positionné sur l’étrier de frein près de la roue arrière. Les réglages peuvent se faire
indifféremment sur chaque tendeur.
•
Pour le réglage près de la poignée, desserrer la molette (vous pouvez avoir besoin d 'un outil pour
effectuer cette opération), et tourner la vis crantée de réglage dans le sens anti-horaire pour tendre
le câble de frein puis resserrer la molette.
•
Pour le réglage à l’étrier arrière, desserrer la molette,
(vous pouvez avoir besoin d 'un outil pour effectuer cette opération), et tourner vis de réglage dans le
sens antihoraire pour tendre le câble de frein puis resserrer la molette.
Pour un réglage correct, le mécanisme de freinage ne doit pas toucher la roue, mais l'écart ne doit pas
être supérieur à 3 à 4mm entre le patin de frein et la roue.
•
Attention : Après avoir réglé les freins, vous devez les tester avant d'utiliser le rollator.
•
Si malgré le réglage les freins ne fonctionnent toujours pas ; ne pas utiliser le rollator.
There are two brake cable tensioners on each side of the Rollator, one in front of the brake handle
and the second is positioned on the brake caliper near the rear wheel. Adjustments can be made to
either tensioner.
To adjust near the handle, loosen the knob (you may need a tool to do this), and turn the adjustment
screw counterclockwise to tighten the brake cable and then tighten the knob again. - For rear caliper
adjustment, loosen the thumbwheel, (you may need a tool to perform this operation), and turn the
adjusting screw counterclockwise to tighten the brake cable, then tighten the thumbwheel again.
For correct adjustment, the brake mechanism should not touch the wheel, but the distance between
the brake pad and the wheel should not be more than 3 to 4mm.
•
Caution: After adjusting the brakes, you must test them before using the rollator.
•
If, despite the adjustment, the brakes still do not work; do not use the rollator.


