


2 USB Autorun Function
31-26
WindO/I-NV4 User’s Manual
2.3 Creating a USB Autorun Definition File
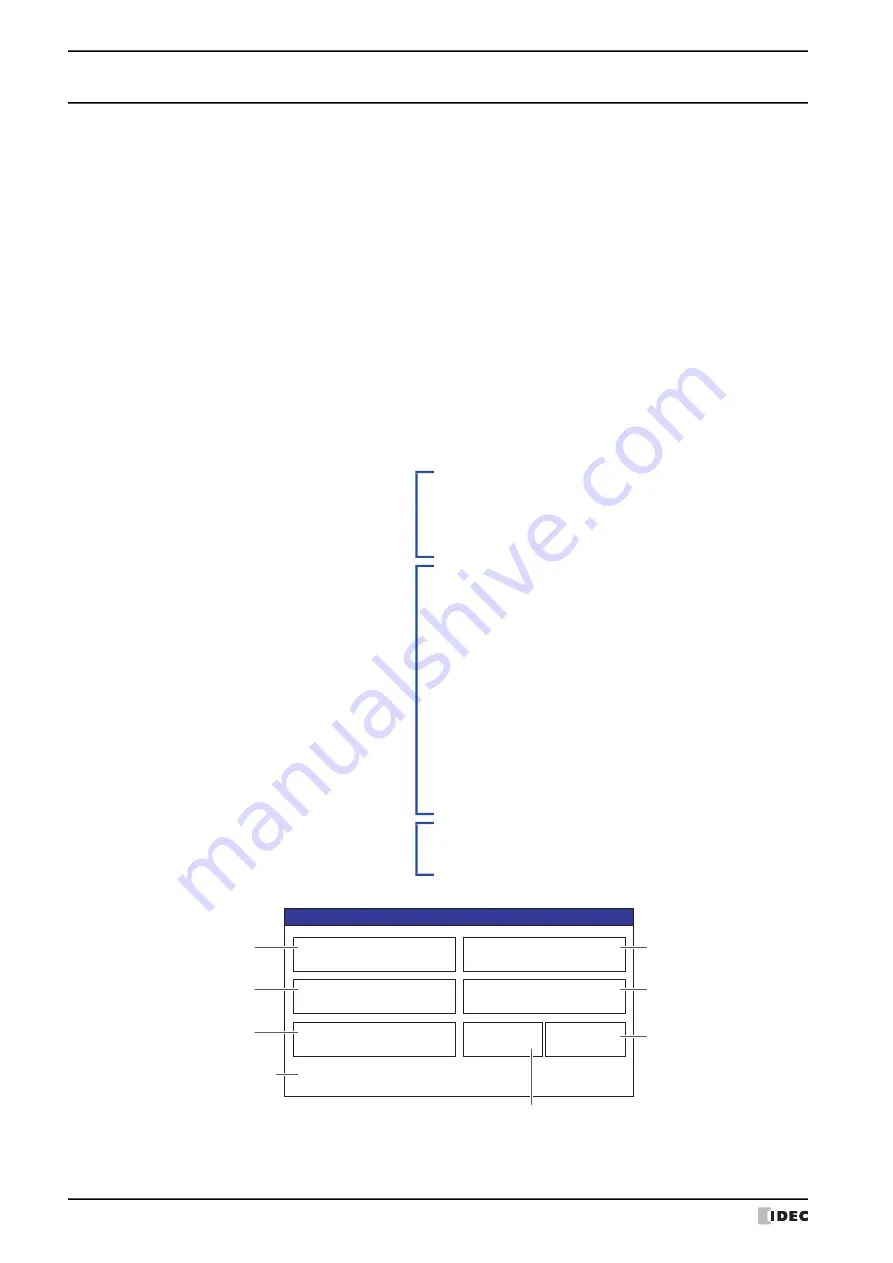
The menu screen that appears when a USB flash drive inserted in the MICRO/I is defined in the USB Autorun
definition file.
The USB Autorun definition file is created using the following methods.
• Created with the USB Autorun definition file creation tool
Refer to USB Autorun Definition File Creation Tool manual.
• Created with the text editor
Refer to “Created using the text editor” on page 31-26.
●
Created using the text editor
You create this file using Notepad or any commercially available text editor. Fill in the items in each section and save
the file with the name “hgauto.ini”.
The USB Autorun definition file has these 3 sections.
Enter the items and definitions for each section.
[AUTORUN] section (required)
Specify the number of command items, enable/
disable the buttons, and the display language to use.
[AUTORUN]
item = 5
button_command = Enable
button_runall = Enable
language = English
[COMMAND] section (required)
Specify the command to execute and its parameters.
Create buttons to execute the number of commands
specified in the [AUTORUN]: section from
[COMMAND_1] to [COMMAND_5], in that order.
[COMMAND_1]
command = PRO_DOWNLOAD
src_path = "B:
\
NV4DATA
\
HG_PROJECT.ZNV"
reset_keep_device = Enable
title = "Production line A - replace MICRO/I program"
··
··
··
[COMMAND_5]
command = LDR_UPLOAD
dst_path = "B:
\
Uploaded_Program"
src_port = COM1
src_net_no = 0
title = "Copy PLC program to USB flash drive"
[COMMENT] section
Enter text to display, as necessary, at the bottom of
the menu screen.
[COMMENT]
comment = "Press the command to execute."
Production line A - replace
MICRO/I program
Copy MICRO/I program to USB
flash drive
Replace sound data
Copy PLC program to USB
flash drive
Production line A - replace
PLC program
Run All
Cancel
Confirmation
Press the command to execute.
[COMMAND_1]
execution button
[COMMAND_4]
execution button
[COMMAND_5]
execution button
Button to close
the menu screen
Execution button for all commands
[COMMAND_2]
execution button
[COMMAND_3]
execution button
Displays text entered
in [COMMENT]
Содержание WindO/I-NV4
Страница 1: ...B 1701 16 User s Manual...
Страница 50: ...1 WindO I NV4 Specifications 2 18 WindO I NV4 User s Manual Baltic ANSI 1257 Cyrillic ANSI 1251...
Страница 108: ...5 WindO I NV4 Common Operations and Settings 2 76 WindO I NV4 User s Manual...
Страница 256: ...7 BACnet Communication 3 148 WindO I NV4 User s Manual...
Страница 372: ...6 Screen Restrictions 5 32 WindO I NV4 User s Manual...
Страница 390: ...5 Part Library Function 6 18 WindO I NV4 User s Manual...
Страница 420: ...3 Text 7 30 WindO I NV4 User s Manual...
Страница 522: ...5 Key Button 8 102 WindO I NV4 User s Manual Password Input These keys switch the user on the Password Input Screen...
Страница 628: ...2 Multi State Lamp 9 34 WindO I NV4 User s Manual...
Страница 924: ...4 Meter 11 76 WindO I NV4 User s Manual...
Страница 990: ...7 Timer 12 66 WindO I NV4 User s Manual...
Страница 1030: ...4 Using Data and Detected Alarms 13 40 WindO I NV4 User s Manual...
Страница 1098: ...4 Using the Data 15 22 WindO I NV4 User s Manual...
Страница 1248: ...5 Restrictions 22 18 WindO I NV4 User s Manual...
Страница 1370: ...2 Monitoring on the MICRO I 25 28 WindO I NV4 User s Manual...
Страница 1388: ...4 Restrictions 26 18 WindO I NV4 User s Manual...
Страница 1546: ...5 Module Configuration Dialog Box 30 36 WindO I NV4 User s Manual...
Страница 1614: ...3 Settings 34 14 WindO I NV4 User s Manual...
Страница 1694: ...5 HG1P 35 80 WindO I NV4 User s Manual 5 6 Dimensions Unit mm Cable Dimensions 191 169 56 70 6 51 55 7...
Страница 1726: ...5 Text Alignment A 10 WindO I NV4 User s Manual...


