background image

12 

Oct. 2018 

A-2200IEH-XR


3.  To Raise Lift & Lock 

a.  Push (

GREEN)


UP

button on the remote 

‘hand held’ pendant controller. 

b.  Raise vehicle to the desired height, then release the 

(GREEN) UP

button. 

c.  Push the 

(BLACK) PARKING

 button to lower the vehicle onto the locking position, as the locking latches 

will automatically engage. 


4.  (Emergency Button) 

·


The lift can be switched off immediately by pressing down the 

(RED)


Emergency

 button on Remote 

Pendant Control. 


When any emergency situation comes, press down the emergency stop button immediately to stop the 
lift. When emergencies are resolved, ‘twist & pull’ the red knob to release the emergency button to 
disengage the emergency stop mode. 


5.  To Lower Lift 

Check all danger points of the lift and be sure that there are no tools, objects or people in the working 
area (danger area) around the lift or under the lift before lowering


a.  If the lift is already in the locked position (latches are engaged), press the 

(GREEN) UP

button to raise the 

lift a short distance to disengage the latch mechanisms. 

b.  Then press 

(BLUE)


DOWN

button on remote controller to lower lift to the floor, while observing the 

complete lowering process to check for any unexpected movement. 

c.  Carefully remove the vehicle off of the lift platform, after lift is fully lowered to floor. 


Remain clear of lift when lowering vehicle. Observe pinch point warning decals. 
If lift is not operating properly, DO NOT use until adjustment or repairs are made by qualified lift service 
personnel. 
 

DO NOT use the (BLACK) PARKING button instead of the (BLUE) DOWN button to lower. 


NEVER press the UP or DOWN button for a long time while the lift is not moving, or the control system 
will be damaged. Release button if you find the lift is not properly responding. 


Once finished with lift operation, engage the emergency button and unplug the lift is recommended. 


If any unsafe movement of the lift occurs, do not to operate the lift and call the local distributor for 
assistance. 


Содержание A-2200IEH-XR

Страница 1: ...Oct 2018 Electro Hydraulic ATV Lift Bench with Retractable Ramp A 2200IEH XR Capacity 2 200lbs Installation Operation Maintenance Manual...

Страница 2: ...pecifications 2 1 Product Description 2 2 Product Specifications 2 3 Hydraulic Schematic 2 4 Circuit Diagram 3 Preparing and Installation 3 1 Site Selection 3 2 Surface Condition 3 3 Necessary Tools 3...

Страница 3: ...ents as described in the Installation Instructions section of this manual 4 Failure by the owner to provide the recommended shelter mounting surface electrical supply and ceiling height could result i...

Страница 4: ...do not operate equipment in the vicinity of open containers of flammable liquids gasoline 14 Use the lift only as described in this manual use only manufacturer s recommended attachments 15 The maint...

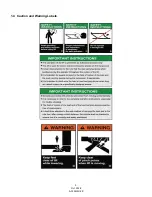
Страница 5: ...5 Oct 2018 A 2200IEH XR 1 4 Caution and Warning Labels...

Страница 6: ...st all All Terrain Vehicles while safely holding them in an elevated locked height position The electro hydraulic ATV lift consists of a fixed structural scissor lift hand held remote controller and e...

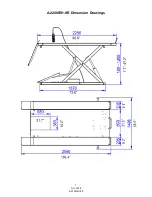
Страница 7: ...7 Oct 2018 A 2200IEH XR A 2200IEH XR Dimension Drawings...

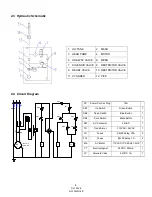
Страница 8: ...ug 16A SB1 Up Switch Green Button 1 SB2 Down Switch Blue Button 1 SB3 Park Switch Black Button 1 KM AC Contactor 24VAC 1 TR Transformer 110VAC 24VAC 1 FU Fuses 6 30 delay 30A 2 FU1 Fuses 5 20 delay 1A...

Страница 9: ...ss of 4 DO NOT install on an asphalt type surface Failure in accomplish the foundation requirement may cause the lift instability or personal injury Installing on asphalt soft clay floor or near the e...

Страница 10: ...g lift raise and secure at almost full height by pressing the BLACK PARKING button to secure lift in the locking position as the electronic latches will automatically engage Securing lift at full to m...

Страница 11: ...personal injury To avoid personal injury and or property damage permit only trained personnel to operate lift ALWAYS use tie downs to secure vehicle to lift while in operation 1 Lift Preparation Lift...

Страница 12: ...s already in the locked position latches are engaged press the GREEN UP button to raise the lift a short distance to disengage the latch mechanisms b Then press BLUE DOWN button on remote controller t...

Страница 13: ...king latch shafts Push latch handle several times for oil to penetrate joints Lubricate the sliding pieces with heavy duty bearing grease With lift lowered check the hydraulic fluid level If necessary...

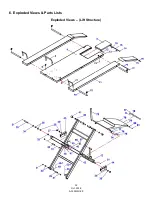
Страница 14: ...14 Oct 2018 A 2200IEH XR 6 Exploded Views Parts Lists Exploded Views Lift Structure...

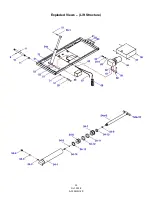
Страница 15: ...15 Oct 2018 A 2200IEH XR Exploded Views Lift Structure...

Страница 16: ...16 Oct 2018 A 2200IEH XR Exploded Views Lift Structure...

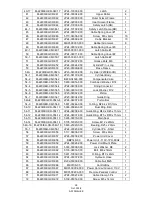
Страница 17: ...002 000 Pin 2 2 33 M 2200IEH XR 033 5206 00020 000 Lock Nut M20 2 34 M 2200IEH XR 034 5302 00025 000 Flat Washer D25 2 35 M 2200IEH XR 035 JP24 00003 000 Pivot Bolt 2 36 M 2200IEH XR 036 5603 25025 00...

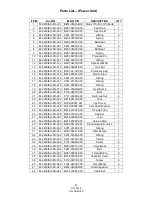
Страница 18: ...EH XR 054 5 5303 00012 000 Lock Washer D12 1 54 6 M 2200IEH XR 054 6 JP23 04002 000 Piston 1 54 7 M 2200IEH XR 054 7 JP23 04004 000 Guide Ring 1 54A 8 M 2200IEH XR 054A 8 JP24 04007 000 Piston Bar 1 5...

Страница 19: ...080 JP25 00004 000 Nylon Ramp Wheel 2 81 M 2200IEH XR 081 5304 00016 000 Circlip D16 6 82 M 2200IEH XR 082 JP24 00002 E00 Ramp Roller 2 83 M 2200IEH XR 083 JP24 00003 E00 Roller Pivot Pin 2 86 M 2200...

Страница 20: ...EH PU 019 BZ13 03000 B00 Gear Pump 1 20 M 2200IEH PU 020 5105 08075 000 Bolt 2 21 M 2200IEH PU 021 5117 06008 000 Self Lock Nut 4 22 M 2200IEH PU 022 BZ14 02100 000 Tank 1 23 M 2200IEH PU 023 QY02 030...

Страница 21: ...t Washer 4 10 M 2200IEH CB 010 JK01 10029 000 Self Tapping Screw 8 11 M 2200IEH CB 011 MK01 00105 000 Connection Rail 1 12 M 2200IEH CB 012 JK01 10010 100 Fuse 1A 2 13 M 2200IEH CB 013 MK01 10008 B00...

Страница 22: ...ading 1 Supply correct voltage to motor 2 Clean lowering valve 3 Replace relief valve cartridge 4 Check or balance the vehicle weight on lift D Problem Lift slowly settles down Possible cause Solution...

Страница 23: ...t considered a warranty issue and therefore must be noted for any potential recovery with the shipping company The customer is required to notify Tuxedo of any missing parts within 72 hours Timely not...

Отзывы: