background image


Model 250 

Printer Applicator 

    Operators/Technical Manual      Section Five 


Section 5 Page 7 of 18 


2. Reverse - If you select the Reverse mode under the Print Sequence menu: Data is 

downloaded to print engine buffer and resides there until required. When the 
product detect photo-eye senses the product, the print engine is triggered and a 
label is then printed and dispensed. As soon as the label is completely dispensed 
onto the tamp pad or blow on grid the application is accomplished (tamp, blow -on, 
etc…) At the end of the application cycle the printer awaits another trigger from the 
photocell to start the process over. This continues until the quantity of labels 
(designated by the operator) runs out. As the label is dispensed from the print 
engine, the air assist will turn on. At the end of the dispense cycle, the air assist 
will de-energize. While the dispense cycle is on the rewind cycle is on. 


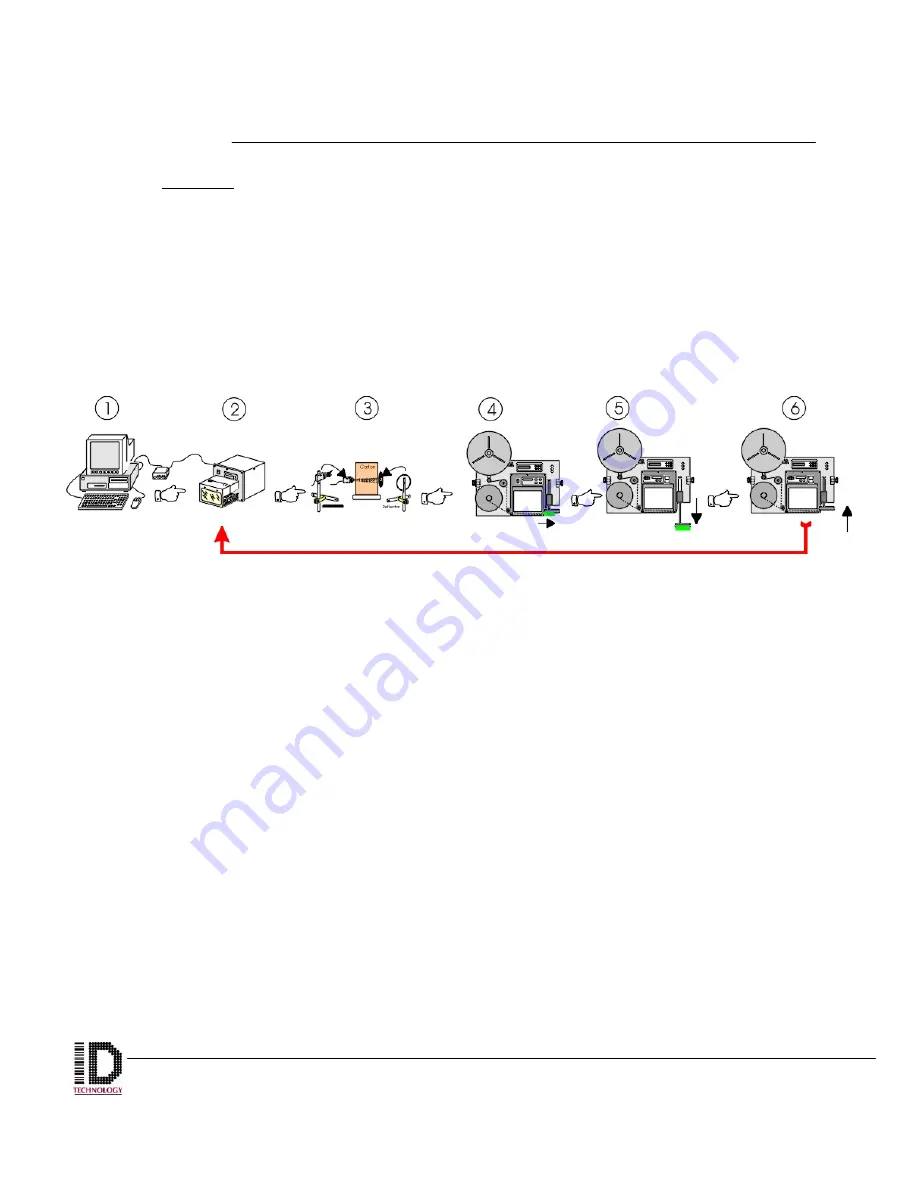
Figure 5-2 

Reverse Print Sequence


1.  Operator generates label and designates quantity. 

2.  Operator sends label to print engine’s buffer. 

3.  Product detector senses product and triggers print engine to print and 

dispense a label. 

4.  Label is printed and dispensed. 

5.  Cylinder extends (or blow on pneumatics are initiated) and Label is 

applied. 

6.  Cylinder retracts (or blow on pneumatics is de-energized) 

7.  Engine awaits another trigger from the product detector. 

Cycle starts back at Print engine until designated quantity is completed. 


Содержание 250

Страница 1: ...250 Print and Apply Operator Technical Manual Model...

Страница 2: ...entification Front View 2 1 Rear View 2 1 Tamp Module 2 4 Pneumatics 2 5 Unwind Assembly 2 6 Rewind Module 2 7 Electronics Module 2 8 Air Assist Tube Module 2 9 Low Label Sensor Assembly 2 9 Tamp Jet...

Страница 3: ...uges 4 5 Changing Tamp Pads 4 6 Section Five Operating Procedures Print Engines 5 1 Using The Menus 5 2 Menu Tree 5 3 Print Sequence 5 6 Apply Mode 5 10 Outputs 5 12 Save Set Up 5 14 Recall Set Up 5 1...

Страница 4: ...l customer service Please fill out and retain with your manual COMPANY NAME INSTALLATION DATE INSTALLED BY CUSTOMER ORDER NO MACHINE ORDER NO APPLICATOR SERIAL NO ELECTRICRONICS MODULE SERIAL NUMBER R...

Страница 5: ...rewind motor is located under the back cover and the serial number label is on the side of the motors enclosure The electronics module label is located on the bottom panel centered and close to the ou...

Страница 6: ...Model 250 Operators Technical Manual Printer Applicator Page 3 of 5 The 250 Printer Applicator mounted on the optional T Base stand...

Страница 7: ...et up 5 Set up 6 Product or Name _____ _____ _____ _____ _____ _____ Print Sequence Normal Reverse Data Driven Apply Mode Tamp Tamp Jet Air Jet Rev Tamp Jet Outputs Output 1 Output 2 Output 3 Output 4...

Страница 8: ...___ _____ _____ _____ _____ Print Sequence Normal Reverse Data Driven Apply Mode Tamp Tamp jet Air jet Rev Tamp jet Outputs Output 1 Output 2 Output 3 Output 4 Save Set up 1 2 3 Factory Recall Set up...

Страница 9: ...eler YES NO ON ORDER Operator Manual on print engine YES NO ON ORDER Technical Manual on print engine YES NO ON ORDER Label Size Ribbon Roll Size Memory Smart Tamp YES NO Beacon YES NO Voltage UPS YES...

Страница 10: ...LCD Adjust Resolution Firmware Configuration Memory B Memory TEST PRINT ENGINE Sato Print a test label using the User Test Print mode Zebra Print a test label using the PAUSE Key Self Test Is printhe...

Страница 11: ...YSTEM CHECK Verify all bolts on the mounting stand are tight Column should be secured in the column mount and unable to rotate Secure raising mechanism in place once applicator is at the correct heigh...

Страница 12: ...Edition Technical Documentation Content and Style Guide This Manual covers the operation and repair of the label applicator and does not cover the label printer print engine Please refer to the print...

Страница 13: ...ble damage to property can occur DANGER Electricity Danger ATTENTION Used when a task is mandatory for safe and disturbance free operation INFORMATION COMMENT Used when additional information is neede...

Страница 14: ...rts replacement and or troubleshooting The applicator is divided into distinct modules organized by function Most of these modules can be replaced as an entire unit with no more than four bolts The en...

Страница 15: ...o Zebra Datamax print engines without modification Microprocessor driven on a single board 4 Tamp stroke standard capable of conversion to various stroke lengths from 2 to 12 8 diameter maximum rewind...

Страница 16: ...n the plant infeed supply To ensure reduced maintenance time a pre filter upstream is recommended 1 6 Product Sensing Product Detectors sense the product and send a signal to the applicator to commenc...

Страница 17: ...print engines without modification 1 13 The T base Support Stand The stand is used for mounting the machine and making it portable There are several accessories that can be added to assist in the dif...

Страница 18: ...k handle that allows the operator to position the applicator over a production line in any required or desired position As the crank handle is rotated the applicator will adjust in or out on the horiz...

Страница 19: ...should be wrapped prior to packaging Items should be protected by at least 3 s on all sides and fix immobile All electronic boards should be protected from static by being wrapped in anti static mate...

Страница 20: ...um 8 Tamp Vacuum Chamber 9 Tamp Pad 10 Air Assist Mounting 11 Low Label Sensor Wand 12 12 5 Unwind Flange 13 Brake Band Mounting 14 Unwind Mounting Block 15 U arm Mounting Block 16 Dancer Arm 17 Rewin...

Страница 21: ...Model 250 Printer Applicator Operators Technical Manual Section Two Section 2 Page 2 of 14 250 Front View Figure 2 1 Front View of the 250 Label Applicator...

Страница 22: ...Model 250 Printer Applicator Operators Technical Manual Section Two Section 2 Page 3 of 14 250 Back View Figure 2 2 Back View of the 250 Label Applicator...

Страница 23: ...dentification Function 1 Flow Adjustment Air Hose Connection Cylinder Extend 2 Air Cylinder 3 Cylinder Guide Rods 4 Face Plate 5 Tamp Module Mounting Block 6 Flow Control Air Hose Connection Cylinder...

Страница 24: ...Part Name or Function 1 Pressure Gauges Display 2 3 station Manifold 3 Solenoid 4 way valve 4 Regulator w gauge 5 Vacuum Transducer for Venturi 6 Connection For Muffler 7 Connection to Tamp Pad 8 Mai...

Страница 25: ...aft 2 Unwind Shaft End View 3 Unwind Shaft Mounting Block 4 Brake Band 5 Spring Mounting Collar 6 Tension Spring Adjustment Arm 7 Tension Spring 8 Dancer Arm Shaft 9 Tension Spring Shaft 10 Unwind Mou...

Страница 26: ...Motor Pulley Shaft 3 Rewind Shaft Mounting Block 4 Rewind Motor Mounting Bolts 5 Face Plate 6 Rewind Flange Shaft Mnting Bolt 7 Rewind Flange 8 Rewind Shaft 9 Waste Take Up Retention Pin 10 Rewind Pul...

Страница 27: ...art Name Function 1 Power Input Module 2 Power In Cable 3 14 Pin Status Output Conn 4 Electronics Module Housing 5 9 Pin Photo Cell Connector 6 9 Pin Flashing Beacon connector 7 15 Pin Connection from...

Страница 28: ...d Wand Bracket Plate Connection Wires to J13 in electronics module Front View Top View Face Plate Mounting Holes Air Assist Tube Module attaches to the faceplate and can be adjusted to each label size...

Страница 29: ...to adapt the tamp application mode to a non contact method of application In this mode the cylinder is extended and a blast of air through the tamp pad propels the label to the surface of the product...

Страница 30: ...Model 250 Printer Applicator Operators Technical Manual Section Two Section 2 Page 11 of 14 Figure 2 11 Optional T Base Stand Module Breakdown...

Страница 31: ...ence Number Part Name Function 1 Raising Crank Handle 2 Vertical Post 3 Applicator Mounting Block 4 Mounting Block Lock Handle 5 Lead Screw Vertical Adjustment 6 Mounting Bolt for U arm 7 Vertical Pos...

Страница 32: ...Yard Arm Crank Handle 6 Mounting Plate Locking Bolt Handle 7 Traversing Slide Mounting Plate 8 Traversing Slide Lead Screw 9 U Arm Mounting Plate 10 Stationary Weldment Swivel Mount 11 Vertical Post...

Страница 33: ...Model 250 Printer Applicator Operators Technical Manual Section Two Section 2 Page 14 of 14 Operator Notes...

Страница 34: ...our machine came in separate cartons open all cartons and remove packing Attach u arm to applicator with the 20 mm bolts lock washer and washers provided Once the u arm is attached tighten down the bo...

Страница 35: ...bolt by hand and ensure all five line up and engage without cross threading Once all bolts have been started using a 4 mm Allen wrench tighten securely Locate the plant air hose connection The applic...

Страница 36: ...plant power Printer Recommend a UPS power source Connect power cable from back of print engine to the electrical panel reference 1 ref 1 figure 3 6 16 pin female connector ref 3 figure 3 6 connector f...

Страница 37: ...ainst unwind reel labels 3 Wand mounting bracket Hex head screw take Allen Wrench Size 3 mm Holds wand in place on sensor Loosen to adjust length of wand 4 Low Label Sensor wand mounting bracket Swive...

Страница 38: ...a 9 pin plug Figure 3 8 The beacon can be mounted to the back of the faceplate or a variety of other places convenient to the operator using 2 1 4X20 bolts The L bracket is attached to the bottom of t...

Страница 39: ...n either direction to tighten onto shaft There is a setscrew through the hub that can be adjusted to give more or less pressure against the shaft a 4 mm Allen wrench is required The label roll should...

Страница 40: ...be threaded under the print head out the far right side of the engine and back under to the left Figure 3 13 shows the print head in the up or open position Referring to the print engines operator s m...

Страница 41: ...ce you have the outer flange on twist flange a quarter turn in either direction to tighten onto shaft There is a setscrew through the hub that can be adjusted to give more or less pressure against the...

Страница 42: ...Print Engine After accomplishing the loading of labels on the applicator you can now thread the labels on the web through the print engine This is an abbreviated explanation for a more in depth proce...

Страница 43: ...Model 250 Printer Applicator Operators Technical Manual Section Three Section 3 Page 10 of 19 Figure 3 17 Annotated parts of the Zebra Print Engine Front view...

Страница 44: ...ed within the print path then close the printhead assembly C by rotating the printhead lock lever D until it latches onto the locking pin E 5 Secure the pinch roller F in position by pressing down on...

Страница 45: ...at is narrower than the media If the print head is not protected by the smooth backing of the ribbon premature printhead failure may result due to excessive abrasion 1 Push the ribbon roll onto the su...

Страница 46: ...Model 250 Printer Applicator Operators Technical Manual Section Three Section 3 Page 13 of 19 Figure 3 20 Front view of ribbon threaded through Zebra engine...

Страница 47: ...ing ok YES NO Spare parts YES NO ON ORDER Operator Technical Manual on labeler YES NO ON ORDER Operator Manual on print engine YES NO ON ORDER Technical Manual on print engine YES NO ON ORDER Applicat...

Страница 48: ...liner Input DSW1 LAY OUT ON OFF 1 2 3 4 5 6 7 8 DSW2 LAY OUT ON OFF 1 2 3 4 5 6 7 8 DSW3 LAY OUT ON OFF 1 2 3 4 5 6 7 8 TEST PRINT ENGINE Print a test label using the User Test Print mode Is printhead...

Страница 49: ...O Check tamp assembly fasteners to see that they are tight and have Loc tite on them YES NO Has applicator height been adjusted so that all products can pass under the applicator YES NO Is tamp pad hi...

Страница 50: ...to be secured in place after desired height of Applicator has been acquired Leveling feet should be secured to the correct height and then locked in place Check all connectors and cabling Secure loose...

Страница 51: ...CREWDRIVER 5 LONG 1 PHILLIPS SCREWDRIVER 6 2 PHILLIPS SCREWDRIVER 7 LONG 2 PHILLIPS SCREWDRIVER 8 1 8 FLAT SCREWDRIVER 9 3 16 FLAT SCREWDRIVER 10 LONG 3 16 FLAT SCREWDRIVER 11 SET OF METRIC COMBINATIO...

Страница 52: ...Model 250 Printer Applicator Operators Technical Manual Section Three Section 3 Page 19 of 19 Operator Notes...

Страница 53: ...to the product the cylinder is retracted to the home position and is ready to receive another label Installation of the tamp jet module should take about five minutes Ensure power is disconnected from...

Страница 54: ...on 3A Page 2 of 9 Figure 3A 2 Tamp Jet Module Parts Identification Table 3A 2 Tamp Jet Module Parts Identification No Qty Nomenclature 1 1 Male Run Tee unifit 2 1 Nipple 3 1 Reducer One Touch 3 1 2 Wa...

Страница 55: ...ction See Fig 3A 4 Remove the back cover of the applicator Using an M4 Allen wrench remove the three bolts from the back cover and set aside These bolts will be needed to re install the cover The loca...

Страница 56: ...ule is located to the left side as you are facing the back Fig 3A 6 shows the location of the pneumatics module with the arrow Remove the air tubing that goes from the applicators plant air filter on...

Страница 57: ...module in port P of the pneumatics block Use your fingers to start the threading of the brass fitting into the port to ensure the threads do not get cross threaded The brass fitting spins freely in t...

Страница 58: ...ubing from the out feed side of the air filter to the Male run Tee fitting on the tamp jet module As shown in Figure 3A 10 These are one touch air fittings therefore all you have to do is insert the t...

Страница 59: ...g from the tampjet module Union Tee 3 to the Venturi transducer Tee fitting coming out of the pneumatic manifold block Illustrated in Figure 3A 11 below Connect the air tubing from the union Tee fitti...

Страница 60: ...applicator Connect the electrical plug from the tamp module to the electronic module of the applicator Run the wire up through the bottom of the electronics module as shown in the figure below Arrow...

Страница 61: ...9 Return the unit to service by re installing the back cover Re connect all the pheriphals onto the back panel of the electronics module Re connect the plant air to the air filter mounted on the appl...

Страница 62: ...to the end user These conditions can be monitored for triggering other applications operations and operator notification The System Status Output Module provides electrical signals depicting the curre...

Страница 63: ...uld contain the following components ITEM Qty DESCRIPTION 3 Mechanical relays NaiS DS 1 form C 1 Solid state relay Crydom Series DO 1 16 pin female receptacle 1 receptacle wire housing 16 female pins...

Страница 64: ...received all the necessary components Refer to figure 3B 1 to see the components of module and Table 3B 1 to see a reference table of the connections that will be used Table 3B 1 System Status Module...

Страница 65: ...0cpm at rated load 50 cps at low level load Initial insuration resistance Min 100M at 500 VDC Initial break down voltages Detection current 10mA Between open Contacts 500Vrms Between contacts sets n a...

Страница 66: ...erating Voltage Range 3 60 VDC Load Current Range 02 1 0 A DC Max Surge Current 5 0 A DC 1 sec Max Off State Leakage 200 ADC at rated voltage Max On State Voltage Drop 1 5 VDC at rated voltage Max Tur...

Страница 67: ...should be diode suppressed Tools required for the installation Screw Drivers Philips and Flat Used to remove the connectors from the back of the electronic module Flat for Printer Beacon Photo Cell P...

Страница 68: ...Cap head bolt Remove the back cover of the applicator Using an M4 Allen wrench remove the three bolts from the back cover and set aside These bolts will be needed to re install the cover The location...

Страница 69: ...Model 250 Printer Applicator Operators Technical Manual Section 3B Section 3B Page 9 of 9...

Страница 70: ...ows the module to be bolted to the face plate see figure 4 2 The guide rods ensure the cylinder travels true in the vertical direction Four bolts hold the block to the face plate see figure 0 3 Air ho...

Страница 71: ...les in the tamp pad The Tamp pad is generally made out of hard Delrin but comes available in neoprene soft foam like material if the application warrants The tamp pad ref 3 figure 4 5 is mounted to th...

Страница 72: ...1 2 2 2 3 3 4 5 5a 5 1 6 7 7 8 9 10 Figure 4 4 Flow Control Valve located on top and on front of air cylinder Figure 4 5 Tamp Pad Assembly top view on top front view under that then tamp pad bottom v...

Страница 73: ...n airflow towards the tamp pads surface and as the label crosses in front of the tube it is blown back towards the tamp pad This assists the label in staying flat against the tamp pad as it is fed fro...

Страница 74: ...flow This is what holds the label up to the tamp pad while waiting to be applied The middle gauge reflects the pressure of the Tamp Cylinder This is the pressure that is used to extend and retract th...

Страница 75: ...there is air left in the lines 4 Manually extend the cylinder to the bottom of the tamp stroke 5 With a 5mm size Allen wrench remove the two socket head bolts on the top of the tamp pad mounting brack...

Страница 76: ...compound onto the labels surface Label stock must be of a thermal transfer stock Print speed up to 10 ips resolution 203dpi 8dots mm ribbon capacity of 1968 ft PCMCIA sockets 2 optional max media widt...

Страница 77: ...ghout the inner menus Within each main menu are sub menus to select and change system parameters The return or enter arrow selects the item chosen This button takes you back one menu each time it is p...

Страница 78: ...lls Delays only displayed if Delay Access is set to Yes in Security 5 14 o Delay Apply Time Value in mS Password Entry 5 17 items below are at main level if security disabled o Print Sequence 5 17 Nor...

Страница 79: ...n Out Supply Low Supply Out Online Tamp Home Apply Ready No Select o Status Menu 5 16 o Save Setup 5 14 1 2 3 Factory Mode Set o Recall Setup 5 14 1 2 3 Factory Mode Set o Security 5 17 Change PIN 123...

Страница 80: ...Model 250 Printer Applicator Operators Technical Manual Section Five Section 5 Page 5 of 18 Time Value in mS Delay Assist Time Value in mS Dwell Tamp Time Value in mS Delay Label Feed Time Value in mS...

Страница 81: ...s until the quantity of labels designated by operator runs out As the label is dispensed from the print engine the air assist will turn on At the end of the dispense cycle the air assist will de energ...

Страница 82: ...over This continues until the quantity of labels designated by the operator runs out As the label is dispensed from the print engine the air assist will turn on At the end of the dispense cycle the a...

Страница 83: ...om the upstream system to start the process over This continues until the upstream system is deactivated or shuts down or there is an out of media signal from the applicator As the label is dispensed...

Страница 84: ...Model 250 Printer Applicator Operators Technical Manual Section Five Section 5 Page 9 of 18 Figure 5 4 Print Cycle Signal Sequence...

Страница 85: ...el using a vacuum tamp pad mounted on an Air Cylinder Enables the pneumatics used in tamp jet mode and disables all other configurations Tamp jet Mode Cycle 1 Label is printed and dispensed onto tamp...

Страница 86: ...a blast of air is driven through the tamp pad 5 The label is aerodynamically propelled towards the product 6 Adhesive on label adheres label to product as cylinder retracts 4 Air Jet This selection e...

Страница 87: ...l Out When Last label has traveled through the print engine Ribbon Out When the last piece of ribbon has traveled through the print engine Supply Low Monitors label and ribbon supply Supply Out Monito...

Страница 88: ...Ready Accessory No Select until you come to the item 2 2 Label Low Ribbon Low Label Out Ribbon Out you want to choose Supply Low Supply Out On Line Tamp Home Apply Ready Accessory No Select 3 3 Label...

Страница 89: ...justment changing the setting of the Delay Apply is the fine adjustment Increasing the time in the menu will increase the delay of the trigger to the applicator This increase in time will effectively...

Страница 90: ...tment affects the time the label is printed and feed onto the tamp pad Used with longer stroke cylinders or slower flow speeds to give the cylinder time to return to the home position When changing th...

Страница 91: ...ntrol the valve that supplies compressed air to the vacuum generator The vacuum generator is used to hold the label on the tamp pad prior to application to the product Normal In this state the vacuum...

Страница 92: ...lidate the entry and either allow or deny access The default PIN when shipped from the factory is 1231 If you forget your PIN number you will need to call for a service technician or return the module...

Страница 93: ...Model 250 Printer Applicator Operators Technical Manual Section Five Section 5 Page 18 of 18 Operator Notes...

Страница 94: ...Model 250 Printer Applicator Operators Technical Manual Section Six Section 6 Page 1 of 20 Section Six Maintenance and Troubleshooting Front View Face Plate with Back Cover Shown...

Страница 95: ...Model 250 Printer Applicator Operators Technical Manual Section Six Section 6 Page 2 of 20 Side View with SATO 8485SE installed Side View of Print Engine Area with Zebra Pax Engine Installed...

Страница 96: ...Nomenclature Normal Status 1 Output 2 Open 2 Output 2 Closed 3 Output 2 Common 4 Output 3 Open 5 Output 3 Closed 6 Output 3 Common 10 Output 4 Open 11 Output 4 Closed 12 Output 4 Common 7 Output 1 Op...

Страница 97: ...Tamp Jet 8 J11 Vacuum 9 J12 LCD Window 10 Operator Input Function Keys 11 TP2 GND Connector 12 J13 Connection to Display Buttons 13 J17 Low Label Conn 14 J6 Smart Tamp Conn 15 J5 Tamp Home Conn 16 J18...

Страница 98: ...5 0 V Duplication of Product Detect Pin 9 Product detect 9 pin Female D Connector PIN FUNCTION 3 Signal 5 0 V Short to 0 V to trigger applicator NPN sinking or relay contact recommended 6 24 VDC 1 2...

Страница 99: ...ace PIN FUNCTION 15 pin Female D Connector 1 0 V From printer 2 5 VDC From printer 3 Print enable To printer 4 Feed To printer 5 Pause To printer 6 Reprint To printer 7 N C 8 N C 9 Low ribbon From pri...

Страница 100: ...on 6 Page 7 of 20 Valves PIN FUNCTION 1 Air Assist Valve Control J8 2 0 V 1 Tamp Valve Control J9 2 0 V 1 Jet Valve Control J10 2 0 V 1 Vacuum Valve Control J11 2 0 V Fan blow off module J7 PIN FUNCTI...

Страница 101: ...tamax PE Series Printer 9 Pin D Connector 62503 Sato Se Series Printer 14 Pin Centronics Connector FUNCTION PIN PIN PIN PIN 0 V 1 1 9 2 5 VDC 2 2 1 13 Print enable 3 3 5 5 Feed 4 4 Pause 5 5 Reprint 6...

Страница 102: ...r power switch is OFF 3 Printer power fuse is blown Inspect and correct Turn power switch ON Replace the fuse Label liner breaking 1 Incorrectly threaded labels 2 Damaged roll of labels 3 Die nicks or...

Страница 103: ...ance 1 Vacuum venturi adjusted incorrectly or exhaust blocked 2 Air assist tube out of adjustment Inspect and correct Refer to 250 manual for adjustment Label placement on tamp pad consistently poor 1...

Страница 104: ...Refer to 250 manual for set up instructions Inspect and correct Refer to Label placement on tamp pad consistently poor Tamping does not occur 1 Applicator not connected to air supply or air pressure...

Страница 105: ...ssistance if required Label application rate unable to keep up with product speed of conveyor Conveyor running too fast products are too closely spaced Check machine specifications for rate versus siz...

Страница 106: ...not received from input device Press Line button on printer Press Job Reset button Check label threading and make sure label hold down is close Check that ribbon is threading through ribbon sensor In...

Страница 107: ...el Sensor out of Calibration 3 Platen dirty See Sato Manual Recalibrate sensor threshold Clean Platen Long tracks of missing print on several labels Print element damaged Replace printhead Poor print...

Страница 108: ...nd close head lever Open and close label hold down ERROR light flashes and RIBBON light on Ribbon end Replace ribbon if necessary Open and close head lever Open and close label hold down IMPORTANT Thi...

Страница 109: ...Model 250 Printer Applicator Operators Technical Manual Section Six Section 6 Page 16 of 20 Timing Cycles...

Страница 110: ...Model 250 Printer Applicator Operators Technical Manual Section Six Section 6 Page 17 of 20...

Страница 111: ...Model 250 Printer Applicator Operators Technical Manual Section Six Section 6 Page 18 of 20...

Страница 112: ...Model 250 Printer Applicator Operators Technical Manual Section Six Section 6 Page 19 of 20...

Страница 113: ...Model 250 Printer Applicator Operators Technical Manual Section Six Section 6 Page 20 of 20 Operator Notes...

Страница 114: ...0 N02 BG C FILTER REGULATOR GUAGE 16 1 MALE CONNECTOR 17 1 10 3 1 4 NPT AIR HOSE FITTING 18 1 62180 AIR ASSIST TUBE 19 1 62181 AIR ASSIST BBRACKET UNWIND ASSEMBLY 3 1 62020 12 ASSY UNWIND 1 1 62021 UN...

Страница 115: ...OR 24VDC 108 RPM PNEUMATICS ASSEMBLY 62100 ASSY PNEUMATICS STD TAMP 6 1 62101 ASSY PNEUMATICS STD TAMP SCHEMATIC 1 1 62122 MANIFOLD 3 STATION MODIFIED 1 1 MANIFOLD 3 STATION 5 PORT W 1 4 ONE TOUCH 2 3...

Страница 116: ...ACTUATOR W 4 IN STROKE SMC NCMB125 0400C 5 1 62258 FITTING SMC KQ2H07 U01 6 3 62256 BEARING PLANE LINEAR 1 2 PURVIS BEARING FLC 08 7 3 SNAP RING INT ROTOR CLIP H0 87 8 2 62259 FLOW CONTROL VALVE SMC...

Страница 117: ...WITHOUT THE WRITTEN PERMISSION OF I D TECHNOLOGY IS PROHIBITED 6 5 2 ITEM QTY ITEM QTY ITEM QTY ITEM QTY PARTNO DESCRIPTION BASEMODULE 1 1 62000 ASSYBASEMODULE RH U ARMASSEMBLY 1 1 62001 UNIVERSALBRAC...

Страница 118: ...WITHOUT THE WRITTEN PERMISSION OF I D TECHNOLOGY IS PROHIBITED 3 4 1 ITEM QTY ITEM QTY ITEM QTY ITEM QTY PARTNO DESCRIPTION BASEMODULE 1 1 62000 ASSYBASEMODULE RH U ARMASSEMBLY 1 1 62001 UNIVERSALBRA...

Страница 119: ...LATE 3 1 62030 08 ROLL IDLER 4 1 62031 SHAFT IDLER 5 1 62034 SPACER ROLL 6 2 62015 08 COLLAR SPRING 1 7 1 62030 16 ROLL IDLER 8 1 62031 SHAFT IDLER 9 1 62034 SPACER ROLL 10 1 62017 STANDOFF COVER 11 1...

Страница 120: ...11 24 2003 THE INFORMATION CONTAINED IN THIS DRAWING IS THE SOLE PROPERTY OF ID TECHNOLOGY CORP ANY REPRODUCTION IN PART OR WHOLE WITHOUT THE WRITTEN PERMISSION OF ID TECHNOLOGY IS PROHIBITED MODEL 25...

Страница 121: ...11 24 2003 MODEL 250 REWIND ASSEMBLY THE INFORMATION CONTAINED IN THIS DRAWING IS THE SOLE PROPERTY OF ID TECHNOLOGY CORP ANY REPRODUCTION IN PART OR WHOLE WITHOUT THE WRITTEN PERMISSION OF ID TECHNOL...

Страница 122: ...62110 MUFFLER VACUUM 8 1 62111 ADAPTER MALE 9 3 62112 CONNECTOR MALE 10 1 KQ2C 07BU BLUE CAP 11 1 KQ2C 07B BLACK CAP 12 1 KQ2C 07GR GREY CAP 13 3 KQ2C 07OR ORANGE CAP 14 1 KQ2C 07Y YELLOW CAP 15 3 62...

Страница 123: ...12 09 2003 THE INFORMATION CONTAINED IN THIS DRAWING IS THE SOLE PROPERTY OF ID TECHNOLOGY CORP ANY REPRODUCTION IN PART OR WHOLE WITHOUT THE WR ITTEN PERMISSION OF ID TECHNOLOGY IS PROHIBITED MODEL...

Страница 124: ...1 08 2004 THE INFORMATION CONTAINED IN THIS DRAWING IS THE SOLE PROPERTY OF ID TECHNOLOGY CORP ANY REPRODUCTION IN PART OR WHOLE WITHOUT THE WRITTEN PERMISSION OF ID TECHNOLOGY IS PROHIBITED 8 SWING T...

Страница 125: ...15 2004 MODEL 250 TAMP BRACKET HEAVY DUTY THE INFORMATION CONTAINED IN THIS DRAWING IS THE SOLE PROPERTY OF ID TECHNOLOGY CORP ANY REPRODUCTION IN PART OR WHOLE WITHOUT THE WRITTEN PERMISSION OF ID T...

Страница 126: ...ITEM QTY ITEM QTY ITEM QTY ITEM QTY PARTNO DESCRIPTION Accessories 1 1 62280 TAMPJETKITASSEMBLY 1 1 62281 2 WAYD O VALVE...

Страница 127: ...2051 FRANKLIN DR FORT WORTH TX 76106 250 PRECISION TILT...

Страница 128: ...AD CAP SCREW M8 SOCKET HEAD CAP SCREW INSTALLATION INSTRUCTIONS 1 REMOVE THE M20 HEX HEAD BOLT 2 REMOVE THE TWO M6 SOCKET HEAD CAP SCREWS 3 PLACE THE TS9100 IN POSITION USING THE M20 HEX HEAD BOLT AND...

Страница 129: ...O A PEEL EDGE In Figure 1 the peel edge of a printer or peel plate the tamp pad and air assist tube are all shown To correctly set up a tamp pad to a peel edge two things must be kept in mind 1 Mainta...

Страница 130: ...e tip of the peel tip label flag When the label is dispensed it should feed in to the chamfer on the peel edge Follow the angle of the Tamp pad the air assist will blow the label back up to the Tamp p...

Страница 131: ...be when the machine starts to cycle to place a label on a product Note Figure 3 Figure 3 Note the label will catch on the air assist tube as the tamp pad cycles The air assist tube will need to be mov...

Отзывы: