background image

E

Manual IB-DK2408-C

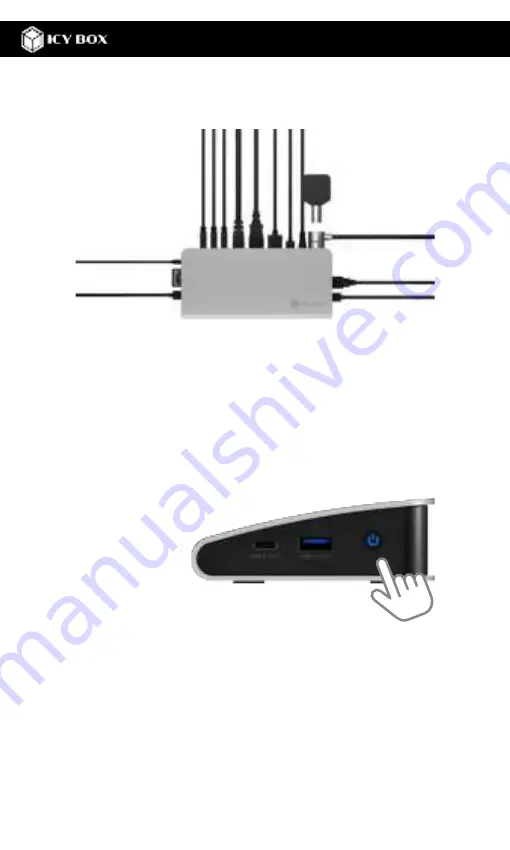
3.  Connect your peripherals to the appropriate interfaces on the dock. 

4.  Switch on the device

Power button function

To power ON: Push the ON/OFF button for less than 1 sec and the dock turns on. 

Both the DockingStation and your connected notebook should now be powered.

To power OFF: Push the ON/OFF button for more than 3 sec and the dock turns off.

Configure a display device

Please set up your display settings according to your operating system and your requirements.
For detailed information, consult the corresponding computer manual and description of your operating system. 

Note:


Video output capabilities are dependent on the graphics card and hardware specifications of your 

connected host notebook. Certain graphics cards and operating systems have limited MST support, while some 
monitors will also limit the maximum resolution.

Supported video resolutions

The DockingStation supports 4K Ultra HD resolution if the connected HDMI

®

/ DisplayPort™ display and the 

graphics unit supports it.

Usage of memory card slots

SD card (UHS-I)

Insert the SD card into the SD card slot with the bevelled corner first. The golden PIN’s of the card must show upwards.

microSD card (UHS-I)

Insert the microSD card into the microSD card slot with the bevelled corner first. The golden PIN’s of the card must 
show downwards.

Single-LUN - the card reader can only work with one memory card at a time

Содержание IB-DK2408-C

Страница 1: ...Manual IB DK2408 C USB Type C Notebook DockingStation Handbuch IB DK2408 C USB Type C Notebook DockingStation ...

Страница 2: ...o not cover the fan outlet and passive cooling elements Avoid direct sunlight on the device power unit Guarantee sufficient ambient air for the device power unit Do not place objects on the device power unit 4 Hazards caused by very small parts and packaging Risk of suffocation Risk of death by suffocation or swallowing Keep small parts and accessories away from children Store dispose of plastic b...

Страница 3: ...stausch zulassen Lüfter Auslass und passive Kühlkörper freihalten Direkte Sonneneinstrahlung auf Gerät Netzteil vermeiden Ausreichend Umgebungsluft für Gerät Netzteil sicherstellen Keine Gegenstände auf dem Gerät Netzteil abstellen 4 Gefahren durch Kleinstteile und Verpackung Erstickungsgefahr Lebensgefahr durch Ersticken oder Verschlucken Kleinteile Zubehör für Kinder unzugänglich verwahren Plast...

Страница 4: ...rts the DockingStation enables a super speed data transmission between USB peripherals 1 USB 3 1 Gen 2 Type C data interface BC1 2 charging standard max 5 V 1 5 A 2 USB 3 1 Gen 2 Type A data interface BC1 2 charging standard max 5 V 1 5 A 3 ON OFF button with LED blue for operation 4 3 5 mm combo audio jack for connecting a headset 5 SD 3 0 microSD 3 0 card reader for SD microSD memory cards 6 USB...

Страница 5: ... Thunderbolt 3 4 Note The DockingStation can still connect to a host computer with a USB Type C port that does NOT support Power Delivery but must still support DisplayPort Alt Mode In this configuration the DockingStation will NOT power your host computer HDMI and DisplayPort enabled display s with cables as needed for additional external displays 4K capable displays are required to achieve up to...

Страница 6: ...m Note Video output capabilities are dependent on the graphics card and hardware specifications of your connected host notebook Certain graphics cards and operating systems have limited MST support while some monitors will also limit the maximum resolution Supported video resolutions The DockingStation supports 4K Ultra HD resolution if the connected HDMI DisplayPort display and the graphics unit ...

Страница 7: ...h the operating system Extended monitor application under MST technology Multi StreamTransport protocol Case 1 Arrange your displays Once the extra monitors are connected they can be configured to either mirror mode extended mode Windows only or they can be configured to the primary display setting e g extending your monitors Position the mouse anywhere on the Windows desktop Right click and selec...

Страница 8: ...elect the relevant monitor for the following settings by clicking the identified monitor symbol Select Multiple displays Extend desktop to this display if you wish to extend a monitor Once the setting is completed simply drag and drop the application icons to arrange your monitors However some applications may not support display on the extended desktop 1 2 3 ...

Страница 9: ...e Identify button Select the relevant monitor by clicking the identified monitor symbol Click on Display resolution Choose the right resolution from the drop down menu Refer to the video matrix table Click Keep changes to confirm and exit 2 Advanced display settings Identify your monitors by clicking the Identify button Click on Advanced display settings 1 2 3 1 Manual IB DK2408 C ...

Страница 10: ...isplay Click on Display adapter properties for display X A new window opens up Click on List All Modes A new window opens up Click on a valid mode according to the video matrix design table shown above Repeat for each attached monitor if necessary 2 3 4 Manual IB DK2408 C ...

Страница 11: ...pens up Click Arrangement Arrange your display Once the extra monitors are connected they can be configured to mirror mode or extended mode for only one additional monitor a second monitor will only be mirrored Click on System Preferences 2 2 1 Manual IB DK2408 C ...

Страница 12: ... window of the respective display set your desired views separately Select the Scaled option and then select the appropriate size in the field below Advanced display settings Hold down the option key click again on Scaled and an advanced menu for resolution settings and repeat frequency settings opens up Please select your preferred settings here Repeat for each monitor if necessary Manual IB DK24...

Страница 13: ...ie DockingStation eine superschnelle Datenübertragung zwischen USB Peripheriegeräten 1 USB 3 1 Gen 2 Type C Datenschnittstelle BC1 2 Ladestandard max 5 V 1 5 A 2 USB 3 1 Gen 2 Type A Datenschnittstelle BC1 2 Ladestandard max 5 V 1 5 A 3 Ein Aus Taste mit LED blau für Betrieb 4 Kombinierte 3 5 mm Audioschnittstelle zum Anschluss eines Headsets 5 SD microSD 3 0 Kartenleser für SD microSD Speicherkar...

Страница 14: ...sten mussderverwendete USBType C AnschlussPowerDeliveryunddenDisplayPort AltModeoderThunderbolt 3 4unterstützen Hinweis Die DockingStation kann auch an Hostcomputern mit USB Type C Schnittstelle OHNE Power Delivery Unterstützung genutzt werden DisplayPort Alt Mode wird trotzdem benötigt In diesem Fall kann das Notebook NICHT über die Type C Schnittstelle mit Strom versorgt werden HDMI und DisplayP...

Страница 15: ...eiten hängen von der verwendeten Grafikkarte und weiteren Hardware spezifikationen des angeschlossenen Hostcomputers ab Bestimmte Grafikkarten und Betriebssysteme verfügen nur über eingeschränkte MST oder Videounterstützung während auch einige Monitore nur geringere Auflösungen unterstützen Unterstützte Videoauflösungen Die IB DK2408 C unterstützt 4K Ultra HD Auflösungen wenn der angeschlossene HD...

Страница 16: ...önnen je nach Betriebssystem leicht variieren Erweiterte Monitorverwendung in Verbindung mit der MST Technologie Multi StreamTransport Protokoll Monitore anordnen Sobald zusätzliche Monitore angeschlossen sind können diese entweder auf den Spiegelmodus den Erweiterungsmodus nur mit Windows oder auf die Einstellung der Primäranzeige konfiguriert werden z B Erweiterung Ihrer Monitore Positionieren S...

Страница 17: ...n Monitor für die folgenden Einstellungen aus indem Sie auf das Symbol des identifizierten Monitors klicken Wählen Sie Mehrere Bildschirme Desktop auf diese Anzeige erweitern wenn Sie einen Monitor erweitern möchten Sobald die Einstellungen abgeschlossen sind ziehen Sie einfach die Monitorsymbole per Drag Drop um Ihre Monitore anzuordnen Einige Anwendungen unterstützen jedoch möglicherweise nicht ...

Страница 18: ...en Wählen Sie den betreffenden Monitor durch Klicken auf das Symbol für den identifizierten Monitor aus Klicken Sie auf Bildschirmauflösung Wählen Sie die richtige Auflösung aus dem Dropdown Menü Klicken Sie zum Bestätigen und Beenden auf Einstellungen Beibehalten 2 Erweiterte Anzeigeeinstellungen Identifizieren Sie Ihre Monitore indem Sie auf die Schaltfläche Identifizieren klicken Klicken Sie au...

Страница 19: ...licken Klicken Sie auf Adaptereigenschaften für Bildschirm X anzeigen A new window opens up Click on List All Modes A new window opens up Click on a valid mode according to the video matrix design table shown above Wiederholen Sie dies bei Bedarf für jeden angeschlossenen Monitor 2 3 4 Handbuch IB DK2408 C ...

Страница 20: ... Sie auf Anordnen Monitore anordnen Sobald zusätzliche Monitore angeschlossen sind können diese entweder auf den Spiegelmodus oder den Erweiterungsmodus nur für einen zusätzlichen Monitor ein zweiter Monitor wird nur gespiegelt konfiguriert werden Klicken Sie auf Systemeinstellungen 2 2 1 Handbuch IB DK2408 C ...

Страница 21: ... separat in dem sich öffnenden Fenster der jeweiligen Anzeige ein Wählen Sie die Option Skaliert und dann die entsprechende Größe im Feld darunter Detailliertere Einstellungen können Sie wie folgt vornnehmen Halten Sie die Option Taste gedrückt und klicken Sie erneut auf Skaliert und ein erweitertes Menü zur Einstellung von Auflösung und Wiederholfrequenz öffnet sich Wählen Sie hier bitte Ihre bev...

Страница 22: ...rrors contained in this manual RaidSonic Technology GmbH reserves the right to make changes in the specifications and or design of the above mentioned product without prior notice The diagrams contained in this manual may also not fully represent the product that you are using and are there for illustration purposes only RaidSonic Technology GmbH assumes no responsibility for any differences betwe...

Отзывы: