ELITE 5120 InsTaLLaTIon
ELITE 5120 INSTALLATION - rev 12/22/15 pjm
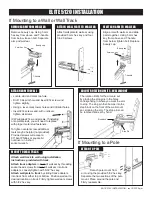
If Mounting to a Wall or Wall Track
MoUnT To WaLL TRaCK
Attach wall track to wall using installation
instructions provided with track.
Attach track adapters
to back of wall ear by threading
socket head screws from front of wall ear into track
adapters. Loosely tighten with 5/32” hex key.
Attach wall plate to track
by sliding track adapters
into track from either top or bottom. Position wall ear to
desired location on track. Firmly tighten wall ear screws
with 5/32 hex key.
REMoVE aRM FRoM WaLL EaR
REaTTaCH aRM To WaLL EaR
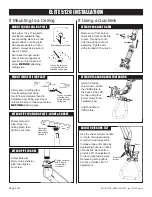
If Mounting to a Pole
Remove beauty cap. Using 5 mm
hex key from above and T-handle
from below, loosen bolt. Separate
arm and wall ear.
Align arm with wall ear and slide
parts together. Using 5 mm hex
key from above and T-handle
from below, tighten bolt. Replace
beauty cap.
aTTaCH WaLL PLaTE To WaLL EaR
Attach wall plate to wall ear using
provided 5 mm hex key and four
1/4-20 screws.
5 mm hex key
5mm hex key
Beauty cap
Beauty cap
T-handle
T-handle
aTTaCH aRM To WaLL
•
Locate stud and mark top hole.
•
Drill 11/64 pilot hole and insert #14 screw and
tighten slightly.
•
Using a level, mark lower holes and drill pilot holes.
•
Insert #14 screws and, with unit level,
tighten all screws.
ICW supplies #14 wood screws. If installing
onto metal studs, you will need to replace
with proper metal stud fasteners.
To tighten center screw, additional
tools may be helpful (not provided).
Provided screws will accept a
90° bent Phillips or square bit
nut driver on a short
socket wrench.
aDJUsT RoTaTIon LIMITs - WaLL MoUnT
The rotation limits for the arm are set
by placing the stop pins in the holes
corresponding to where you want the arm
to stop. The stop pin then bumps into the
stop block on the front of the wall mount
ear, stopping the arm. The stop pins can
be removed and set by hand.
Stop Pin
Stop block
aTTaCH To PoLE
Detach pole mount from
arm using the provided 5/32 hex key.
Separate the two sections of the pole
mount. Place around the pole and
firmly reassemble.


