background image

TITAN ELITE WALL MOUNT INsTALLATION

TITAN ELITE EASY-TO-WIRE WALL MOUNT INSTALLATION - 09/01/16 pjm

Page 3 of 4

Cord Management - Wall Mount

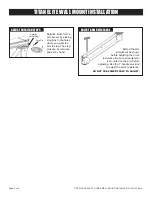
PREss WIREs INTO CHANNEL OF ELITE ARM sECTION

After feeding the wires through 

the Titan (upper) section of 

the arm, press them into the 

channels of the Elite (lower)

section. 
Use wire clips to secure them. 

Be sure wires don’t bind  

and the arm moves freely.

Wire clip

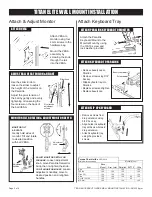
FEED WIRE THROUGH TITAN ARM 

Pull wires one at a time through the arm. Feed the 

largest wire first, allowing enough slack so the arm 


turns freely. 

Feed the first wire through the wall ear and out 

of the first wire port. Feed the wire back down 

through the first wire port and through the Titan 

arm segment. Feed the wire up and out of the 

second wire port, back down and into the  

Elite section of the arm.
Repeat these steps with the second wire.

Wires run through 

the joints.

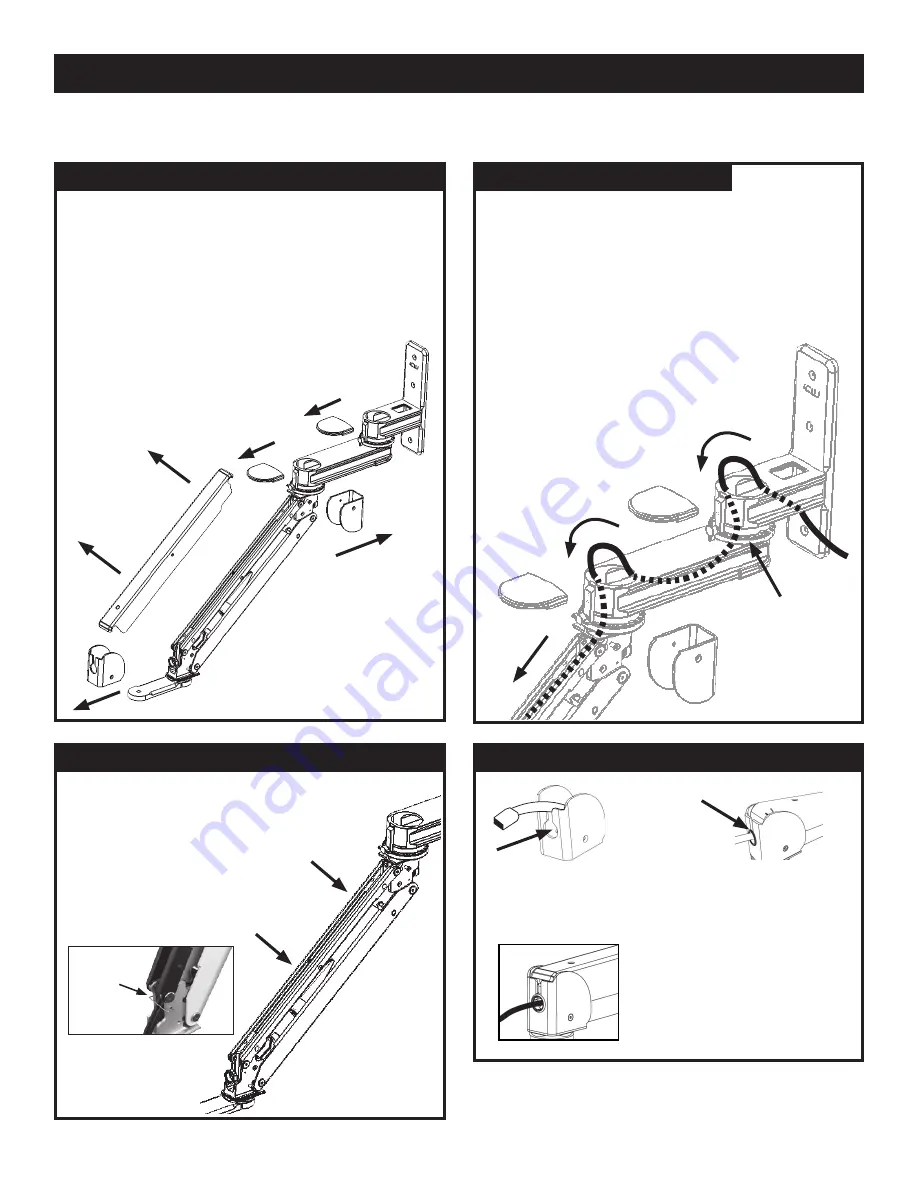
REPLACE ARM COVERs

Before reattaching arm 

covers, slip wires through 

end cover port.

Reattach black plastic 

bushing around exiting 

wires.

Replace covers on the Elite 

section of the arm. DO NOT 

use a power tool to replace 

screws.

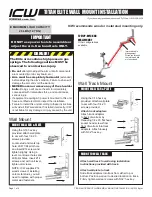
REMOVE ELITE ARM COVERs & TITAN ARM CAPs

END COVERs 

Remove the end covers by unscrewing the two 3/4” 

long 10-24 flathead screws using a Phillips head 

screwdriver.

TOP COVER

Remove the long arm cover by unscrewing the two 

1/4” long 6-32 flathead screws in the center of the 

cover using a Phillips head screwdriver. If you  

use a power tool, be very careful not to strip the 

screws. The arm needs to be in a  

vertical position to remove  

the long top cover.

TITAN ARM CAPs 

Slide off the plastic caps 

that cover the wire ports 

on the Titan section of 

the arm.

Содержание TITAN ELITE T2E12P-WT2-KUB

Страница 1: ...djust the arm Use hand tools ONLY iMPORTANT Improved cable management Wires run through the joints and are more enclosed MOUNT TO WALL TRACK Attach wall track to wall using installation instructions provided with track Attach wall plate to track Slide track adapters into track from either top or bottom Position wall ear to desired location on track Firmly tighten wall ear screws with 5 32 hex key ...

Страница 2: ...ew ATTACH KEYBOARD TO PARALINK ADJUST BALL VESA TENSION HEIGHT Use the slider knob to loosen the slider to adjust the height of the monitor on the Paralink Adjust the pivot tension of the ball by gently and evenly tightening or loosening the four screws on the back of the ball VESA Pivot tension adjustment screws Slider knob MONITOR TILT ROTATION ADJUST MONITOR DEPTH MONITOR TILT ROTATE Gently hol...

Страница 3: ...and out of the second wire port back down and into the Elite section of the arm Repeat these steps with the second wire Wires run through the joints REPLACE ARM COVERS Before reattaching arm covers slip wires through end cover port Reattach black plastic bushing around exiting wires Replace covers on the Elite section of the arm DO NOT use a power tool to replace screws REMOVE ELITE ARM COVERS TIT...

Страница 4: ...g stop pins in the holes where you want the arm to stop The stop pins can be removed and set by hand Rotation Limiter Ring Stop Pin ADJUST ARM RESISTANCE Extend the arm straight out as shown before adjusting the arm s resistance Be sure all equipment is mounted on the arm before adjusting Use the T handle provided to adjust the arm s resistance Do not use power tools to adjust ...

Отзывы: