background image

Page 2 of 4

TITAN 2020 EASY-TO-WIRE INSTALLATION - 5/20/20

TITAN 2020 EASY-TO-WIRE INSTALLATION

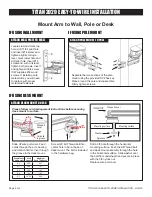
Desk Mount  

Part Number

Stud  

Length

Maximum  

Desk Thickness

D0

3.50”

2.47”

D1

3.50”

1.87”

D3

5.50”

1.87”

D5

7.50”

1.87”

D7

10.50”

2.38”

ATTACH DESK MOUNT TO DESK

IF USING WALL MOUNT

IF USING POLE MOUNT

IF USING DESK MOUNT

ATTACH WALL PLATE TO WALL

Locate stud and mark top 

hole, drill 11/64 pilot hole 

and insert #14 screw and 

tighten slightly. Using a 

level, mark lower hole and 

drill pilot hole, insert #14 

screw and, with unit level, 

tighten both screws. Insert 

and tighten middle screw. 

ICW supplies #14 wood 

screws. If installing onto 

metal studs, you will need 

to replace with proper 

metal stud fasteners.

ATTACH POLE MOUNT TO POLE

Separate the two sections of the pole 

mount using the provided 5/32 hex key. 

Place around the pole and reassemble. 

Firmly tighten screws.

Mount Arm to Wall, Pole or Desk

Wire port 

cover

Screw 3/8” All Thread bolt into 

center hole in bar at base of 

desk mount. The bolt is included 

in the hardware bag.

Slide off wire port cover. Feed 

cords through the arm, bearing 

and rotation limiter, then through 

the groove in the desk mount. 

Drill a 3/8 hole through the horizontal 

mounting surface. Push the All Thread bolt 

and desk mount assembly through the hole 

in the horizontal surface. Slide washer over 

the bolt from underneath and secure in place 

with the 3/8 nylock nut. 
Replace wire port cover.

Cords lie 

in groove

Please follow cord management instructions before securing 

desk mount to surface.

Nylock nut

Mounting surface

Wire port cover

Washer

Mounting surface

Содержание TITAN 2020

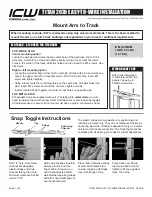
Страница 1: ...straps level with flange of cap Place track over flange Insert provided bolt and tighten until snug against track then stop Snap Toggle Instructions FOR WOOD STUD Center mounting option Locate the wall stud and mark the top center hole of the wall track Drill a 11 64 pilot hole insert a 14 screw and tighten slightly Using a level mark the lower holes in the center of the track drill pilot holes an...

Страница 2: ...ers ATTACH POLE MOUNT TO POLE Separate the two sections of the pole mount using the provided 5 32 hex key Place around the pole and reassemble Firmly tighten screws Mount Arm to Wall Pole or Desk Wire port cover Screw 3 8 All Thread bolt into center hole in bar at base of desk mount The bolt is included in the hardware bag Slide off wire port cover Feed cords through the arm bearing and rotation l...

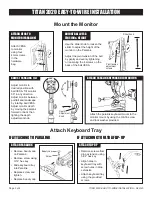
Страница 3: ...board tray using the provided screws ATTACH FLIP UP ADJUST PARALINK TILT Adjust monitor to desired position with ball VESA Tilt monitor 50 in any direction Adjust monitor between portrait and landscape by rotating ball VESA Adjust monitor depth by moving the paralink forward or back then tighting the depth adjustment knob 360 ATTACH PARALINK KEYBOARD TO MONITOR Attach the paralink keyboard mount t...

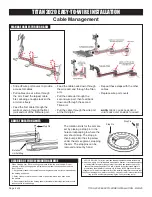
Страница 4: ...wire port covers NOTE CORDS CAN BE DAMAGED IF JOINTS ARE ROTATED MORE THAN 360º NOTICE ICWUSA COM Inc provides the appropriate hardware fasteners to match the majority if not all standard monitors and devices It is the responsibility of the installer integrator to ensure that the screws and fasteners have the adequate thread engagement The rule of thumb is that the thread depth is greater than the...

Отзывы: