background image

Installation Guide


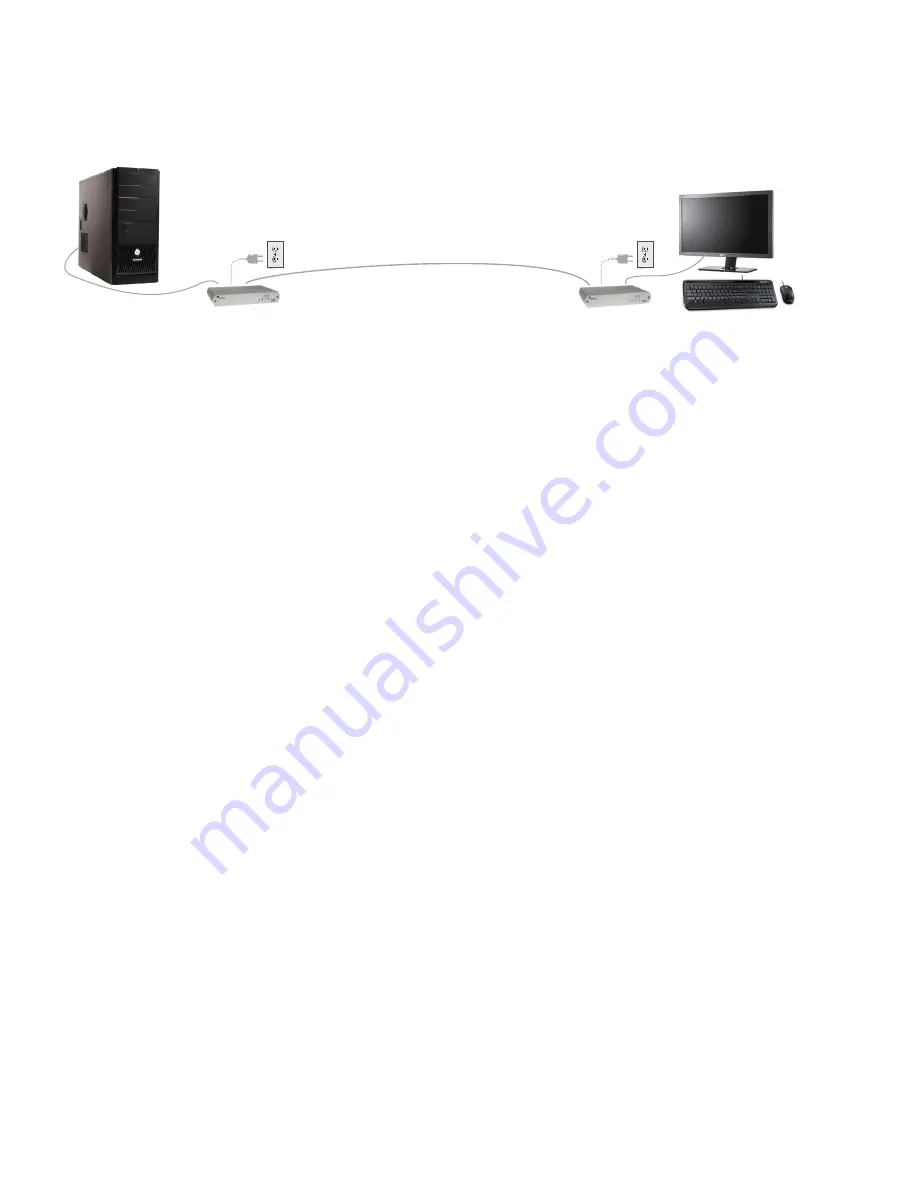
Before you can install the product, you need to prepare your site:

DVI & USB

up to 100m CAT 5e/6/7

(STP recommended)

REX

LEX


Computer

Monitor 

1.  

Determine where the computer is to be located and set up the computer.

2.  

Determine where you want to locate the remote desktop including the monitor, keyboard, mouse  


and any other USB device(s).

3.  

If you are using surface cabling, the product supports a maximum distance of 100m (330 ft).


 or 


If you are using premise cabling, ensure the 

CAT

 5e/6/7 cabling is installed between the two 

locations,with 

CAT

 5e/6/7 information outlets located near both the computer and the USB device(s), 

and the total length, including patch cords is no more than 100m.


Installing the LEX Unit 

1.  

Place the LEX unit near the computer.

2.  

 Install the supplied USB cable to the USB port on the LEX, and an available USB 2.0/1.1 Type A Port on 
the computer.

3.  

 Install  the 

supplied HDMI cable to the LEX

 (HDMI In), and an available HDMI Port on the computer.

4.  

Plug the 5V, 3A power adapter into a suitable AC outlet near the LEX.

Installing the REX Unit 

1.  

Place the REX unit near the monitor and USB device(s) in the desired remote location.

2.  

Connect the REX (HDMI Out) to the monitor with 

a high quality HDMI cable

.

3.  

Plug in your USB device(s) into the USB ports on the REX.

4.  

Plug the 5V, 3A power adapter into a suitable AC outlet near the REX.

8

Содержание 00-00386

Страница 1: ...EL5363 HDMI USB 2 0 Extender HDMI and USB 2 0 100m CAT 5e 6 7 KVM Extender System User Guide ...

Страница 2: ...ntation of WEEE regulations may vary slightly by individual EU member states Please check with your local and state government guidelines for safe disposal and recycling or contact your national WEEE recycling agency for more information Product Operation and Storage Please read and follow all instructions provided with this product and operate for intended use only Do not attempt to open the prod...

Страница 3: ...X Unit 7 Installation Guide 8 Installing the LEX Unit 8 Installing the REX Unit 8 Connecting the LEX to the REX 9 Connecting a USB device 9 Powering the Extender System 9 Checking the Installation 10 Troubleshooting Guide 11 Specifications 13 Contacting Technical Support 14 Warranty Information 14 Obtaining Warranty Service 15 Technical Glossary 16 ...

Страница 4: ... USB 1 1 or 2 0 compatible device s A minimum CAT 5e Shielded Twisted Pair UTP cable with two CAT 5e 6 7 RJ45 connectors if using surface cabling OR A minimum of CAT 5e cabling with two information outlets and two CAT 5e patch cords with CAT 5e RJ45 connectors if using premise cabling While CAT 5e UTP is the minimum category of twisted pair cabling for the best experience and to minimize interfere...

Страница 5: ...other HDMI connections Cabling Solid core Category 6a 7 STP cable with Category 6a 7 RJ45 connectors is recommended for best performance Using unshielded cabling may leave your signal more susceptible to interference and noise which may result in poor video performance or reduced extension distance Maximum distance and product performance will be reduced in the presence of interference or coiled e...

Страница 6: ...nicating with each other and working Blinking Green Light The host computer has entered power saving mode No Light The host and the LEX are not communicating or not connected 4 Video LED Green Solid Green Light HDCP digital rights management content is being transmitted Blinking Green Light Video non HDCP content is being transmitted No Light There is no video being transmitted 5 Config Reserved f...

Страница 7: ...g with each other and working Blinking Green Light The host computer has entered power saving mode No Light The host and the LEX are not communicating or not connected 4 Video LED Green Solid Green Light HDCP digital rights management content is being transmitted Blinking Green Light Video non HDCP content is being transmitted No Light There is no video being transmitted 5 Config Reserved for use ...

Страница 8: ...ts located near both the computer and the USB device s and the total length including patch cords is no more than 100m Installing the LEX Unit 1 Place the LEX unit near the computer 2 Install the supplied USB cable to the USB port on the LEX and an available USB 2 0 1 1 Type A Port on the computer 3 Install the supplied HDMI cable to the LEX HDMI In and an available HDMI Port on the computer 4 Plu...

Страница 9: ...other end of the patch cord into the CAT 5e 6 7 information outlet near the host computer 3 Plug one end of the second CAT 5e 6 7 patch cord not included into the Link port RJ45 on the REX 4 Plug the other end of the second patch cord into the CAT 5e 6 7 information outlet near the USB device s Connecting a USB Device 1 Install any software required to operate the USB device s Refer to the documen...

Страница 10: ...us controllers by clicking the sign If the EL5363 has been installed correctly you should find it listed as one Generic Hub To open Device Manager in Windows 10 8 8 1 or Windows 7 Open the Start menu right click on Computer then select Manage Device Manager 4 For OS X users open the System Profiler to confirm that the EL5363 has installed correctly In the left hand column under Hardware select USB...

Страница 11: ...s on LEX and REX are off There is no connection between the LEX and REX 1 Ensure a CAT 5e 6 7 cable is connected between the LEX and REX Ensure CAT 5e UTP or better cabling with conductor RJ45 connectors is used 2 Connect a short CAT 5e 6 7 patch cord between the LEX and REX to determine if the original CAT cable is defective 3 Ensure the CAT 5e 6 7 cable is as straight as possible i e not coiled ...

Страница 12: ...roduct Connect the KVM extender product to the computer 7 If the second USB device does not operate the KVM extender product may be malfunctioning Contact Technical Support for assistance 8 If the second device does operate properly the first device may not be compatible with the KVM extender product Contact technical support for issues Blinking Video on the Sink Monitor A poor quality or damaged ...

Страница 13: ... V AC 50 60 Hz Output 5V DC 3A 15 W Power Available to USB Device at REX 500 mA each port Maximum USB Devices Supported 30 USB devices Enclosure Material Silver anodized aluminum Enclosure Dimensions 112 mm x 175 mm x 30 mm 4 4 x 6 9 x 1 18 LOCAL EXTENDER LEX Video Connector 1 x HDMI In USB Connector 1 x USB Type B Receptacle Link Connector 1 x RJ45 REMOTE EXTENDER REX Video Connector 1 x HDMI Out...

Страница 14: ...are has resulted from accident abuse or misapplication Limitation of Liability The hardware warranty set forth in this agreement replaces all other warranties Icron Technologies Corporation expressly disclaims all other merchantability and fitness for a particular purpose and noninfringement of third party rights with respect to the hardware Icron Technologies Corporation dealer agent or employee ...

Страница 15: ...o you at Icron Technologies Corporation s expense not later than thirty days after Icron Technologies Corporation receives the defective product Address the returned product to RMA Coordinator Icron Technologies Corporation 4664 Lougheed Highway Suite 221 Burnaby BC Canada V5C 5T5 Contacting Sales sales icron com Tel 1 604 638 3920 Contacting Technical Support icron com support Tel 1 604 638 3939 ...

Страница 16: ...onnector is used to attach the USB cable to a USB device RJ45 The Registered Jack RJ physical interface is what connects the network cabling CAT 5 to the Local Extender Unit and Remote Extender unit You may use either the T568A scheme Table 1 or the T568B scheme Table 2 for cable termination as this extender uses all four pairs of the cable RJ45 connectors are sometimes also referred to as 8P8C co...

Страница 17: ...Icron Technologies Corporation 4664 Lougheed Highway Suite 221 Burnaby BC Canada V5C 5T5 Tel 1 604 638 3920 Fax 1 604 638 3930 icron com ...

Отзывы: