background image

Tiny Serial-to-Ethernet Device Server  

Copyright ©  2016 ICP DAS CO., Ltd. All Rights Reserved.


-


37 - 


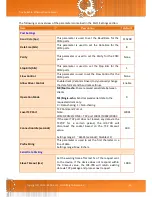
The following is an overview of the parameters contained in the IP Address Settings section: 

Item 

Description 

IP Address


Address Type


Static  IP:

  If  no  DHCP  server  is  installed  on  the  network,  the  network 

settings  can  be  configured  manually.  Refer  to 

Section  4.3.1.1  Manual 

Configuration

 for more details. 

DHCP:

  The  Dynamic  Host  Configuration  Protocol  (DHCP)  is  a  network 

application  protocol  that  automatically  assigns  an  IP  address  to  each 
device.  Refer  to 

Section  4.3.1.2  Dynamic  Configuration


for  more 

details. 

Static IP Address


Each  tDS-700  connected  to  the  network  must  have  its  own  unique  IP 
address. This parameter is used to assign a specific IP address. 

Subnet Mask 

This  parameter  is  used  to  assign  the  subnet  mask  for  the  tDS-700 
device.  The  subnet  mask  indicates  which  portion  of  the  IP  address  is 
used to identify the local network or subnet. 

Default Gateway 

This parameter  is used to  assign  the  IP Address of the  Gateway  to be 
used by the tDS-700. A Gateway (or router) is a device that is used to 
connect an individual network to one or more additional networks. 

MAC Address 

This parameter is used to set a user-defined MAC address, which must 
be in the format FF-FF-FF-FF-FF-FF. 

Virtual COM


TCP Command Port 

This parameter is used to configure the TCP Command Port to a custom 
value depending on your requirement. Note that if the TCP Command 
Port configuration setting is completed, the TCP port of serial port will 
be change, as follows: 
COM1= TCP Command Port + 1 
COM2= TCP Command Port + 2 
 
The  default  TCP  Command  Port  is  10000,  Thus,  the  serial  COM 
port1/port2 is 10001/10002, and so on. 

Command Port Timeout 
(Socket Watchdog) 

If the command port does not receive any data from the TCP/IP socket 

for a certain period, the tDS-700 can disconnect the socket. 

 
Settings range value: 1 ~ 65535 (seconds);  

Default value: 30 (seconds); Disabled: 0; 

Update Settings 

Click this button to save the revised settings to the tDS-700. 


Содержание tDS-712

Страница 1: ...ble However no responsibility is assumed by ICP DAS for its use nor for any infringements of patents or other rights of third parties resulting from its use COPYRIGHT Copyright 2016 by ICP DAS All rig...

Страница 2: ...CA 002 Cable 17 2 6 PIN ASSIGNMENTS 18 2 6 1 tDS 712 tDS 712i tDSM 712 18 2 6 2 tDS 722 tDS 722i 18 2 6 3 tDS 732 tDS 732i 19 2 6 4 tDS 715 tDS 715i 19 2 6 5 tDS 725 tDS 725i 20 2 6 6 tDS 735 tDS 735i...

Страница 3: ...NET I O APPLICATIONS 57 5 4 PAIR CONNECTION APPLICATIONS 59 5 5 TCP CLIENT MODE APPLICATIONS 66 6 CGI CONFIGURATION 74 6 1 CGI URL SYNTAX 74 6 2 CGI COMMAND LIST 75 APPENDIX A GLOSSARY 77 1 ARP ADDRES...

Страница 4: ...ve the shipping materials and cartons in case you need to ship the module in the future More Information Documentation CD NAPDOS tDS 700 Document http ftp icpdas com pub cd tinymodules napdos tds 700...

Страница 5: ...e virtualized to a standard PC COM Port in Windows Therefore users can transparently access or monitor serial devices over the Internet Ethernet without the need for software modification tDS 700 devi...

Страница 6: ...ded into a machine The tDS 700 features a powerful 32 bit MCU that allows it to efficiently handle network traffic The tDS 700 offers true IEEE 802 3af compliant classification Class 1 Power over Ethe...

Страница 7: ...Connectivity via the Internet is now common in many of the latest applications from home appliances to vending machines to testing equipment to UPS etc An Ethernet network can link office automation...

Страница 8: ...is that perhaps the existing the COM Port communication system was built many years ago and is now outdated As a result a new technology VxComm was developed to virtualize the COM Ports of the tDS 70...

Страница 9: ...ved 9 The VxComm driver controls all the details of the Ethernet TCP IP programming technique meaning that with the assistance of tDS 700 and VxComm technology your COM Port program will be able to ac...

Страница 10: ...nables the tDS 700 to be configured via a standard web browser interface e g Google Chrome Internet Explorer or Firefox etc This means that it is easy to check the configuration of the tDS 700 via an...

Страница 11: ...3 wire RS 232 2 wire RS 485 2 wire RS 485 2 wire RS 485 4 wire RS 422 COM2 5 wire RS 232 3 wire RS 232 2 wire RS 485 2 wire RS 485 5 wire RS 232 3 wire RS 232 COM3 3 wire RS 232 2 wire RS 485 3 wire R...

Страница 12: ...tions Supports UDP responder for device discovery UDP Search Static IP or DHCP network configuration Easy firmware update via the Ethernet BOOTP TFTP Tiny Web server for configuration HTTP Contains a...

Страница 13: ...232 3 wire RS 232 3 wire RS 232 tDS 715 tDS 715i Plastic 2 wire RS 485 4 wire RS 422 tDS 725 tDS 725i Plastic 2 wire RS 485 2 wire RS 485 tDS 735 tDS 735i Plastic 2 wire RS 485 2 wire RS 485 2 wire R...

Страница 14: ...un position after the update is complete Front View 1 Robust Insulated and Fire retardant Case 2 Serial COM Ports The number of serial COM Ports available depends on the type of tDS 700 series module...

Страница 15: ...DC adapter can be used to power the tDS 700 module 6 PoE and Ethernet RJ 45 Jack The tDS 700 series module is equipped with an RJ 45 jack that is used as the 10 100 Base TX Ethernet port and features...

Страница 16: ...ions The following diagrams provide the dimensions of the tDS 700 series module and CA 002 cable that can be used as a reference when defining the specifications and the DC power supply plug for any c...

Страница 17: ...d 17 tDS 722 722i 732 732i 715 715i 725 725i 735 735i 718 718i 724 724i 734 734i 2 5 2 CA 002 Cable Pin Assignment P1 P2 1 RED OPEN 2 BLACK OPEN Note Cable color BLACK NO DESCRIPTION QTY UNIT 1 UL2464...

Страница 18: ...S 722i tDS 712 tDSM 712 tDS 712i Terminal No Pin Assignment COM1 09 N A N A 08 CTS1 CTS1 07 RTS1 RTS1 06 N A N A 05 GND ISO GND 04 N A N A 03 TxD1 TxD1 02 RxD1 RxD1 01 N A N A tDS 722 tDS 722i Termina...

Страница 19: ...l No Pin Assignment 10 F G F G COM3 09 GND ISO GND 08 RxD3 RxD3 07 TxD3 TxD3 COM2 06 GND ISO GND 05 RxD2 RxD2 04 TxD2 TxD2 COM1 03 GND ISO GND 02 RxD1 RxD1 01 TxD1 TxD1 tDS 715 tDS 715i Terminal No Pi...

Страница 20: ...i tDS 725 tDS 725i Terminal No Pin Assignment 10 F G F G 09 N A N A 08 N A N A 07 N A N A COM2 06 GND ISO GND 05 D2 D2 04 D2 D2 COM1 03 GND ISO GND 02 D1 D1 01 D1 D1 tDS 735 tDS 735i Terminal No Pin A...

Страница 21: ...No Pin Assignment 10 F G F G 09 N A N A RS 232 08 GND ISO GND 07 RxD1 RxD1 06 TxD1 TxD1 RS 485 RS 422 05 GND ISO GND 04 RxD1 RxD1 03 RxD1 RxD1 02 TxD1 D1 TxD1 D1 01 TxD1 D1 TxD1 D1 tDS 724 tDS 724i T...

Страница 22: ...016 ICP DAS CO Ltd All Rights Reserved 22 2 6 9 tDS 734 tDS 734i tDS 734 tDS 734i Terminal No Pin Assignment 10 F G F G COM3 09 GND ISO GND 08 RxD3 RxD3 07 TxD3 TxD3 COM2 06 GND ISO GND 05 RxD2 RxD2 0...

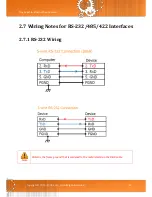
Страница 23: ...et Device Server Copyright 2016 ICP DAS CO Ltd All Rights Reserved 23 2 7 Wiring Notes for RS 232 485 422 Interfaces 2 7 1 RS 232 Wiring Note FGND is the frame ground that is soldered to the metal shi...

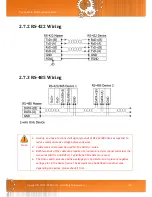
Страница 24: ...ommon mode voltage between devices 2 Twisted pair cable must be used for the DATA wires 3 Both two ends of the cable may require a termination resistor connected across the two wires DATA and DATA Typ...

Страница 25: ...nnect the Power Supply and the Host PC 1 Ensure that the network settings on your PC are configured correctly 2 Ensure that the Windows firewall or any Anti Virus firewall software is correctly config...

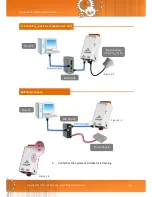
Страница 26: ...CP DAS CO Ltd All Rights Reserved 26 5 Verify that the System LED indicator is flashing Figure 3 4 12 to 48 VDC jack Power Supply Non PoE PoE Power Supply Host PC Hub Swith Power Supply 12 48 VDC Jack...

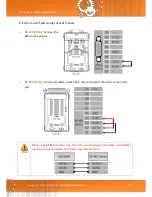
Страница 27: ...lf test wiring check as follows RS 232 Wiring Connect the RxD to the TxD pins RS 422 Wiring Connect the RxD1 to the TxD1 pins and connect the RxD1 to the TxD1 pins Note While using RS 485 modules e g...

Страница 28: ...nstall files on the CD and the download addresses are shown below CD NAPDOS Software VxComm_Driver http ftp icpdas com pub cd tinymodules napdos software vxcomm_dr iver Step 3 Search for the tDS 700 s...

Страница 29: ...ill take effect within 2 seconds If you don t know the correct network configuration information contact your Network Administrator to obtain the details Step 4 Configuring the Virtual COM Ports 1 Wai...

Страница 30: ...Copyright 2016 ICP DAS CO Ltd All Rights Reserved 30 2 Click the Add Server s button Assign a COM Port number and click OK to save your settings 3 Click on tDS 700 name and check the virtual COM port...

Страница 31: ...Rights Reserved 31 4 Click Tools Restart Driver and then click the Restart Driver button Step 5 Testing your tDS 700 1 Right click Port 1 and then choose the Open COM Port item 2 Check that the confi...

Страница 32: ...ton If a response is received it will be displayed in the received field 4 If the test is successful then your COM port program should now be able to work with this Virtual COM Port Note While using R...

Страница 33: ...Chrome Firefox or Internet Explorer which are reliable and popular Internet browsers that can be used to configure tDS 700 series module Note that if you intend to use Internet Explorer ensure that th...

Страница 34: ...ter the Password After the main login page is displayed enter a password the factory default password is admin and then click the Submit button to continue Step 4 Log in to the tDS 700 Web Server Fact...

Страница 35: ...ware and hardware information section includes information related to the Model Name the current Firmware version the IP Address the current position of the Initial Switch the Alias the MAC Address an...

Страница 36: ...Type Static IP Address Subnet Mask and Default Gateway values are the most important network settings and should always correspond to the LAN configuration If they do not match the tDS 700 module will...

Страница 37: ...d to identify the local network or subnet Default Gateway This parameter is used to assign the IP Address of the Gateway to be used by the tDS 700 A Gateway or router is a device that is used to conne...

Страница 38: ...u Step 2 Enter the relevant details in the respective network settings fields Step 3 Click the Update Settings button to complete the configuration 4 3 1 2 Dynamic Configuration Dynamic configuration...

Страница 39: ...an overview of the parameters contained in the General Settings section Item Description Default Network Ethernet Speed This parameter is used to set the Ethernet speed The default value is Auto Auto...

Страница 40: ...Enable Disable the assign cgi Enable UDP Configuration This parameter is used to enable or disable UDP configuration function Enable UDP Alarm Alarm IP Address UDP The tDS 700 can send and UDP packag...

Страница 41: ...onfiguration Step 2 Click the OK button in the message dialog box Step 3 Check whether the module has been reset to the original factory default settings for use with the VxComm Utility Refer to Chapt...

Страница 42: ...l Rights Reserved 42 The Forced Reboot function can be used to force the tDS 700 to reboot or to remotely reboot the device After the tDS 700 module has rebooted the original login screen will be disp...

Страница 43: ...the hardware switch Initialization via web is useful when module is installed in remote site and can be accessed by a remote PC via TeamViewer Note If the remote firmware update is failed then the tra...

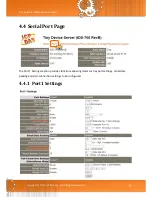
Страница 44: ...yright 2016 ICP DAS CO Ltd All Rights Reserved 44 4 4 Serial Port Page The Port 1 Settings section provides functions allowing items such as port settings serial data packing and pair connection setti...

Страница 45: ...he data format and baud rate settings Enable Operation Mode M0 Multi echo Share received serial data between clients M1 Single echo Send received serial data to the requested client only 0 Data sharin...

Страница 46: ...ars Disabled 0 1 char 1 0x0D 2 chars 2 0x0D 0x0A 0 Timeout Between Chars ms Set the waiting time after Rx of the response sent from the device If the device does not respond within the timeout value t...

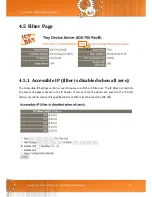
Страница 47: ...filter is disabled when all zero The Accessible IP Settings section is used to query or edit the IP Filter List The IP Filter List restricts the access of packets based on the IP header If one or mor...

Страница 48: ...ion Add IP To The List Add an IP address to the IP Filter List Add Range IP Mask IP Add an IP address range to the IP Filter List Delete IP Number Delete a specific IP address from the IP Filter List...

Страница 49: ...DAS CO Ltd All Rights Reserved 49 4 6 Monitor Page After clicking the Monitor tab the Current Connection Status page will be displayed showing detailed information regarding the current status of the...

Страница 50: ...word tab the Change Password page will be displayed To change a password first enter the old password in the Current password field use the default password admin and then enter a new password in the...

Страница 51: ...to Ethernet Device Server Copyright 2016 ICP DAS CO Ltd All Rights Reserved 51 4 8 Logout Page After clicking the Logout tab you will be immediately logged out from the system and be returned to the...

Страница 52: ...CO Ltd All Rights Reserved 52 5 Typical Applications This chapter provides some examples of typical scenarios for the tDS 700 module including applications focused on the Virtual COM Direct Socket Con...

Страница 53: ...2 485 devices to an Ethernet network The VxComm utility allows the built in tDS 700 COM Port to be virtualized to a standard COM Port of a host PC as shown below In the configuration above Meter 1 is...

Страница 54: ...td All Rights Reserved 54 5 2 Direct Socket Connection Applications tDS 700 series module can accept the TCP connection include raw data directly it also can communicate with TCP client and Serial Dev...

Страница 55: ...ply power to the slave device Ex M 7015 Device ID 2 10 30 VDC power used 4 Install VxComm utility and then configuration Ethernet setting such as IP Mask Gateway details for tDS 700 series module refe...

Страница 56: ...rved 56 7 Type the IP address of tDS 700 in the IP Address field and assign a TCP IP port of tDS 700 and then click the Open TCP button 8 Type a string in the send field then click the Send button If...

Страница 57: ...VxComm technology programs that support serial devices on the host PC can be upgraded from an RS 485 network to an Ethernet network without requiring any modifications to the program Configurable Eth...

Страница 58: ...in MS Excel to view the log data as shown in the example below By using the I 7000 DCON utility and MS Excel in conjunction with VxComm technology the signal data originating from I 7000 modules via...

Страница 59: ...ications tDS 700 device servers can be used to create a pair connection application as well as serial bridge or serial tunnel and then route data between two serial devices via TCP IP which is useful...

Страница 60: ...Follow the procedure described below Step 1 Connecting to a network PC and Power 1 Confirm that the tDS 700 modules are functioning correctly Refer to Chapter 3 Setting up the tDS 700 module for more...

Страница 61: ...tup for a pair connection test Step 2 Configuring the Ethernet Settings Contact your Network Administrator to obtain the correct and functioning network configuration for the tDS 700 modules including...

Страница 62: ...tep 3 Configuring the Pair connection Client Mode on the Web Server for tDS 700 1 1 Enter the password default admin in the Login password field and then click the Submit button to enter the configura...

Страница 63: ...down options for example 115200 8 None and 1 4 The pair connection settings area as follows 4 1 Select Client from the Application Mode Server Mode drop down options 4 2 Type the IP address of the tD...

Страница 64: ...of the tDS 700 2 3 Set the Baud Rate to 115200 and the Data Format to 8 None 1 Refer to Figures 5 3 to 5 5 for illustrations of how to perform the above steps 4 Select Server from the Application Mod...

Страница 65: ...Note The Baud Rate and data format depend on the serial port settings for the web configuration above Figure 5 7 1 Double Click Test2COM exe 2 Type COM1 COM2 3 Check Data Bits 8 4 Check Parity None 5...

Страница 66: ...e actively by TCP server program The whole system should operate like this The following are examples of TCP Client Mode tests TCP Client Mode Settings Model Port Settings default Pair connection Sett...

Страница 67: ...that the tDS 700 module is functioning correctly Refer to Chapter 3 Setting up the tDS 700 Module for more details 2 Connect both the tDS 700 TCP server PC 2 and hyper terminal PC 1 to the same sub n...

Страница 68: ...work configuration including the IP Address Mask and Gateway details for the tDS 700 module Also refer to Chapter 3 Setting up the tDS 700 Module for more details Step 3 Configuring Pair connection TC...

Страница 69: ...ample 115200 8 None and 1 4 The pair connection settings area as follows 4 1 Select Client from the Application Mode Server Mode drop down options 4 2 Type the IP address of the TCP Server PC 2 in the...

Страница 70: ...ts Reserved 70 Step 4 Testing the Pair connection TCP Client Mode Functions 1 Install TcpIpEcho exe TCP IP Test Server program on your PC The software is located at http www brothersoft com tcp ip tes...

Страница 71: ...n the Server IP and Port Number field for example 10 0 8 21 and 500 5 Click the Echo Messages Back To Client check box 6 After clicking the OK button the server will begin listening on the specific IP...

Страница 72: ...click in the Configure Port area and then choose the Open COM Port item under the VxComm utility 8 Select the appropriate COM Port Baud Rate and Data Format settings from the relevant drop down optio...

Страница 73: ...hen click the Send button on the COM1 terminal PC 1 10 Confirm that TCP server PC 2 will receive this string under the TCP IP Test Server 11 When a response is received it will be displayed in the rec...

Страница 74: ...ease make sure you have correctly configured the network settings for the tDS 700 before using CGI configuration Please refer to Chapter 3 Setting up the tDS 700 module about the Ethernet settings 6 1...

Страница 75: ...eout Socket Watchdog cmdwdt 1 65535 seconds Default 30 Disable 0 07 Set MAC Address mac Format FF FF FF FF FF FF 08 Set Alarm IP Address UDP aip xxx xxx xxx xxx 09 Set Alarm Port UDP aport 1 65535 sec...

Страница 76: ...hr0 endchr1 Number char1 char2 06 Set Operation Mode opmode0 opmode1 0 1 07 Set Slave Timeout slto0 slto1 ms 08 Set Data Buffer Delay Time dbdt0 dbdt1 ms 09 Set Packing Length Packlen0 packlen1 0 255...

Страница 77: ...packet to machine B across a physical network to which they are both attached but A only has the Internet address for B IPB The question arises how does A map that address to the MAC address for B MAC...

Страница 78: ...he manufacturer s web site or FTP 5 Gateway Computers that interconnect two networks and pass packets from one to the other are called Internet Gateways or Internet Routers Gateways route packets that...

Страница 79: ...facturers purchase blocks of MAC addresses and assign them in sequence as they manufacture Ethernet interface hardware Thus no two hardware interfaces can have the same MAC address 10 Packet A packet...

Страница 80: ...ply called the Mask is a 32 bit number that masks and IP address and divides the IP address into the network address and the host address Given its own IP address and its subnet mask a host can determ...

Страница 81: ...known as TCP IP TCP IP can be used to communicate across any set of interconnected networks 17 UDP User Datagram Protocol UDP is an internet protocol that provides a much simpler service to the applic...

Страница 82: ...200 1197 6 0 20 2400 2395 2 0 20 4800 4790 4 0 20 9600 9568 0 0 33 14400 14392 0 05 19200 19136 0 33 38400 38464 0 17 57600 57552 0 08 115200 114960 0 21 128000 128240 0 18 230400 229920 0 21 250000 2...

Отзывы: