background image


Chapter 4 

iCAM-7

60D User’s Manual        ICP DAS                                                                      

Setup 

 79 


 GPIO Input:

 This method will trigger the Camera snapshot operation 

according to the set time interval (in seconds) whenever GPIO Input 
Signal is detected within the defined days of the week and at the time 
of the set days.  
(As for the more GPIO Signal Settings, you may refer to 

4.4.4 GPIO 

Tab

)


Interval

: the Time Lapse; Snapshot is triggered at every setting 

interval time that minimum 3 seconds. 
 

Number

: Single snapshot or 6 snapshots with the setting interval (1 or 

2 seconds). 
 

Target

: The stream of accumulated snapshots may be stored in the SD 

Card, Remote Disk, sent to host by E-mail, FTP, activated GPIO 
Output Port as preferred, or through all of them. 


Содержание iCAM-760D

Страница 1: ...iCAM 760D 7 37 MP Dual Lens Panoramic Dome Network Camera User s Manual Version 1 01...

Страница 2: ...ments of patents or other rights of third parties resulting from its use Copyright and Trademark Information Copyright 2017 by ICP DAS CO LTD All rights reserved worldwide Trademark of Other Companies...

Страница 3: ...AM FINDER to Assign IP Address 20 2 4 2 Open the Web based UI of the Camera 23 3 Live View UI Settings 26 3 1 Quick Access Buttons 28 3 2 Camera Live View UI Setting Tools 29 4 Setup 38 4 1 Video Audi...

Страница 4: ...ideo Tab 71 4 4 3 Snapshot Tab 76 4 4 4 GPIO Tab 81 4 5 Local Storage Setup 82 4 5 1 Local Storage Tab 83 4 5 2 Playback Tab 84 4 6 Remote Storage Setup 85 4 6 1 Remote Storage Tab 85 5 Appendix 86 5...

Страница 5: ...ifications 2 Add Section 2 2 about how to install microSD card into the camera 3 Add Section 4 3 5 WISE Tab for communicating the camera with the WISE controller to perform a WISE Surveillance Solutio...

Страница 6: ...e impact Do not install the device under high temperature less than 45 C environment Excessive heat could damage the equipment Do not cover device with any object or install it in a poorly ventilated...

Страница 7: ...ovides user various 3840 x 1920 video layout including Original View Double Broad View Triple View and Quad View The ePTZ function including preset point without moving parts can replace part of tradi...

Страница 8: ...Manual ICP DAS 8 Introduction Two way Audio Built in microSD microSDHC microSDXC Card Slot for On Board Storage Weather proof IP66 rated Outdoor Housing Built in 802 3af Compliant PoE ONVIF 2 2 Compl...

Страница 9: ...Chapter 1 iCAM 760D User s Manual ICP DAS 9 Introduction 1 1 Hardware Overview iCAM 760D iCAM 760D with outdoor 6 dome housing Dimensions...

Страница 10: ...connections with outside devices User can make the connectors to support Audio DC Jack or Terminal Block for GPIO This model does not support for IR board Please refer to following table of the pins...

Страница 11: ...H V Shutter Time 1 100 000 to 1s WDR Technology eWDR Enhanced Day Night Removable IR cut filter for Day Night Function Minimum illumination 1 9 Lux F2 8 Color 0 1 Lux F2 8 B W External IR Illuminators...

Страница 12: ...CP IP IPv4 UDP SMTP FTP DHCP DDNS NTP DNS ARP RTSP RTP UPnP ONVIF Profile S Multicast Protection Multiple user access levels with password protection IP address filtering Interface 10 Base T 100 BaseT...

Страница 13: ...Casing Indoor IP54 Outdoor Weather proof IP66 rated housing Safety Certifications CE FCC Class B LVD Operating Temperature Starting 10 C 50 C Working 40 C 50 C Operating Humidity 10 80 System Requirem...

Страница 14: ...Please check if below components are all included in the box NO A 1 B 1 A 2 B 2 Quantity 3 4 4 3 1 Screws 2 Wall Mount Ceiling Mount Installation Step 1 Install the Bracket B 2 by applying the Screw...

Страница 15: ...ep 1 Loose the 4 screws of cover and remove the cover Step 2 Take Screw A 1 3 pcs Insert each screw through the pan and then the Bracket A 2 Step 3 Concurrently squeeze the Bracket A 2 3 pcs into the...

Страница 16: ...roSDHC microSDXC 64 GB or above for local storage application The user can prepare a microSD card to install into the camera via the following steps Step 1 Loose the 4 screws of cover remove the cover...

Страница 17: ...port RJ45 on the cable For this PoE model user can use PoE Switch as power supply 3 Use CAM FINDER software utility in CD to set up the camera see 2 4 Configuring Camera via CAM FINDER or directly set...

Страница 18: ...tup file setup exe and complete the installation step by step iCAM CD Path Software_Utility Cam Finder The latest version of the CAM FINDER software program is available on the iCAM product website ht...

Страница 19: ...ER icon on the Desktop of PC or choose Start All Programs CAM FINDER path to run the software The CAM FINDER window is showing as the following picture If want to change the software language please c...

Страница 20: ...d Setup 2 4 1 Use CAM FINDER to Assign IP Address 1 Click the Device Search to search the camera on the network 2 Under your selected item double click the left Mouse button or Right click the Mouse b...

Страница 21: ...ual ICP DAS 21 Installation and Setup 3 Check Static IP address item to select the network connection method of the camera 4 After modifying the camera properties click Set button to save and enable t...

Страница 22: ...nual ICP DAS 22 Installation and Setup 5 This Utility can batch modify IP address automatically Use Ctrl or Shift key on the keyboard to choose several Camera Devices Then click the Batch Device Setti...

Страница 23: ...ted unit run the Open Web on the select item from the CAM Finder software window 2 Manual input the username and password for the login authentication of camera webpage For the first time login of set...

Страница 24: ...ol Comply with the ActiveX installation as they are needed to view the video stream and some other operations Besides use of Microsoft IE browser is recommended as it offers a better compatibility Ple...

Страница 25: ...n from Your Browser If your IE Browser can t get the ActiveX download properly you may have to temporarily lower your security settings to perform a one time only installation of the ActiveX component...

Страница 26: ...a Device s IP address gotten via CAM FINDER utility NOTE For the first time user there will be a prompt to install the ActiveX control Conply with the ActiveX installation as it is needed to view the...

Страница 27: ...Camera Live View UI Settings 27 3 The Live View Setting window will then display offering all the necessary set up tools for changing the live view reconfigurations The functions of each of these tool...

Страница 28: ...on to someone facing the network Camera from the computer For ideal voice reception the distance of the person on view should be kept within 2 meters from the Camera Snapshot Click this button to capt...

Страница 29: ...the Double Broad Triple or Quad ePTZ display mode is selected Click the ePTZ function to display the ePTZ setting tools Recording Path Recording file name Specify a storage destination path for the v...

Страница 30: ...gs 30 Display Mode With the part of fisheye lens the Camera can offer the following live view display modes Original View 360 degree Full View Double Broad View 180 degree Ultra Wide Angle View x 2 Tr...

Страница 31: ...lution in actual size 1600 x 1200 The default is in uncheck status 800 x 400 Protocol Option for TCP UDP or HTTP transmission protocol with H 264 MPEG4 streaming is available Video Stream Two kinds of...

Страница 32: ...to move ePTZ pane to a convenient location in the window CH Select the ePTZ channel or display window 1 2 3 or 4 to implement ePTZ setting Step Adjust and set the speed of live view panning motion Di...

Страница 33: ...ns in sequence 1 2 3 4 with the configured Time and Speed value Uncheck it Auto Patrol function would stop Auto Pan Click button to enable Auto Pan function then selected CH window would start to pan...

Страница 34: ...3 iCAM 760D User s Manual ICP DAS Camera Live View UI Settings 34 Auto Pan continue 360 rotate with anti clockwise While Camera Mount is set to 360 camera live view would rotate with anti clockwise di...

Страница 35: ...continue 180 Pan from left to right direction If Camera Mount is set to 180 camera live view would pan from left to right direction Zoom Button Click button to zoom in and button to zoom out the sele...

Страница 36: ...ame as office123 _20170510_102808 avi To start recording click the Recording button in the Quick Access Button area Browse Click Browse button to define Snapshot Path and Snapshot Filename for the sna...

Страница 37: ...al Storage and Remote Storage As you get familiar with features and functions of your Camera you may want to change or update a number of its settings to further upgrade its performance This can be ac...

Страница 38: ...Chapter 4 iCAM 760D User s Manual ICP DAS Setup 38 4 Setup NOTE For Live View setup execution please refer to the previous chapter Live View UI Settings...

Страница 39: ...r 4 iCAM 760D User s Manual ICP DAS Setup 39 4 1 Video Audio Setup Clicking the Video Audio button will display tabbed panes for defining Camera video stream audio and privacy mask functions 4 1 1 Vid...

Страница 40: ...General Settings Lens type There are fisheye and fixed 2 lens types Brightness The luminance of the captured image apart from its hue or saturation Try to assign the fit value according to the environ...

Страница 41: ...y to assign the fit value according to the environment Sharpness Sharpness can be defined as edge contrast So when we increase sharpness we increase the contrast only along near edges Try to assign th...

Страница 42: ...tify people or objects Try to set them according to the stream quality EV Compensation Exposure Compensation is a feature of a camera that allows you to adjust the exposure value manually You may incr...

Страница 43: ...ages even under backlighting White Balance Because camera doesn t have ability to automatically adjust different color temperature to the environment six templates are provided to let you choose for d...

Страница 44: ...vely Day Night Threshold Set the illumination lux value 5 100 to auto trigger the Camera into day or night mode relative to luminance of the area under surveillance When the environment luminance beco...

Страница 45: ...CP DAS Setup 45 MTF Turn on this function could higher sharpness and contrast the image quality would be improved When MTF is off you could see When MTF is on you could see Camera Mount Two camera mou...

Страница 46: ...ts for the video quality of the Camera streaming function NOTE If the Event Alarm Setting see Section 4 4 2 4 4 3 is enabled an alert message will display requiring you to disable the feature first be...

Страница 47: ...to meet the provided bit rate Quality Bitrate The options for streaming mode quality are expressed differently between VBR showing Quality and CBR showing Bitrate Quality Standard Good Detailed Bitrat...

Страница 48: ...LC media player is used the port can be renamed with easy to remember pathname For example the default RTSP Port Access Name is live1 sdp it means your playback stream name would be RTSP camera s IP a...

Страница 49: ...your Camera audio interface Mute Enable or disable mute function of the Camera s Audio In signal Volume Plug an audio source device into the Audio In port of camera And its playback volume could be ad...

Страница 50: ...on the area you wish to block and then release the mouse right button Notice that the laid out screen turns into phantom block 3 Once the masking screen is acceptable click the Enable Privacy Mask che...

Страница 51: ...he masking screens 1 Click Delete button 2 Click Save button and wait a while Then the screen is permanently removed 3 To permanently disable the Privacy Mask function disable the Enable Privacy Mask...

Страница 52: ...Chapter 4 iCAM 760D User s Manual ICP DAS Setup 52 4 2 System Setup Clicking the System button will display the following tabbed panes relative to system configurations...

Страница 53: ...4 2 1 Information Tab The Information tabbed pane provides the existing system status of the iCAM Camera which includes Model Name System Time Firmware Version MAC Address ActiveX Control Version Wir...

Страница 54: ...ased on the setup status of the System Time Settings as detailed below Time Zone Select the applicable Time Zone of your city in reference to Greenwich Mean Time Automatic Select this item if you want...

Страница 55: ...ra clock date and time with that of the local host computer Assign value Select this option to enter the date and time manually Enable Daylight Saving Select this option only when applicable at your l...

Страница 56: ...User List The Admin Administrator is a permanent default setting and cannot be removed nor changed Hence new User Name Group settings are only added below the default setting Add Remove Click Add butt...

Страница 57: ...enabled User Group Three group options are available namely Administrator User is allowed to change Camera settings and perform all Camera functions Operator User is allowed to login Live View Webpage...

Страница 58: ...he Maintenance tabbed pane allows you to upgrade the firmware with the latest version and to restore the Network Camera settings to factory default Please specify the correct firmware version mapped w...

Страница 59: ...process Logo replacing When upload process is completed it s strongly recommended to close and restart Web Browser Backup Clicking the Backup button allows you to manually save Camera s parameters and...

Страница 60: ...her browser page opening and then displaying Camera s basic log lists Remote Log Settings Check Enable remote log selection first and then manual entering IP address port setting of Remote Log Server...

Страница 61: ...Chapter 4 iCAM 760D User s Manual ICP DAS Setup 61 4 3 Network Setup Clicking the Network button will display the following tabbed panes on configuring Camera connection with the network...

Страница 62: ...o redefine the network and port protocol settings of the Network Camera Where Network Settings DHCP This option obtains the available dynamic IP address assigned by the DHCP server each time the Camer...

Страница 63: ...er E mail Address through SMTP service So you won t worry about the difficulty in Camera s Webpage access As for the settings of SMTP Service kindly please contact with your E mail service provider Af...

Страница 64: ...h you registered and got through DNS Service Provider The assigned host name is used to access the network device instead of IP Address User Name Password Account authentication for logging into the w...

Страница 65: ...So the more the client number is the larger the network bandwidth required and the bigger loading of the camera In other words the camera can send just one streaming and each client can receive the st...

Страница 66: ...the first address of IP range which you would like to deny its access to camera End IP address Fill in the last address of IP range which you would like to deny its access to camera please note that...

Страница 67: ...mera it enables to record a piece of video or to take images when there is an event triggered by either I O condition or ROI Region of Interest by camera In this way the storage size can be reduced si...

Страница 68: ...ow for defining event recording of the Camera The iCAM 760D is equipped with a card slot for microSD microSDHC microSDXC 64GB memory card This storage card is utilized to store recording of local vide...

Страница 69: ...Click Add button and a default area Region01 will pop up on the screen 3 Click and hold inside the area to drag it to the location where you want to focus detection Resize the frame by dragging its c...

Страница 70: ...picture Enter a new name and click the Save button Wait for a while for the change to take effect 7 To delete an area that is no longer needed but was previously saved click on the unwanted area and...

Страница 71: ...apse 3 Target defining the video record file target destination Schedule This method activates the Camera video surveillance recording operation continuously when the defined days of the week and set...

Страница 72: ...ording operation for a defined Time Lapse in seconds whenever motion is detected Recording Length Each recording time span is in accordance with the setting value of the Recording Length in seconds Ta...

Страница 73: ...thin the defined days of the week and at the time of the set days Recording Length Each recording time span is in accordance with the total value of Pre event recording and Post event recording in sec...

Страница 74: ...en its state changes As for the more GPIO Signal setting you may refer to 4 4 4 GPIO Tab Recording Length Each recording time span is in accordance with the total value of Pre event recording and Post...

Страница 75: ...tings As for the settings of FTP Service kindly please contact with your FTP service provider While all parameters filled in Windows FTP Transferring Utility are correct and working properly under you...

Страница 76: ...cheduled time and capture interval 2 Number single snapshot or 6 snapshots 3 Target defining the video record file target destination Always Under this method the Camera automatically continuous to ca...

Страница 77: ...ation continuously when the defined days of the week and set time of the set days are met Time Lapse Snapshot is triggered at every 1 2 or 3 seconds intervals Target The stream of accumulated snapshot...

Страница 78: ...t the time of the set days Single or 6 snapshots may be captured as defined Interval the Time Lapse Snapshot is triggered at every setting interval time that minimum 3 seconds Number Single snapshot o...

Страница 79: ...he time of the set days As for the more GPIO Signal Settings you may refer to 4 4 4 GPIO Tab Interval the Time Lapse Snapshot is triggered at every setting interval time that minimum 3 seconds Number...

Страница 80: ...ings As for the settings of FTP Service kindly please contact with your FTP service provider While all parameters filled in Windows FTP Transferring Utility are correct and working properly under your...

Страница 81: ...IO Input Signal condition GPIO Input The Trigger Pattern can decide which kind of pattern would trigger event successfully Low to High High to Low or State change GPIO Output To set how long in second...

Страница 82: ...utton will display the following tabbed panes to provide information on existing local storage such as disk size info type and status If recording is in progress when clicking the Local Storage button...

Страница 83: ...status and provide SD card control option where user can select to allow the Camera to auto overwrite earlier files in order to maintain the defined Keep Free Space memory size Enable cyclic storage E...

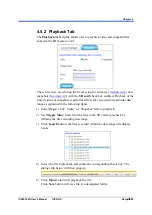
Страница 84: ...is performed from files recorded on particular date range as explained in the following figure 1 Select Type Click Video or Snapshot files to playback 2 Set Trigger Time Search for the files in the SD...

Страница 85: ...o Use of server disk Enabled Check Enabled box to start Remote Disk Recording Type NFS and SMBFS two kind of Remote Server are provided Remote Folder Path If NFS Server type is selected shared folder...

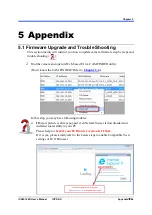
Страница 86: ...he camera and open its Web based UI via CAM FINDER utility Don t know the CAM FINDER Refer to Chapter 2 4 In this step you may have following troubles If below picture is always popped even NetcamView...

Страница 87: ...Chapter 5 iCAM 760D User s Manual ICP DAS Appendix 87 Find Tools icon and then select Compatibility View settings Or...

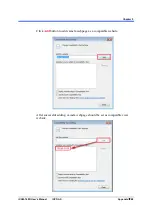
Страница 88: ...Chapter 5 iCAM 760D User s Manual ICP DAS Appendix 88 Click Add button to add camera webpage as a compatible website After successful adding camera webpage should be set as compatible view website...

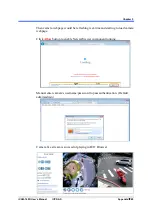
Страница 89: ...age would be refreshing real time and starting to load camera webpage Click Allow button to enable NetcamViewer component running Manual enter camera s username password to pass authentication Default...

Страница 90: ...sytem32 LibPMD dll is always popped kindly please turn off all browser windows include CDWizard application and then try NetcamViewer installation again So before NetcamViewer installation please make...

Страница 91: ...r installation you may see below prompt windows are always popped This will mainly remind you to close all running browser applications and then press OK button to continue NetcamViewer installation O...

Страница 92: ...nput username and password of the camera to pass login authentication of camera webpage Default username and password are admin and admin 3 After Live View page is entering successfully find the SETUP...

Страница 93: ...t firmware version downloading 6 After downloading it click the Browse button to open the file open dialog for firmware choosing Select the appropriate firmware file from its folder in PC and then cli...

Страница 94: ...exit the window Then you will see Camera Webpage is reloading it means all processes of camera are stopping at the same time 9 After all processes are stopped the camera will start to upgrade the firm...

Страница 95: ...page connection will be closed And then you have to re login again 12 After camera Web based UI is re login successfully go to Information Tab of Camera Setup Webpage to check if the firmware version...

Страница 96: ...AM setting after reset IP 192 168 255 2 Default Username Password admin admin Submask 255 255 0 0 Gateway address 192 168 0 1 DNS Server address 8 8 8 8 The hardware reset steps are as the following 1...

Отзывы: