CAN-2018C Quick Start Ver. 1.1, Feb/2014
7
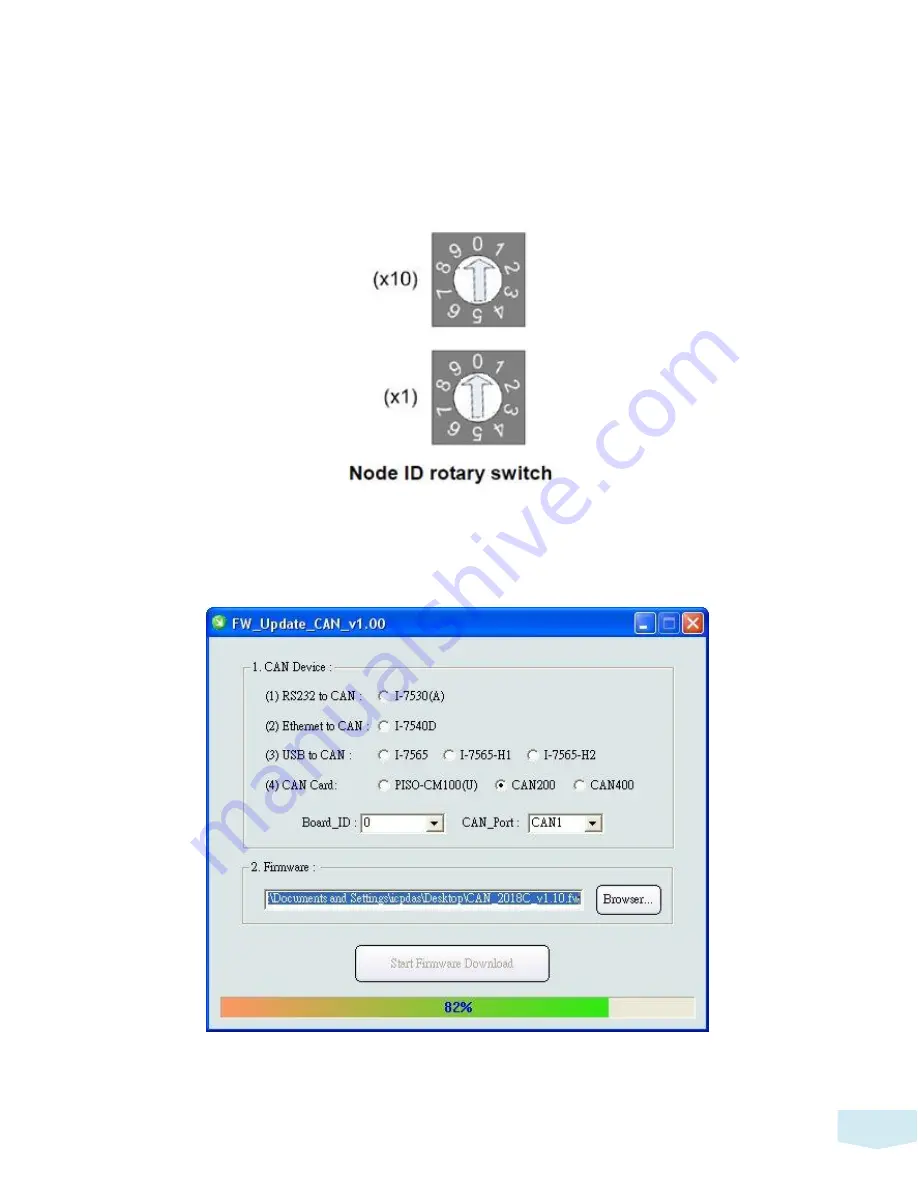
CAN-2018C Firmware Update
Step 1
– Set Module to “Bootloader” mode (set Node ID to 00). Then power on the
module.
Step 2
– Run FW_Update_CAN Utility
(FW_Update_CAN Utility)
Страница 1: ...r Switch for 120 terminator resistor Connector 5 pin screwed terminal block CAN_GND CAN_L CAN_SHLD CAN_H CAN_V Analog Input Channels 8 Input Type 15mV 50mV 100mV 500mV 1V 2 5V 20mA Requires Optional E...
Страница 2: ...CAN 2018C Quick Start Ver 1 1 Feb 2014 2 CAN 2018C Pin Assignments...
Страница 3: ...CAN 2018C Quick Start Ver 1 1 Feb 2014 3 CAN 2018C Internal I O Structure...
Страница 4: ...CAN 2018C Quick Start Ver 1 1 Feb 2014 4 CAN 2018C Wiring Connection Type Note When connecting to a current source an optional external 125 Ohm precision resistor is required...
Страница 5: ...CAN 2018C CAN Bus Wire Connection CAN_SHID FG is Optional 2 Wire Connection Pin Signal Description 5 CAN_V Power positive 4 CAN_H Signal high of CAN Bus line 3 CAN_SHLD Cable Shield FG 2 CAN_L Signal...
Страница 6: ...CAN 2018C Quick Start Ver 1 1 Feb 2014 6 3 Wire Connection 4 Wire Connection The CAN 2000 is powered by the master device...
Страница 7: ...AN 2018C Quick Start Ver 1 1 Feb 2014 7 CAN 2018C Firmware Update Step 1 Set Module to Bootloader mode set Node ID to 00 Then power on the module Step 2 Run FW_Update_CAN Utility FW_Update_CAN Utility...
Страница 8: ...are interface 2 set Dev_Port or Board_ID 3 set CAN_Port number 2 Download Firmware 1 Click Browser button to choose firmware file can_2018c_xx fw 2 Click Start Firmware Update button to start firmware...