■
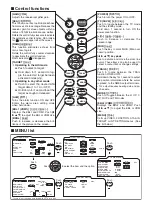
Control functions
TX
SAVE
TARGET
TRAILS
MODE
ALM
+
-
MOB
MENU
EBL2
VRM2
EBL1
VRM1
BRILL
ZOOM
OFF CENT
AIS
HL OFF
GAIN
SEA
RAIN
TLL
POWER
[GAIN] [
]
Adjusts the receiver amplifier gain.
[SEA] [
]
This function serves to eliminate echoes
from waves at close range. Reduces the
receiver gain for close objects within a
radius of 8 NM to eliminate sea clutter.
Rotate the control fully clockwise to activate
the automatic control function. SEA indica-
tor ( ) appears upper left of the screen.
[RAIN] [
]
This function eliminates echoes from
rain, snow, fog etc.
Rotate the control fully counter clockwise
to deactivate the control function.
RAIN indicator ( ) disappears.
[TARGET] [
]
❍
Operating in the AIS mode
➥
Push to select a target.
➥
Hold down for 1 second to tog-
gle the selected target between
activated or sleeping.
❍
Operating in any other mode
➥
Push to select the desired ATA
target data (1 to 10, or OFF).
➥
Hold down for 1 second to set the
target as caught or released.
[ALM] [
]
Turns the alarm function ON and OFF.
Enters the alarm area setting mode
when held down.
[EBL1 (VRM1)] [
]
Displays the EBL1 and VRM1. Push [
t
u
p
q
] to adjust the EBL or VRM size.
[BRILL] [
]
Push to increase or decrease the bril-
liance of the picture on the screen.
[POWER] [
]
Push to turn the power ON or OFF.
[TX (SAVE)] [
]
Push to toggle between the TX mode
and the standby mode.
Hold down 1 second to turn ON the
power save function.
[+]/[–] [
]/[
]
Push to increase or decrease the
screen range.
[MOB] [
]
Push the key to mark MOB (Man over
board) position.
[
t
u
p
q
] key pads
Use to activate and move the cross line
cursor. These keys can also be used to
select a menu item or change settings.
[TRAILS] [
]
Push to toggle between the TRAIL
function ON and OFF.
Hold down the key for 1 second to output
the position information where the cursor
is placed, to the NMEA output terminals.
• TLL output requires bearing data and po
-
sition data.
[MODE] [
]
Push to toggle between the H UP, C
UP, N UP and TM modes.
[EBL2 (VRM2)] [
]
Displays the EBL2 and VRM2. Push
[
t
u
p
q
] to adjust the EBL or VRM
size.
[MENU] [
]
Calls up VIDEO, FUNCTION, ATA AIS,
TARGET or INT. SETTING menus. (See
the list below.)
MENU
Push
MENU
Push
Push
to select the item and the option.
MENU
Push
MENU
Push
MENU
Push
MOB
INT. SETTING
BRG INPUT
SPD INPUT
TX INH START
TX INH ANGLE
SAVE TIME
SYMBOL
CHARACTER
BRILL
NMEA
30M
LOG*
6M
15M
MANUAL
AUTO
N+1
AUX
GPS
GPS
0
˚
0
˚
KEY ILLUM
MAG VAR
1
2
3
1
2
3
1
2
3
4
0.0
˚
W
1M
VIDEO MENU
D.RANGE
IR
STRETCH
PULSE
SEA
TRAIL TIME
ON
1
2
MANUAL
AUTO
MID.
WIDE
OFF
OFF
SP
6S
3M
15S
6M
30S
15M
1M
TUNE
1
2
3
4
NAR.
LP
FUNCTION MENU
POSN DISP
WPT
ON
DIST UNIT
BRG
DIRECTION
ZONE ALARM
BEEP
MAG
PT/SB
KM
OUT
ON
OFF
CURS
NM
TRUE
TRUE
IN
RING
OFF
ON
OWN VECT
ON
OFF
SHIP
360
˚
R
OFF
ATA AIS MENU
ATA No.DISP
OFF
ALL
ON
OFF
ATA ALARM
ON
OFF
AIS DISPLAY
ON
OFF
AIS ALARM
ON
OFF
AIS RANGE
8.0NM
AUTO ACTIVATE
1.0NM
NUMBER OF AIS
100
SLOW WARN
0.1KT
LOST AIS TRGT
ERASE
SEL
ATA
TARGET MENU
VECT MODE
VECT TIME
CPA LIMIT
TCPA LIMIT
TRUE
REL
6M
1.0NM
1 M
TARGET TRACK
1 M
*The “LOG” is not displayed when the BRG INPUT is set to “GPS.”
■
MENU list


