background image

PIVOT-IR USER MANUAL

27

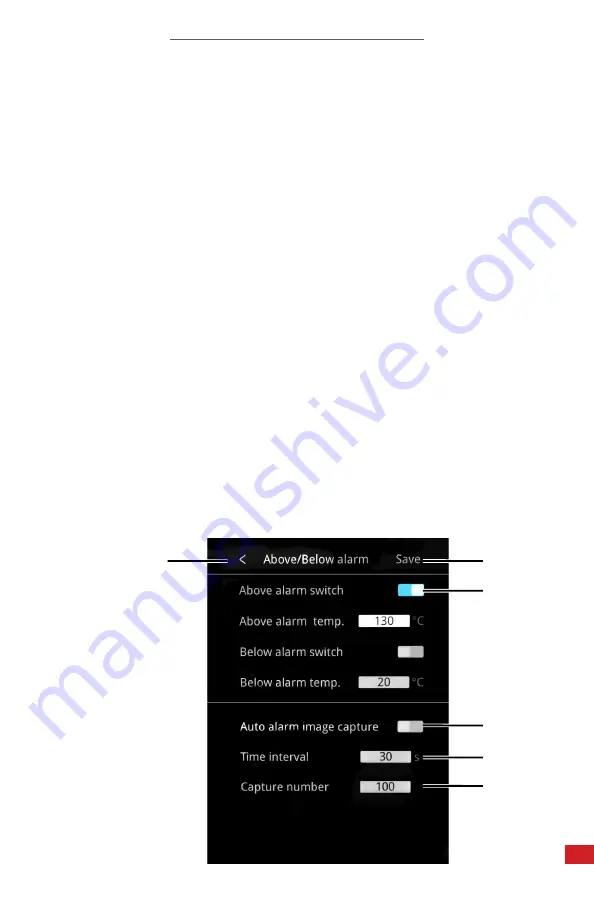
8-7-1-4      Alarm Snapshot

By default, alarm snapshot is disabled. Enabling the features allows the device to 

capture and automatically save a set number of images at a user-defined interval 

whenever a temperature threshold is exceeded (see

 Section 8-14 Temperature 

Alarms

).

Enable alarm snapshot as follows:

1. 

Using the touchscreen, 

tap the Settings icon to open the settings menu. 

2. 

Tap Temperature Alarm. A submenu opens.

3. 

Enable preferred alarms (see

 Section 8-14 Temperature Alarms

).

4. 

Toggle the Auto Alarm Image Capture setting to the On position by tapping 

the switch. Disable the function by tapping the switch again. Blue means 

active; gray means inactive.

5. 

Open  the  keyboard  by  tapping  the  Time  Interval  input  field

. Use the 

keyboard  by  tapping  the  touchscreen  to  input  the  preferred  number  of 

seconds. 

Tap Enter to accept changes and close the keyboard. Tap Return 

to cancel changes and close the keyboard.

6. 

Open  the  keyboard  by  tapping  the  Capture  Number  input  field

. Use the 

keyboard  by  tapping  the  touchscreen  to  input  the  preferred  number  of 

images to capture. 

Tap Enter to accept changes and close the keyboard. 

Tap Return to cancel changes and close the keyboard.

7. 

Tap

 Save to save settings. 

8. 

Tap < to exit the submenu.

9. 

Tap < to exit the Settings Menu.

3.

7.

8.

4.

5.

6.

Содержание PIVOT-IR

Страница 1: ...N IMPORTANT SAFETY INFORMATION INSIDE 2105 W Cardinal Dr Beaumont TX 77705 ICI cameras fall under US Federal Law and Export Control For more information contact us 409 861 0788 sales infraredcameras com www infraredcameras com Edit Text Out Ind Industry Revision 05 2022 001 ...

Страница 2: ...PIVOT IR USER MANUAL 2 Revision History 5 2022 001 Document created ...

Страница 3: ... and Definitions of Interface 14 Package Includes 15 Quick Start Instructions 16 7 1 Tripod Setup 16 7 2 Lens Module Rotation 18 7 3 Charging Instructions 19 Operation Instructions 20 8 1 How to Charge the Battery 20 8 1 1 Charging via Computer 20 8 1 2 Charging via Power Adapter 20 8 2 Power On Off the Device 21 8 3 Hibernation Mode 21 8 4 User Interface 22 8 4 1 Rotary Menus 23 8 4 1 1 Open the ...

Страница 4: ...on 32 8 9 Image Modes 32 8 9 1 Image Alignment 33 8 9 2 Image Opacity 34 8 10 Zoom 34 8 11 Polarity 35 8 12 Level Span 35 8 13 Thermal Analysis 35 8 13 1 Temperature Range 35 8 13 2 Emissivity 36 8 13 3 Ambient Temperature 37 8 13 4 Distance 37 8 13 5 Analysis Objects 38 8 13 5 1 Center Point Temperature point 38 8 13 5 2 Hot Spot Temperature Tracking 39 8 13 5 2 Cold Spot Temperature Tracking 39 ...

Страница 5: ... 2 Emissivity 48 9 3 Temperature Correction 50 9 4 Ambient Temperature 50 9 5 Distance and Angle of Reflection 50 9 6 Humidity 50 Cleaning and Maintenance 51 10 1 Cleaning the Germanium Lens 51 10 2 Disinfecting the Camera Surface 51 10 3 Device Calibration 51 10 4 Storage 51 Troubleshooting 52 11 1 Thermal imager does not power on 52 11 2 Thermal imager shuts off unexpectedly 52 11 3 No thermal i...

Страница 6: ...rmission of Infrared Cameras Inc The documentation must not in whole or part be copied photocopied reproduced translated or transmitted to any electronic medium or machine readable form without prior consent in writing from Infrared Cameras Inc Names and marks appearing on the products herein are either registered trademarks or trademarks of Infrared Cameras Inc and or its subsidiaries All other t...

Страница 7: ...e crossed out wheeled bin symbol indicates that waste electrical and electronic equipment should not be discarded together with unseparated household waste but must be collected separately All local authorities have established collection schemes under which residents can dispose of equipment at a recycling center or other collection points or WEEE will be collected directly from households More d...

Страница 8: ...irst 1 1000th of an inch of a subject Environment of use industrial and petrochemical buildings electrical plants security rooms science labs animal reserves as well as environmental conservatories and aerial integrations among others You agree that this product is for civilian use only and shall not use applications that may infringe the rights of third parties medical and safety devices or other...

Страница 9: ...PIVOT IR USER MANUAL 9 2 9 Training To read about infrared training visit https infraredtraininginstitute com ...

Страница 10: ...or to explode It can also decrease the performance or the life cycle of the battery Do not continue to charge the battery if it does not become charged in the specified charging time If you continue to charge the battery it can become hot and cause an explosion or ignition Injury to persons can occur Do not attach the batteries directly to a car s cigarette lighter socket Using the incorrect equip...

Страница 11: ...e there is an unusual smell from the battery the battery feels hot changes color changes shape or is in an unusual condition Speak with a sales office if one or more of these problems occurs Clean the case with a damp cloth and a weak soap solution Do not use abrasives isopropyl alcohol or solvents to clean the case or lens screen Be careful when cleaning the infrared lens Do not clean the infrare...

Страница 12: ...nsitivity NETD 40 mK 0 04 C at 30 C 86 F Frame Rate 25 Hz Humidity 95 non condensing Pixel Operability 99 Drop Rating 2 m 6 56 Dimensions without lens 142 mm x 76 mm x 19 mm L x W x D 0 5 mm 5 56 x 2 99 x 0 75 L x W x H 0 02 Weight 210 g 7 41 oz Power DC 5V 2A Battery Internal rechargeable Operation Time 6 hours continuous Charging Time 3 hours Power Management Adjustable Interface USB Type C Vide...

Страница 13: ...rms Alarm snapshot duration and frequency Interval photography duration and frequency Internal non uniformity correction NUC Unlimited voice annotation text available Speaker Microphone 1 4 20 tripod support Wi Fi support Specifications subject to change without further notice Models and accessories subject to regional market considerations License procedures may apply Products described herein ma...

Страница 14: ...ppearance and Definitions of Interface 1 Lens Module 2 Touch Screen 3 Tripod Mount 4 Microphone 5 Power 6 Visible Lens 5 Structure 10 11 6 7 8 1 2 3 5 4 7 Germanium Lens 8 LED Flashlight 9 Power Indicator 10 Type C 11 Strap Hook 9 ...

Страница 15: ...PIVOT IR USER MANUAL 15 6 Package Includes ENSURE ALL SYSTEM EQUIPMENT AND COMPONENT ITEMS ARE PRESENT BEFORE BEGINNING INSTALLATION Pivot IR USB to Type C Cable ...

Страница 16: ...T PATH OF THE OBJECT S TO BE IMAGED TO ENSURE THE EQUIPMENT WILL NOT BE MOVED OR KNOCKED DOWN USING A DIVIDING BARRIER HELPS KEEP TRIPODS SEPARATE FROM THE PATH or Mount the fully charged Pivot IR to a tripod using the 20 mount located on the side of the device The Pivot IR can be used as a handheld device A ...

Страница 17: ...TON FOR AT LEAST 3 SECONDS PRESS AND HOLD THE POWER BUTTON FOR MORE THAN 5 SECONDS TO SHUT DOWN THE CAMERA THE THERMAL IMAGER NEEDS SUFFICIENT WARM UP TIME FOR THE MOST ACCURATE TEMPERATURE MEASUREMENTS AND BEST IMAGE QUALITY THIS TIME CAN OFTEN VARY BY ENVIRONMENTAL CONDITIONS IT IS BEST TO WAIT A MINIMUM OF 10 MINUTES FOR THE DEVICE TO COMPLETELY WARM UP ...

Страница 18: ...inger DO NOT FORCE THE LENS IF THERE IS RESISTANCE TRY ROTATING THE LENS IN THE OPPOSITE DIRECTION THE LENS ROTATES SMOOTHLY AND AN AUDIBLE CLICK IS HEARD WHEN A CORRECT ANGLE IS ACHIEVED THE LENS MODULE CAN BE ROTATED AT ANGLES OF 0 30 60 AND 90 AN AUDIBLE CLICK IS HEARD WHEN A CORRECT ANGLE IS ACHIEVED DO NOT EXCEED THE MAXIMUM ANGLE OF 90 WHEN ROTATING THE LENS TO AVOID DAMAGE TO THE CAMERA DO ...

Страница 19: ...to the bottom of the device Plug the other end of the USB cable into an available USB port on a computer CHARGE THE BATTERY FOR A MINIMUM OF 3 HOURS BEFORE USING ICI DOES NOT RECOMMEND CHARGING THE DEVICE WHILE IT IS ON A TRIPOD LAY DEVICE FACE DOWN ON A FLAT AND STABLE DESK OR TABLE WHILE CHARGING ...

Страница 20: ... Type C cable into the bottom of the device 2 Plug the other end of the USB Type C cable into an available USB port on a computer The camera can be charged by USB cable no matter if the device is powered on or off The light on the bottom of the device lights up during charging Red indicates not fully charged and green indicates fully charged 8 1 2 Charging via Power Adapter 1 Plug one end of the U...

Страница 21: ...tion Mode Push and release the Power button to power on off the screen display This sends the device into hibernation mode Placing the device in this standby mode helps to conserve battery power See Section 8 15 4 Power Management Settings for more information AFTER POWERING OFF WAIT TEN SECONDS BEFORE ATTEMPTING TO POWER THE DEVICE ON AGAIN THE DEVICE AUTOMATICALLY POWERS OFF AFTER A SET AMOUNT O...

Страница 22: ...terface The device interface appearance 1 Date Time 2 Analysis Data 3 Display Window 4 Temperature Measurement Point 5 Rotary Menu 6 Main Menu 7 Settings 8 Capture Gallery Light NUC 9 Image Mode 10 Zones 11 Polarity 12 Level Span Bar 13 Battery Life 2 13 12 3 4 5 6 7 8 9 1 10 11 Max 34 3 C Min 32 1 C 34 9 C 31 9 C ...

Страница 23: ...Settings menu opens a window containing a list of options Clicking an option opens a submenu with either more options or device information Close the submenu by tapping in the upper left corner 8 4 1 3 Close the Rotary Menus Close the rotary menu by tapping the display window 8 4 1 2 Using the Rotary Menus Using the touchscreen tap on the preferred icon If the preferred icon is not visible tap and...

Страница 24: ... FLASHLIGHT LOOKING INTO THE FLASHLIGHT MAY CAUSE EYE DAMAGE AND PERSONAL INJURY DO NOT POINT THE FLASHLIGHT DIRECTLY AT PEOPLE OR ANIMALS OR INDIRECTLY OFF REFLECTIVE SURFACES LEAVING THE FLASHLIGHT ON DRAINS THE BATTERY AT AN INCREASED RATE POWER OFF THE FLASHLIGHT WHEN NOT IN DIRECT USE 8 5 Power On Off the Flashlight Use the flashlight to assist visibility in dark locations 1 Using the touchsc...

Страница 25: ... appears 3 Tap the Capture icon A save options box appears 4 Name the image using one of the options Open the keyboard by tapping the input field at the top of the save options box Use the keyboard by tapping the touchscreen to input the preferred name Tap Enter to accept changes and close the keyboard Tap Return to cancel changes and return to the save options box or Tap the QRC icon to scan a co...

Страница 26: ...o open the settings menu 2 Tap Image Capture A submenu opens 3 Toggle the Timed Image Capture setting to the On position by tapping the switch Disable the function by tapping the switch again Blue means active gray means inactive 4 Open the keyboard by tapping the Time Interval input field Use the keyboard by tapping the touchscreen to input the preferred number of seconds Tap Enter to accept chan...

Страница 27: ...ting to the On position by tapping the switch Disable the function by tapping the switch again Blue means active gray means inactive 5 Open the keyboard by tapping the Time Interval input field Use the keyboard by tapping the touchscreen to input the preferred number of seconds Tap Enter to accept changes and close the keyboard Tap Return to cancel changes and close the keyboard 6 Open the keyboar...

Страница 28: ...eld at the top of the save options box Use the keyboard by tapping the touchscreen to input the preferred name Tap Enter to accept changes and close the keyboard Tap Return to cancel changes and return to the save options box or Tap the QRC icon to scan a code to automatically name the image 3 Tap the Save icon to save the image Tap the Back icon to cancel saving 8 7 3 2 Automatic File Naming User...

Страница 29: ...o return to the gallery 5 Tap to exit the Gallery 8 7 3 3 Rename Images Media can be renamed at any time as follows 1 Using the touchscreen tap the Settings icon to open the settings menu 2 Tap the Gallery icon Press and hold the screen then drag up or down to scroll through the gallery 3 Tap the image to rename 4 Tap the Edit icon A keyboard appears 5 Use the keyboard by tapping the touchscreen t...

Страница 30: ...C cable into the bottom of the device 10 Navigate to the DCIM folder of the device 11 Export media to preferred location on computer 12 Power off the device and unplug the cable when finished 8 7 6 Live Streaming to a Computer Users can synchronize the picture in the camera to the PC software for real time display and analysis Stream directly to a computer as follows 1 Using the touchscreen tap th...

Страница 31: ...Tap to return to the gallery 7 Tap to exit the Gallery 8 7 8 Delete Multiple Images Delete multiple images as follows 1 Using the touchscreen tap the Settings icon to open the settings menu 2 Tap the Gallery icon 3 Tap the Selection icon 4 Tap the images to be deleted A red box appears around selected images Press and hold the screen then drag up or down to scroll through the gallery to find image...

Страница 32: ... grain after the device makes its adjustments 3 Tap the display window to exit the Rotary Menu 8 9 Image Modes There are 4 image modes available 1 Thermal infrared image 2 Fusion ICI Dual Vision infrared and visible image 3 PIP Picture in Picture thermal image overlay over the visible image 4 Digital visible image only 1 2 3 4 IF THE FUSION OR PICTURE IN PICTURE MODE IS SELECTED ENSURE THE IMAGE A...

Страница 33: ...PECTION LOCATIONS 8 9 1 Image Alignment Registration When using fusion and picture in picture mode it is important to ensure the image alignment is set correctly to receive the best image Align the images as follows 1 Using the touchscreen tap the Image Mode icon from the main menu A rotary menu appears 2 Tap the preferred image mode 3 Adjust the alignment using the and to the right of the rotary ...

Страница 34: ...nu The zoom factor is displayed 4 Tap the display window to exit the rotary menu 8 9 2 Image Opacity When using fusion mode it is important to ensure the image opacity is set correctly to receive the best image Adjust the opacity as follows 1 Using the touchscreen tap the Image Mode icon from the main menu A rotary menu appears 2 Tap the Fusion mode icon 3 Adjust the opacity using the and to the l...

Страница 35: ...mum temperature detected If a number falls outside this range the image may wash out i e the extraneous energy in the viewing environment may reduce the perceived contrast of the image The device has automatic level and span adjustment and automatically adjusts the image contrast Choosing the correct temperature range helps with the adjustment process see 8 13 1 Temperature Range SELECT THE APPROP...

Страница 36: ...ld the screen then drag up or down on the Emissivity rotary dial to set the emissivity 4 Tap Save to save settings 5 Tap to exit the submenu 6 Tap to exit the Settings Menu SURFACES WITH AN EMISSIVITY OF 0 60 MAKE RELIABLE AND CONSISTENT MEASUREMENTS PROBLEMATIC THE LOWER THE EMISSIVITY THE GREATER POTENTIAL FOR ERROR WITHIN THE DEVICE S CALCULATIONS ERRORS MAY STILL OCCUR EVEN WHEN ADJUSTMENTS AR...

Страница 37: ...Save to save settings 5 Tap to exit the submenu 6 Tap to exit the Settings Menu 8 13 4 Distance Although distance usually does not affect the temperatures measured by the software it can be helpful to know the distance to the target location The default distance measurement unit is meters Change the distance as follows 1 Using the touchscreen tap the Settings icon to open the settings menu 2 Tap P...

Страница 38: ... corner of the screen for each analysis object 8 13 5 1 Center Point Temperature point By default the center point analysis object is enabled If it becomes disabled users can enable it as follows 1 Using the touchscreen tap the Analysis Object icon from the main menu A rotary menu appears 2 Tap the center point analysis object Tap the analysis object again to disable it A line shows through the an...

Страница 39: ...otary menu 8 13 5 2 Cold Spot Temperature Tracking By default the hot spot temperature tracker is disabled Enable the hot spot temperature tracker as follows 1 Using the touchscreen tap the Analysis Object icon from the main menu A rotary menu appears 2 Tap the green analysis object to enable the cold spot tracker Tap the analysis object again to disable it A line shows through the analysis object...

Страница 40: ...referred temperature alarm setting to the On position by tapping the switch Disable the function by tapping the switch again Blue means active gray means inactive 4 Tap Save to save settings 5 Tap to exit the submenu 6 Tap to exit the Settings Menu 8 13 5 4 Delete ALL Analysis Objects Delete all existing analysis objects as follows 1 Using the touchscreen tap the Analysis Object icon from the main...

Страница 41: ...ferred low temperature alarm threshold Tap Enter to accept changes and close the keyboard Tap Return to cancel changes and close the keyboard 6 Tap Save to save settings 7 Tap to exit the submenu 8 Tap to exit the Settings Menu 8 14 3 Visual Alarm Threshold settings must be enabled for the visual alarms to function Visual alarms shows automatically on screen when thresholds are either met or excee...

Страница 42: ...cally 4 Tap to exit the submenu 5 Tap to exit the Settings Menu ENSURE THE PROPER TEMPERATURE UNIT IS SELECTED FOR YOUR APPLICATION CELSIUS FAHRENHEIT AND KELVIN UNITS ARE AVAILABLE 1 METER 3 281 FEET 8 15 2 Temperature Units By default the imager is set to measure temperatures in Celsius C Change the temperature scale unit as follows 1 Using the touchscreen tap the Settings icon to open the setti...

Страница 43: ...ERY AT AN INCREASED RATE SET THE AUTOMATIC SHUTOFF TIME TO SAVE POWER HIBERNATION SETTINGS ARE DETERMINED BY THE AUTOMATIC SHUTOFF SETTINGS AND HELP CONSERVE BATTERY POWER 8 15 4 2 Automatic Shutoff By default automatic shutoff is enabled The device powers off automatically after 20 minutes Adjust the automatic shutoff as follows 1 Using the touchscreen tap the Settings icon to open the settings m...

Страница 44: ...gle the Hotspot feature to the On position by tapping the switch Disable the function by tapping the switch again Blue means active gray means inactive 4 Open the keyboard by tapping the Network Name input field Use the keyboard by tapping the touchscreen to input the preferred network name Tap Enter to accept changes and close the keyboard Tap Return to cancel changes and close the keyboard 5 Ope...

Страница 45: ...to open the settings menu 2 Tap System A submenu opens 3 Tap Date Time A submenu opens 4 Press and hold the screen then drag up or down on the rotary dial to set the date and time 5 Tap Save to save settings 6 Tap continuously to exit the menus 8 15 8 Language Settings English is the default language of the device Change the device language as follows 1 Using the touchscreen tap the Settings icon ...

Страница 46: ...ws 1 Using the touchscreen tap the Settings icon to open the settings menu 2 Tap System A submenu opens 3 Tap Device Information Information is shown on screen 4 Tap continuously to exit the menus 8 15 11 Format the Memory Card Users can format the internal memory card as follows 1 Back up images on an external device before formating the internal memory 2 Using the touchscreen tap the Settings ic...

Страница 47: ...exit the menus 8 15 13 Device Software Upgrade The device may periodically need a software upgrade or patch Ensure the device is charged before proceeding with the upgrade If the device loses power during the process the upgrade may fail and the device may become unusable Update to the latest software version as follows 1 Contact customer service to receive the latest software upgrade RAR file 2 S...

Страница 48: ...hermal Analysis 9 2 Emissivity All objects radiate infrared energy The amount of energy radiated varies based on the actual surface temperature and the surface emissivity of the object The Thermal imager senses the infrared energy from the surface of the object and uses this data to calculate an estimated temperature value Many common objects and materials such as painted metal wood water skin and...

Страница 49: ... materials Material Emissivity Water 96 Stainless steel 14 Aluminum plate 09 Asphalt 96 Concrete 97 Cast iron 81 Rubber 95 Wood 85 Brick 75 Tape 96 Brass plate 06 Human skin 98 PVC plastic 93 Polycarbonate 80 Oxidized copper 78 Rust 80 Paint 90 Soil 93 SURFACES WITH AN EMISSIVITY OF 0 60 MAKE RELIABLE AND CONSISTENT MEASUREMENTS PROBLEMATIC THE LOWER THE EMISSIVITY THE GREATER POTENTIAL FOR ERROR ...

Страница 50: ...re they stand or by attaching a camera to an unmanned aerial system While there is an input field for Distance there is not an input for Angle of Reflection Use the Comments section to create notes concerning positioning and angles then adjust the Distance setting according to Section 8 14 4 Distance 9 6 Humidity Humidity remains in the atmosphere even on bright days Water of all three states can ...

Страница 51: ...e the cloth and repeat the wiping process 10 2 Disinfecting the Camera Surface Do not use corrosive cleaning solutions on the optical glass components It is recommended to disinfect the camera surface regularly with a non corrosive sanitizing product Follow the directions provided by the manufacturer of the cleaning solution Adhere to the sanitation protocols and cleaning schedule set forth by the...

Страница 52: ...he device Charge battery 11 3 No thermal image If lens is foggy use professional equipment to clean the lens 11 5 Camera out of focus Adjust the distance settings of the device Move closer to the target 11 4 Unclear or dark visible images Turn on lights in imaging area Turn on device light If lens is foggy use professional equipment to clean the lens 11 6 Temperature data is missing or has strange...

Страница 53: ...nd before attempting to take temperature measurements Ensure the correct temperature range is selected The default temperature range is 20 C to 150 C 4 F to 302 F When measuring high temperature objects ensure the temperature range is set to the 100 C to 500 C 212 F to 932 F range Ensure device is at proper height Adjust the distance to the target Adjust the distance setting Adjust the emissivity ...

Страница 54: ...d operators in space power companies medical pulp and paper food industry research and development and various process industries You can see our products and services used in industrial commercial and government applications worldwide Additionally our ICI 7320 was awarded Product of the Month by NASA Originally named Texas Infrared still DBA Infrared Cameras Inc has been in business since March 1...

Отзывы: