background image

EN-

18

You can make or receive phone calls with 

Bluetooth-enabled  phones  through  the 

unit.  You  can  also  listen  to  music  from  a 

Bluetooth-enabled device.

Pair the Bluetooth-enabled Devices

To  connect  your  Bluetooth  device  to  the 

unit, you need to pair the device to the unit. 

Pairing needs only to be done once. You can 

pair up to five devices. 

You also can search 

for Bluetooth devices by mobile phone.

1.  Turn  on  the  Bluetooth  function  on  the

device.

2.  Touch [ 

+

 ] to search for Bluetooth device

with the device.

3.  Select 

the Bluetooth device ID in the

pairing list.

4.

Touch [ Link ].

5.  Enter default password “0000”.


Note:

•  The operational range between this unit

and a Bluetooth device is approximately 5 

meters .

•  Before  you  connect  a  Bluetooth  device

to this unit, familiarize yourself with the 

Bluetooth capabilities of the device.

•  Compatibility with all Bluetooth device is

not guaranteed.

•  Any  obstacle  between  this  unit  and

a Bluetooth device can reduce the 

operational range.

•  Keep  this  unit  away  from  any  other

e l e c t r o n i c   d e v i c e   t h a t   m a y   c a u s e 

interference.

Bluetooth Mode

Disconnect Bluetooth Device

To disconnect one device, touch [ 

 ] .


Note:

•  The  device  will  also  be  disconnected

when  the  device  is  moved  beyond  the 

operational range.

•  If you want to reconnect the device to the

unit, place it within the operational range.

• If you do not want to reconnect the device

to the unit automatically, touch [ 

 ], then 

set [ Auto Connect ] to [ Off ]. 
For details, see the “Adjust Bluetooth 
Settings” section.

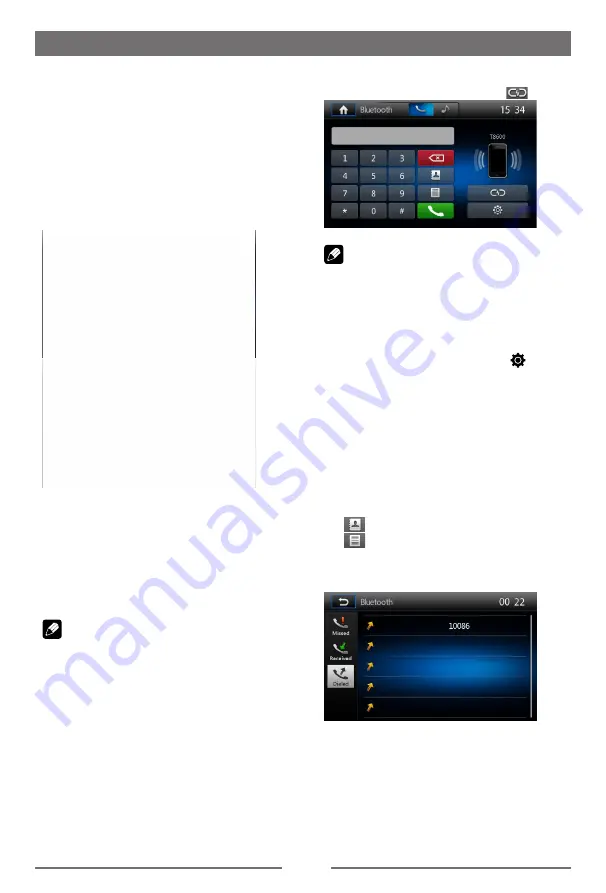
Make a Call

1.  Select  Bluetooth  function  in  the  home

menu.

2. Pair the phone with the unit.

3.  Search  for  phone  number  from  the

following list:

[

 ]: Phone Book

[

 ]: Call Log

[Missed calls]

[Received calls]

[Dialed calls]

Or touch the number pad directly.

Answer an Incoming Call

By default, all incoming calls are received 

automaticaly.

1.  If there is an incoming call, 

the screen will

appear “Incoming”

Содержание AURORA G7

Страница 1: ...1 DIN DVD MULTIMEDIA STATION BUILT IN NAVIGATION BLUETOOTH AURORA GX735 DE Bedienungsanleitung EN User manual Benutzerhandbuch AURORA G7 Deutsch English...

Страница 2: ...s an einem Ort an dem es die Verkehrssicherheit beeintr chtigen kann Um nicht gegen die Verkehrsregeln zu versto en und Unf lle zu vermeiden darf die Video Funktion niemals w hrend der Fahrt betrieben...

Страница 3: ...12 DAB Modus optional 13 Wiedergabe 14 Diskladen 14 Diskauswerfen 14 Benutzung der Bedienungsoberfl che 14 Wiedergabebedienung 15 USB Ger tanschlie en 15 USB Ger t entfernen 15 SD Karte einschieben 15...

Страница 4: ...dr cken vorherige r dr cken und halten Scan Frequenz von tief nach hoch 3 dr cken TFT Display offen Dimmmodus TFT Display geschlossen Zeitmodus dr cken und halten TFT Display offen TFT Display aussch...

Страница 5: ...ehrsprogramm Hinweis Der gr te Teil der Informationen wird bei geschlossenem Bildschirm auf der LCD Aanzeige angezeigt Die LCD Anzeige unterst tzt nur die Englische Sprache Taste Bedienung Funktion 8...

Страница 6: ...uf Vorlauf Wiedergabe 10 W hlen Anrufentgegennehmen 11 Eingabe 12 Men cursor 13 Stopp Zur ck 14 Zahlenbereich 15 Hauptmen ffnen 16 POWER StromversorgungEin Aus 17 Winkel DVD 18 DVD Untertitel 19 A B W...

Страница 7: ...Sollte die Fernbedienung nicht funktionieren wechseln Sie bitte die Batterie 5 Verwenden Sie nur eine Knopfzellen Lithium Batterie CR2025 3V 6 Die Batterie bitte nicht aufladen zerlegen oder ins Feue...

Страница 8: ...n Halten Sie den VOL MUTE Drehknopf auf dem Bedienteil gedr ckt oder dr cken Sie die POWER Taste auf der Fernbedienung Tastent ne Bei jeder Aktion auf dem Touchscreen oder der Fernbedienung gibt das G...

Страница 9: ...Z Stufung 15 to 15 Wertebereich 0 50 0 75 1 00 1 25 HPF Frequenzbereich 10 12 5 15 17 5KHZ Stufung 15 to 15 Wertebereich 1 00 Grundfunktionen Fader Balance einstellen Sie k nnen Sie Verteilung der Aus...

Страница 10: ...Sie TIME Zeit 2 Ber hren Sie die Uhrzeit auf dem Bildschirm ein Untermen wird angezeigt 3 Ber hren Sie um die Stunden und Minuten einzustellen Zeitdarstellung ndern 1 Ber hren Sie Desk Timer Zeitanze...

Страница 11: ...pfangen wird stoppt der Suchlauf und der Sender wird abgespielt Manuelle Sendersuche W hrend der manuellen Sendersuche ndert sich die Frequenz in Schritten Dr cken Sie die Tasten der Fernbedienung kur...

Страница 12: ...kale Suche Ber hren Sie das LOC Symbol um Lokal oder Fernradio zu w hlen Wenn das LOC Symbol Rot leuchtet werden nur Sender mit ausreichender Signalst rke erkannt EQ Auswahl Dr cken Sie um zu den EQ E...

Страница 13: ...Funktion aktiviert ist und eine Verkehrsmeldung empfangen wird wird die aktuelle Abspielquelle durch die Verkehrsdurchsage deaktiviert jedoch nur wenn im FM Frequenzband des Ger tes der Empfang von V...

Страница 14: ...sw hlen Dr cken Sie BAND um zwischen DAB1 DAB2 und DAB3 zu wechseln Suche W hlen Sie eine der folgenden vier Suchmethoden aus 1 voreingestellte Suche eingestellte Sender suchen 2 aktuelle Suche Sender...

Страница 15: ...auszuschalten L_Band Service Link Dr cken Sie Service Link um zwischen DAB DAB DAB RDS DAB ALL oder OFF zu wechseln Wiedergabe Disk laden Sie k nnen Video Audio oder Bilder von folgenden Disks abspie...

Страница 16: ...hren Sie die Tasten auf dem Bildschirm um den vorherigen n chsten Titel oder das Kapitel zu berspringen Suche nach einem Ordner F r Video Dateien 1 Ber hren sie um alle verf gbaren Video Ordner anzuze...

Страница 17: ...dschirm um das Bedienmen aufzurufen 2 Ber hren Sie f r das zweite Men 3 Ber hren Sie das A B Symbol Wiederholung A Beginn der Wiederholung Wiederholung A B Ende der Wiederholung Der ausgew hlte Abschn...

Страница 18: ...2 3 DVD TTL 1 8 CHP 5 12 F r VCD 1 Disktyp 2 VCD Titelinformationen Beispiel 1 8 Die VCD verf gt ber 8 Titel aktuell wird Titel 1 wiedergegeben 1 2 VCD 1 8 verstrichene Zeit 1 bereits verstrichene Wi...

Страница 19: ...tooth Funktion des Ger ts Kompatibilit t mit allen Bluetooth Ger ten wird nicht garantiert Jedes Hindernis zwischen Ihrem Ger t und einem Bluetooth Ger t kann die Reichweite vermindern Halten Sie dies...

Страница 20: ...ect Um die automatische Verbindungsfunktion zu aktivieren oder deaktivieren Auto answer Um die automatische Anrufannahme ein oder auszuschalten Pairing password Kopplungscode einstellen Phone Book Tel...

Страница 21: ...en Sie um die Wiedergabe fortzusetzen Titel ausw hlen n chster Titel 1 Ber hren Sie um zum n chsten Titel zu wechseln vorheriger Titel 1 Ber hren Sie um zum Anfang des aktuellen Titels zu wechseln Ber...

Страница 22: ...inzeln widerholen Ralle wiederholen iPod Videowiedergabe Dr cken Sie das Haus Symbol oben links und w hlen Sie anschlie end aus den Videodateien die gew nschte aus Ber hren Sie w hrend der Wiedergabe...

Страница 23: ...Sie den Rekorder neu positionieren wollen erneuern Sie den Klebestreifen Videodateien exportieren Computer microSD W hlen Sie auf der linken Seite eine Datei aus und dr cken dann das Symbol zum export...

Страница 24: ...gen vorzunehmen Abschalt Timer Ber hren Sie Auto off time automatische Abschaltung um den Abschalt Timer zu aktivieren G SENSOR Empfindlichkeit Ber hren Sie G SENSOR sensitivity G Sensor Empfindlichke...

Страница 25: ...nktioniert oder empfindlich genug ist sollten Sie den Touchscreen kalibrieren Kalibrieren Sie die Benutzeroberfl che wie folgt 1 Ber hren Sie Calibration Kalibrierung im Einstellungsmen 2 Ber hren Sie...

Страница 26: ...ischaltung an ausschalten Standardm ig ist die Videofreischaltung nicht aktiviert Es wird bei der Wiedergabe ein SIcherheitshinweis angezeigt Disk Alterseinstufung 1 Ber hren Sie Disc Disk 2 W hlen Si...

Страница 27: ...V IN1 AV IN2 DVBT 3 Ber hren Sie oder um die Werte von 0 12 einzustellen Die Lautst rke beginnt dann automatisch bei dem eingestellten Wert der jeweiligen Funktion Werkseinstellungen 1 Ber hren Sie Re...

Страница 28: ...ung der durchgebrannten Sicherung entspricht 4 Ersetzen Sie die Sicherung GPS 1 Ber hren Sie die linke obere Ecke um das Hauptmen anzuzeigen 2 Ber hren Sie Navigation das Navigationsmen wird in ein pa...

Страница 29: ...cht in der N he von W rmequellen Deise k nnen zu Besch digungen am Ger t f hren 5 F r die Funktionst chtigkeit der CD Funktion darf das Ger t nicht steiler eingebaut werden als 30 Bitte berschreiten S...

Страница 30: ...uschacht und befestigen Sie das Ger t mit den Schrauben am Einbaurahmen Hinweis Beachten Sie dass der Bildschirm Platz zum Ausfahren ben tigt Blende befestigen Befestigen Sie die Blende mit den Vertie...

Страница 31: ...Einbau und Ausbau 2 Dr cken Sie die Blende leicht nach unten und ziehen diese dann ab Ger teausbau 1 L sen Sie die Schrauben der Befestigung am Einbaurahmen 2 Ziehen Sie das Ger t mit beiden H nden h...

Страница 32: ...rBereich 90dB Klirrfaktor Ausgang 0 1 Frequenzgang 3dB 20Hz 20KHz Maximale Ausgangsleistung 4 50W Belastungs Impedanz 4 AUX IN Klirrfaktor 0 5 Frequenzgang 3dB 20Hz 20KHz Audio Eingangspegel 1Vrms Aud...

Страница 33: ...en bertragungsraten 32 320kbps und variable Daten bertragungsrate Unterst tzte Videoformate DVD MP4 Regionen Code Die Welt ist in sechs DVD Regionen aufgeteilt Eine DVD Disc kann nur abgespielt werden...

Страница 34: ...us am Stecker TFT Bildschirm es wird ein Warnhinweis angezeigt Videofreischaltungskabel nicht verbunden Verbinden Sie das BRAKE Kabel mit der Handbremse schlechte Bildwiedergabe Farbsystem der DVD nic...

Страница 35: ...DE 34 Pink Wire Kabeldiagramm Handbremskabel Videofreischaltung Pink Wire R ckfahrsignal Reverse...

Страница 36: ...DE 35 Kabeldiagramm TV BUS RADIO ANT...

Страница 37: ...CLASS 1 LASER PRODUCT P N 127075005506...

Страница 38: ...1 DIN DVD MULTIMEDIA STATION BUILT IN NAVIGATION BLUETOOTH AURORA GX735 DE Bedienungsanleitung EN User manual User manual AURORA G7 Deutsch English...

Страница 39: ...ower supply with negative grounding Never install this unit where the operation condition for safe driving is impaired Never use the video display function in the front when driving to prevent the vio...

Страница 40: ...d a Disc 15 Eject a Disc 15 Touch Screen Controls 15 Controlling Playback 15 Connect a USB Device 15 Remove a USB Device 15 Insert Remove a SD Card 15 Play Pause 15 Previous Next 16 Search for a Folde...

Страница 41: ...ress and hold Scan Frequency From High to Low 2 Press Previous Press and hold Scan Frequency From Low to High 3 Press TFT Display Open Dimmer Mode TFT Display Close Time Mode Press and hold TFT Displa...

Страница 42: ...ion is activated 5 RDS function indicators AF Alternative Frequency PTY Program TYpe TA Traffic Announcement TP Traffic Program Note Most information can be displayed on this LCD only when the TFT mon...

Страница 43: ...EN 5 Before Using Remote Control OPEN CLOSE DVD MENU SLOW RDM...

Страница 44: ...Files Play Photo Left Right Mirror Play Disc Select Files Return To Play List Play Photo Clockwise Rotation Play Disc Select Files 13 Press Stop Play 14 Press Number Input 15 Press Return to Main Men...

Страница 45: ...emote control won t work please change the battery 5 Use button shaped lithium battery CR2025 3V only 6 DO NOT recharge disassemble heat or expose the battery in fire 7 Insert the battery in proper di...

Страница 46: ...irmation An audible beep tone confirms each function selection The Beep tone can be disabled through the Setup menu Playing Source Selection Press the SRC button to change between available playing so...

Страница 47: ...cies RESET Cancel the equalizer function settings Adjust Fader Balance You can adjust front back left right balance of the speaker and the subwoofer volume to get larruping listening effect according...

Страница 48: ...played 3 Touch to select the time zone you desire 4 The time zone of the device default setting is GMT 01 00 Tuner TFT Display 7 1 5 6 8 2 9 3 4 10 11 14 15 16 13 12 1 Touch to view the SOURCE MENU an...

Страница 49: ...Numeric keyboard is displayed touch number to input frequency 2 Touch to delete the input number step by step 3 Touch OK to enter Preset Station The unit has 5 bands such as FM1 FM2 FM3 AM1 AM2 and e...

Страница 50: ...ing radio frequency some interference could be heard Turning off AF function can settle this problem TA Function The TA Traffic Announcement flag function lets the unit receive traffic announcements a...

Страница 51: ...d Touch Band icon on the screen to select one radio band among DAB1 DAB2 and DAB3 Tune There are four search mode You can select search mode from the followings 1 Preset Search Search preset service o...

Страница 52: ...o delete menu Recall the stored services 1 Touch the icon to show list menu 2 Touch to select a preset service PTY Search Touch PTY icon to show PTY type Touch the or icon to scroll and touch to selec...

Страница 53: ...B Play the video and display playback information C Display onscreen control menu D Time display Controlling Playback To access the on screen controls touch the screen except upper left corner and to...

Страница 54: ...off Cancel repeat play For CD MP3 WMA files 1 Touch anywhere except the upper left corner to display menu on the screen if necessary 2 Touch repeatedly 1 Repeat single Play the current single repeate...

Страница 55: ...12 indicates that current title has 12 chapters and the chapter playing back now is the fifth chapter 1 2 3 DVD TTL 1 8 CHP 5 12 For VCD 1 Disc type 2 VCD Track information 1 8 indicates that this VC...

Страница 56: ...Compatibility with all Bluetooth device is not guaranteed Any obstacle between this unit and a Bluetooth device can reduce the operational range Keep this unit away from any other electronic device t...

Страница 57: ...Download on the sub menu popped out Phonebook sync may take several minutes to load on initial setup Music Mode A2DP A2DP is short for Advanced Audio Distribution Profile The mobile phones supporting...

Страница 58: ...cting a track Track up 1 Touch the button to move to the beginning of the next track 2 Each time you touch the button the track advances to the beginning of the next track Track down 1 Touch the butto...

Страница 59: ...uffle Songs Shuffle Albums Repeat Repeat off Repeat One Repeat All iPod video playback To playback video from iPod touch top left corner of the screen then select a video file to play During playback...

Страница 60: ...temperature range is 15 40 C 3 If you need to re install the recorder replace the 3M double sided tape by a new one How to export the video file Computer Plug in microSD Choose the file on left side w...

Страница 61: ...uch Frame rate to select the desired frame rate Time setup Touch Time setup to set the time Auto off time Touch Auto off time to set the auto off time G SENSOR sensitivity Touch G SENSOR sensitivity t...

Страница 62: ...ps path setup Calibration When the touch operation is not sensitive or valid you should calibrate the touch screen through calibration setting function Adjust the response positions of the touch panel...

Страница 63: ...ark On mode the screen will display WARNING if you play the video disc The above warning screen will prevent the driver watching images Adjust Disc Rating 1 Touch Disc 2 Touch an option repeatedly to...

Страница 64: ...on a source Media Radio Bluetooth AV IN1 AV IN2 DVBT 3 Touch or to assign value 0 to 12 When switching to the source the volume increases automatically Adjust Reset Settings 1 Touch Reset 2 Touch an o...

Страница 65: ...ed fuse 4 Replace the fuse while the units power is disconnected TV Touch DVBT in the main menu to switch to TV mode and touch the center of the screen to show control buttons Other Modes GPS 1 Touch...

Страница 66: ...ment and connect to the car battery Otherwise a high possibility of serious short circuit to the electrical system may be occurred Replacing a new fuse with 10A rating when the old one is broken using...

Страница 67: ...EN 29 Device connections Pink Wire Parking Brake Cable Connections Pink Wire Reverse Driving Cable Connections...

Страница 68: ...izontally Installing the unit more than 30 degree vertically may result in worse performance 6 To prevent electric spark connect the positive pole first and then the negative pole 7 DO NOT block the c...

Страница 69: ...f the opening is too shallow the monitor may be extended out 10mm from the dashboard Method B 1 Insert this unit directly to the opening of the dashboard 2 Place M4x3 M5x5 cylindrical screw or M5x5 co...

Страница 70: ...ward and pull out the lower part Disassemble the unit 1 Unscrew the 4 pieces M2 2 screws 2 Use a screwdriver to bend straight the bended mounting tab and tip out the unit from the mounting bracket 3 P...

Страница 71: ...z 20KHz Maximum Output Power 4 50W Load Impedance 4 AUX IN Distortion 0 5 Frequency Response 3dB 20Hz 20KHz Audio Input Level 1Vrms Audio Audio Output Impedance 10K Audio Output Level 2Vrms Max Video...

Страница 72: ...in the display Unsupported file formats are skipped For example Word documents doc or Mp3 files with extension dlf are ignored and not played AAC PCM audio files DRM protected WMA files wav m4a m4p m...

Страница 73: ...e a T h a i l a n d Indonesia South East Asia Region 4 Australia New Zealand Mid south America South Pacific Ocean Islands Oceania Region 5 Russia Mongolia India Middle Asia East Europe North Korea N...

Страница 74: ...ing is not correct Check wiring and correct Flashing image or interference appears on screen The color system of DVD disc does not match the monitor Adjust the color system of the DVD disc playing bac...

Страница 75: ...EN 37 Wire Connections TV BUS RADIO ANT...

Страница 76: ...CLASS 1 LASER PRODUCT P N 127075005506...

Отзывы: