v
When the green LED flashes slowly (one flash per second), the hard drive is
being rebuilt.
v
When the green LED flashes rapidly (three flashes per second), the controller
is identifying the hard drive.
4. Refer to the
Network Attached Storage 200 User’s Reference
for information
about using the ServeRAID utility to configure the hot-swap drive.
Replacing a hot-swap hard drive:
You do not have to switch off the appliance to
remove or install the hot-swap hard drives.
Attention:
1. Before you replace a hot-swap hard drive, check the Hard Drive Status LED on
the front of the drive to see if the drive is defective (if the drive is defective, the
LED will be amber). If you partially or completely remove a good drive instead
of a defective one, you might lose valuable data.
This situation is especially relevant because your appliance has a RAID adapter
installed. The RAID adapter can rebuild the data that you need, provided that
certain conditions are met.
2. Before you remove a hot-swap hard drive that is not defective, back up all
important data.
3. To avoid damage to a hard drive, pull on the release lever to disengage the
hard drive connector from the backplane at the back of the drive bay, wait
approximately 30 seconds to allow the hard drive to spin down, and then
completely remove it from the bay.
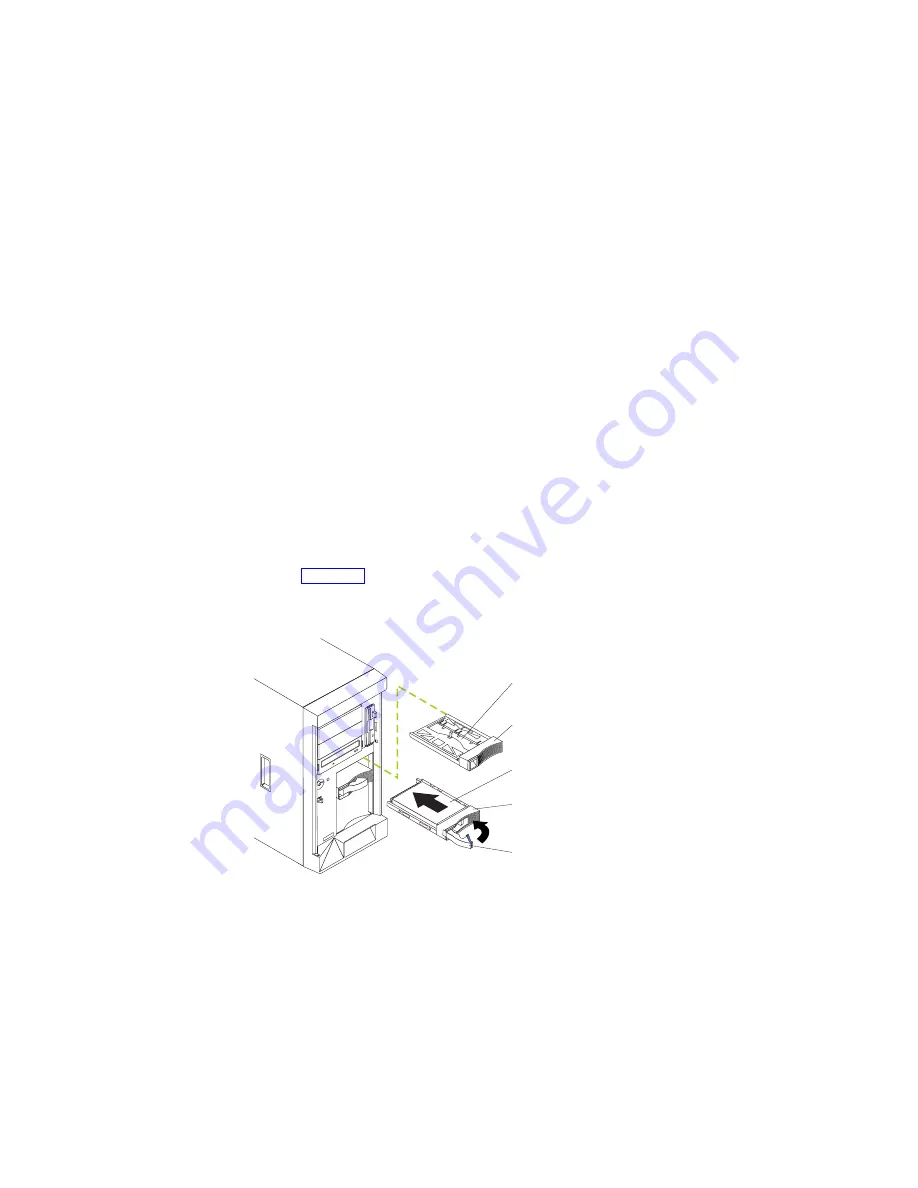
Refer to Figure 31 while you perform the steps in this procedure.
To replace a drive in a hot-swap drive bay:
1. Before you begin, read the documentation that comes with your hard drive.
2. If your appliance is a Model 200, unlock and open the appliance door.
Attention:
To maintain proper system cooling, do not operate the appliance
for more than two minutes without either a hard drive or a filler panel installed
for each drive bay.
3. Locate the defective hard drive (look for an amber Hard Drive Status LED on
the front of the drive).
Slim filler
Filler panel
Hard disk drive
Drive tray
Drive tray handle
(in open position)
Figure 31. Replacing a drive in a hot-swap drive bay in the Model 200
46
IBM TotalStorage
™
Network Attached Storage 200 Installation Guide
Содержание totalstorage 200
Страница 1: ...IBM TotalStorage Network Attached Storage 200 Models 200 and 225 Hardware Installation Guide ...
Страница 2: ......
Страница 3: ...IBM TotalStorage Network Attached Storage 200 Models 200 and 225 Hardware Installation Guide ...
Страница 8: ...vi IBM TotalStorage Network Attached Storage 200 Installation Guide ...
Страница 10: ...viii IBM TotalStorage Network Attached Storage 200 Installation Guide ...
Страница 14: ...xii IBM TotalStorage Network Attached Storage 200 Installation Guide ...
Страница 18: ...4 IBM TotalStorage Network Attached Storage 200 Installation Guide ...
Страница 40: ...26 IBM TotalStorage Network Attached Storage 200 Installation Guide ...
Страница 86: ...72 IBM TotalStorage Network Attached Storage 200 Installation Guide ...
Страница 99: ...Appendix B Safety and environmental notices 85 ...
Страница 100: ...86 IBM TotalStorage Network Attached Storage 200 Installation Guide ...
Страница 101: ...Appendix B Safety and environmental notices 87 ...
Страница 102: ...88 IBM TotalStorage Network Attached Storage 200 Installation Guide ...
Страница 103: ...Appendix B Safety and environmental notices 89 ...
Страница 104: ...90 IBM TotalStorage Network Attached Storage 200 Installation Guide ...
Страница 117: ...Appendix B Safety and environmental notices 103 ...
Страница 130: ...116 IBM TotalStorage Network Attached Storage 200 Installation Guide ...
Страница 144: ...130 IBM TotalStorage Network Attached Storage 200 Installation Guide ...
Страница 147: ...warranty statement 119 Index 133 ...
Страница 148: ...134 IBM TotalStorage Network Attached Storage 200 Installation Guide ...
Страница 151: ......


