3
2
3
a
a
b
a
Step
Screw
(quantity)
Color
Torque
2
M2
×
4
mm,
bind-head,
nylon-coated
(1)
Black
0.245
Nm
(2.5
kgfcm)
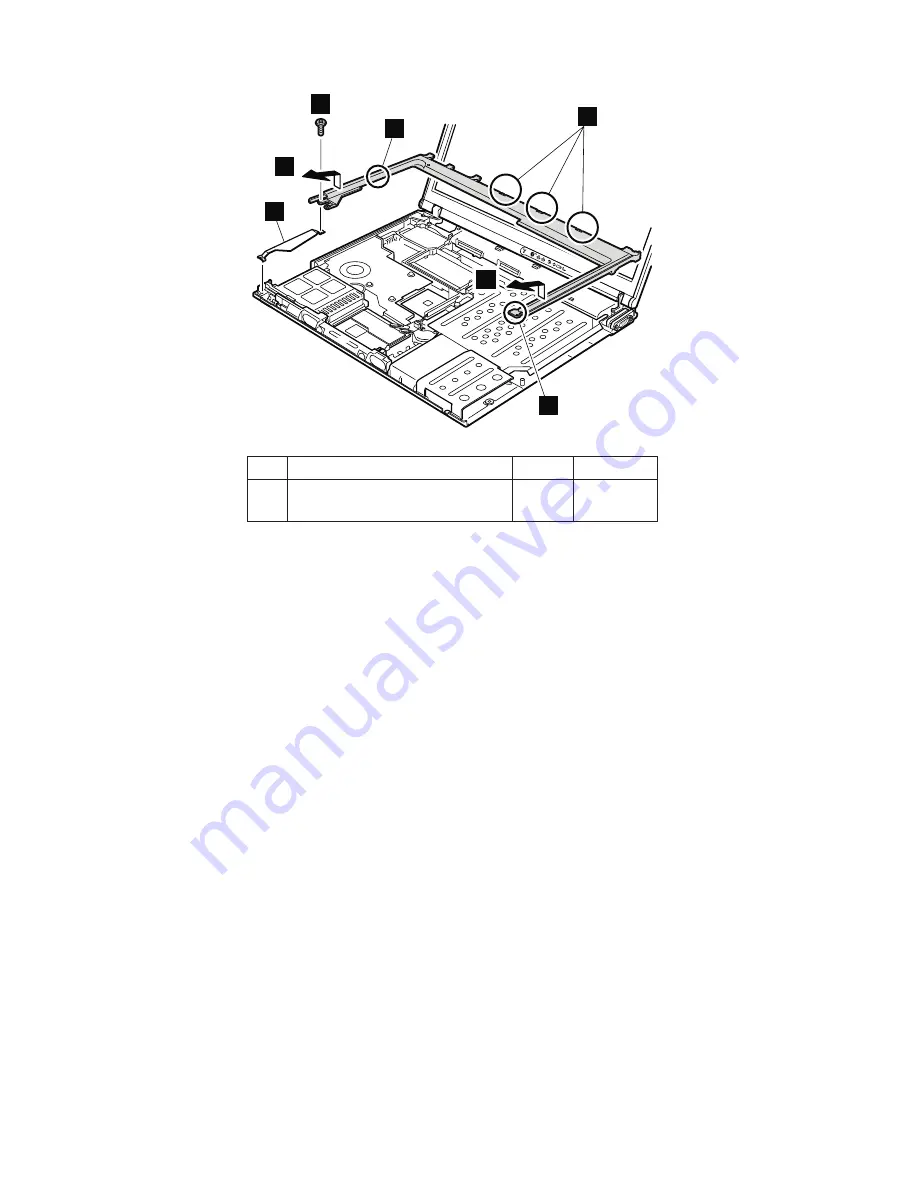
In
step
3
,
make
sure
that
all
the
latches
marked
a
are
detached,
and
then
remove
the
bezel.
When
installing:
Make
sure
that
all
the
latches
marked
a
are
firmly
attached.
Attach
harness
left
(
b
),
and
then
secure
the
keyboard
bezel
with
the
screws.
Removing
and
replacing
a
FRU
110
MT
2668/2669/2686/2687
Содержание THINKPAD T43 -
Страница 6: ...vi MT 2668 2669 2686 2687...
Страница 8: ...2 MT 2668 2669 2686 2687...
Страница 155: ...5 4 Removing and replacing a FRU ThinkPad T43 T43p Series 149...
Страница 157: ...3 2 Removing and replacing a FRU ThinkPad T43 T43p Series 151...
Страница 168: ...Remove the right latch from the LCD cover 23 24 Removing and replacing a FRU 162 MT 2668 2669 2686 2687...
Страница 172: ...b 4 4 c 5 5 continued Removing and replacing a FRU 166 MT 2668 2669 2686 2687...
Страница 182: ...3010 ThinkPad Dock II PCI cover 1 2 1 Bottom view Removing and replacing a FRU 176 MT 2668 2669 2686 2687...
Страница 187: ...1 2 3 4 5 6 7 8 9 16 10 12 13 14 15 19 17 18 11 Locations ThinkPad T43 T43p Series 181...
Страница 206: ...14 1 in LCD FRUs 1 b a 2 c d e 3 6 7 8 5 4 Parts list 200 MT 2668 2669 2686 2687...
Страница 211: ...15 0 in LCD FRUs 1 2 5 3 6 7 8 4 Parts list ThinkPad T43 T43p Series 205...
Страница 231: ...Notices ThinkPad T43 T43p Series 225...
Страница 232: ...Part Number 27R0700 1P P N 27R0700...


