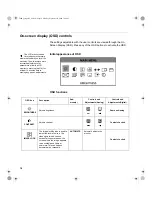
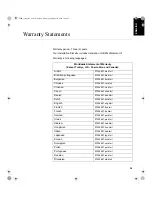
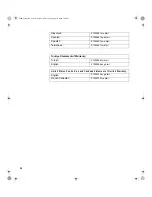
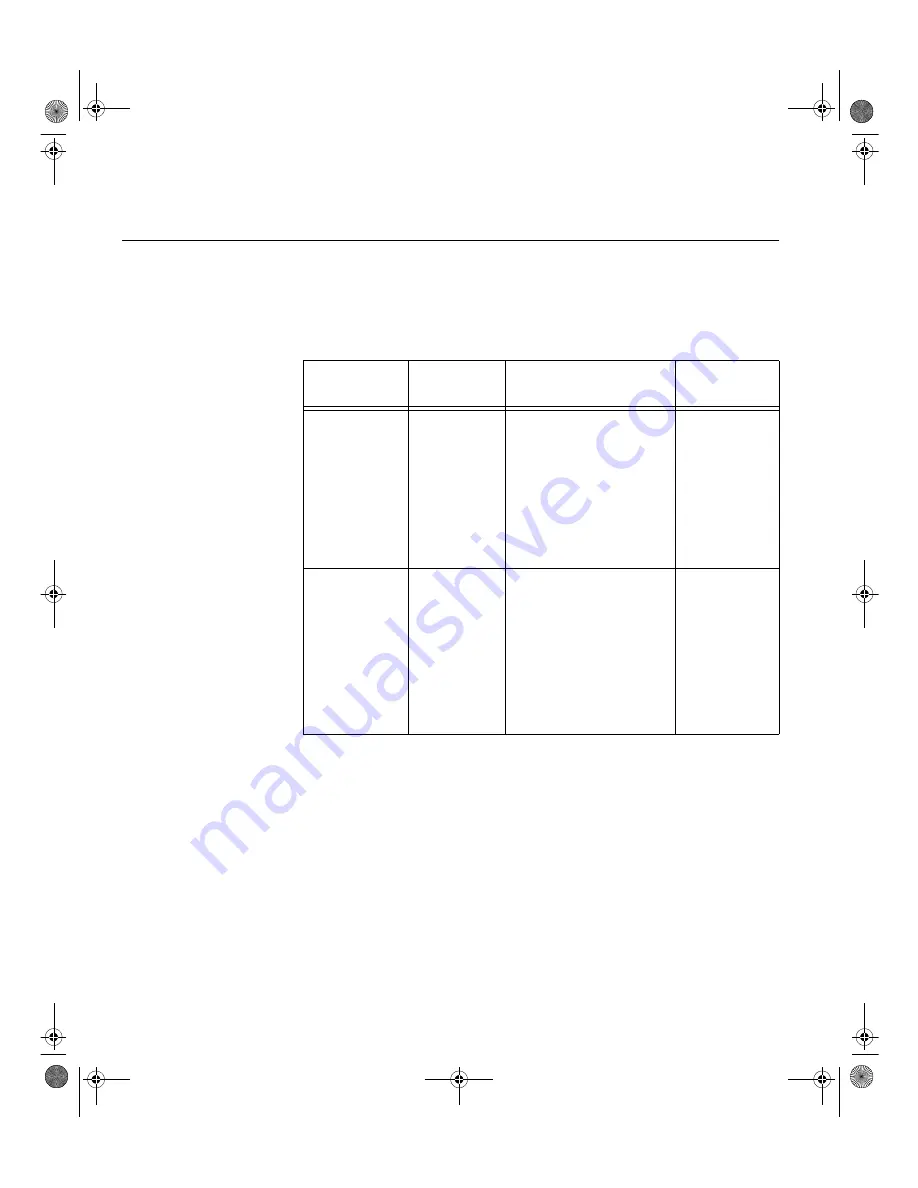
background image

22

Troubleshooting

If you have a problem setting up or using your monitor, you may be able to 
solve it yourself. Before calling your retailer or IBM, try the suggested actions 
that are appropriate to your problem.
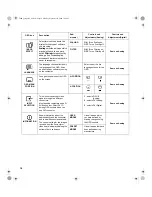
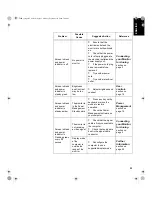
Problem

Possible 

Cause

Suggested Action

Reference

Computer 
doesn’t boot 
after the 
graphics 
adapter is 
installed

There is 
another 
graphics 
adapter in the 
computer

Š

Remove the other 

graphics adapter plugged 
into one of the expansion 
slot.

Š

If the card is built-in to 

the motherboard, check 
your system manual for 
instructions on how to 
disable the built-in adapter.

Connecting 
your Monitor 
for Analog


section on 
page 5

The screen 
image is 
garbled or 
unusable 
(rolling screen 
images, 
overlapping 
screen images 
or a blank 
screen)

The display 
driver is trying 
to use a 
setting your 
monitor 
doesn’t 
support

Š

Select the correct 

monitor again.

Connecting 
your Monitor 
for Analog


section on 
page 5

T84H_setup0915_final.fm  Page 22  Monday, September 25, 2000  7:40 PM

Содержание T750

Страница 1: ...DEUTSCH ENGLISH FRAN AIS ESPA OL ITALIANO JAPANESE COMPL WARR English T84H Eng fm Page 1 Monday September 25 2000 7 45 PM...

Страница 2: ...ce to an IBM product program or service is not intended to state or imply that only IBM s product program or service may be used Any functionally equivalent product program or service that does not in...

Страница 3: ...7 Setup Diskette for Windows 95 Windows 98 7 Setup Diskette for Windows 2000 8 Auto Setup Analog Only 9 Auto Setup 9 Auto Setup for DOS 10 Auto Setup for Windows 3 1 Windows 95 Windows 98 Windows NT...

Страница 4: ...If needed contact your dealer to purchase a compatible graphics adapter Handling Instructions Do not support the monitor within the screen area The Liquid Crystal Display is glass and can be damaged b...

Страница 5: ...nd swivel the screen backward and forward as shown below Working Practices This section gives advice on how you can work comfortably and reduce fatigue Rest Take regular breaks Vary your posture stand...

Страница 6: ...as the lighting changes during the day Many application programs let you select color combinations which can help you to view in comfort See the User controls section on page 14 for more information C...

Страница 7: ...adapter card may be colored blue to match the blue connector on your monitor s video cable The AC adapter and signal cable are connected to your monitor If you wish to change these or to fit a differ...

Страница 8: ...8 Switch on the power source and your computer To turn on the monitor push and release the power switch To switch it off push and release the power switch again Switching on your Monitor 1 Switch on...

Страница 9: ...unlike CRTs a faster refresh rate does not improve display quality IBM recommends using either 1280 x 1024 at a refresh rate of 60Hz 5 Select the SETTINGS tab In case of Windows 95 6 1 Select the Cha...

Страница 10: ...faster refresh rate does not improve display quality IBM recommends using either 1280 x 1024 at a refresh rate of 60Hz 7 Select the MONITOR tab 8 Select the PROPERTIFS button 9 Select the Driver tab 1...

Страница 11: ...operation locate the operating system on your PC from the table below and follow the appropriate instructions You may choose to run AUTO SETUP for each operating system that you use This means that i...

Страница 12: ...mode you want to setup You may repeat this process for as many of the color and video modes as you need The size and diversity of the dot pattern varies with the screen resolution 9 When the dot patt...

Страница 13: ...your PC and follow the instructions from the table below 6 When the test pattern appears press the OSD Enter button at the bottom of the monitor to display the initial OSD menu Position the mouse poi...

Страница 14: ...s You have completed the monitor setup for Windows If you use other operat ing systems perform the appropriate AUTO SETUP for those systems also see Auto Setup for DOS on page 10 T84H_setup0915_final...

Страница 15: ...button at the bottom of the monitor to display the initial OSD menu 4 Use an Arrow button or to select the IMAGE LOCK icon and press the OSD Enter button to access the function 5 Using an Arrow butto...

Страница 16: ...the Arrow buttons then press OSD Enter to select that function Use the Arrow buttons to make adjustments Icon Control Description Exit OSD inactive Switches the video input source OSD active Exits fr...

Страница 17: ...l briefly turn amber to indicate that the new value has been saved OSD Lock Unlock This feature allows you to secure the current control settings while allowing the user to adjust Brightness and Contr...

Страница 18: ...en adjustments Initial appearance of OSD OSD functions OSD Icon Description Sub menu s Controls and Adjustments Analog Controls and Adjustments Digital BRIGHTNESS Adjusts brightness Same as Analog CON...

Страница 19: ...creases greenness Increases or decreases blueness RESET Resets the Brightness Contrast Image Lock Fine and Coarse Color H Position V Position and Display Size settings NO Does not make the adjustment...

Страница 20: ...as Analog V POSITION INPUT SELECTION This monitor can accept video signals through two different connectors Most desktop computers use a D SUB connector Select DVI D among OSD controls when you use DV...

Страница 21: ...may change when the display mode changes This is normal and the image can be readjusted using AUTO SETUP and the monitor controls Unlike CRT monitors which require a high refresh rate to minimize fli...

Страница 22: ...37 8 kHz O O 800 600 72 Hz 48 0 kHz O O 800 600 75 Hz 46 8 kHz O O 832 624 75 Hz 49 7 kHz O O 1024 768 60 Hz 48 4 kHz O O 1024 768 70 Hz 56 5 kHz O O 1024 x 768 75 Hz 60 0 kHz O O 1280 x 1024 60 Hz 64...

Страница 23: ...ates as described in the table below As an ENERGY STAR Partner IBM has determined that this product meets the ENERGY STAR guidelines for energy efficiency IBM recommends that you switch off your monit...

Страница 24: ...e the other graphics adapter plugged into one of the expansion slot If the card is built in to the motherboard check your system manual for instructions on how to disable the built in adapter Connecti...

Страница 25: ...s blank and power indicator is steady amber The monitor is in the Power Management Standby state Press any key on the keyboard or move the mouse to restore operation Check the Power Management softwar...

Страница 26: ...ngs User controls section on page 15 Image appears to be discolored The Color setting may be incorrect Adjust the Color settings User controls section on page 15 A few dots are missing discolored or i...

Страница 27: ...System BIOS version number 7 Operating System and version number 8 Display driver version number 9 Video Adapter Type More help late breaking news and details of the latest accessories for these prod...

Страница 28: ...f the hinge and base assembly 7 If you are installing an arm or wall mounting device follow the directions included with the device If you are just changing your cables continue with Step 8 8 Connect...

Страница 29: ...c Power Consumption Normal Operation DPMS Stand by DPMS Suspend DPMS off 48 W 3 W for Analog 4 W for Digital 3 W for Analog 4 W for Digital 3 W for Analog 4 W for Digital Video Input Analog Input Sign...

Страница 30: ...ure Operating Storage Shipping Humidity Operating Storage Shipping 10 to 35 C 50 to 95 F 20 to 60 C 4 to 140 F 20 to 60 C 4 to 140 F 10 to 80 5 to 95 5 to 95 T84H_setup0915_final fm Page 28 Monday Sep...

Страница 31: ...Chinese Z1255697 chi html Croatian Z1255697 cro html Czech Z1255697 cze html Danish Z1255697 dan html Dutch Z1255697 dut html English Z1255697 eng html Finnish Z1255697 fin html French Z1255697 fre ht...

Страница 32: ...Z1255697 tai html Turkiye Statement of Warranty Turkish Z1255698 tur html English Z1255698 eng html United States Puerto Rico and Candada Statement of Limited Warranty English Z1254753 eng html French...

Отзывы: