ENGLISH
11
10. Press the ESC key to return to Windows.
You have completed the monitor setup for Windows. If you use other operat-ing systems, perform the appropriate AUTO SETUP for those systems, also: seeAuto Setup for DOS on page 9.
Страница 1: ...e nach Art der verwendeten Hardware und Software auch anders lauten In einigen F llen m ssen die Einstellungsschritte unter Umst nden abge ndert werden Weitere Informationen finden Sie im Computer ode...
Страница 2: ...ctement mise la terre et en bon tat de marche Tout quipement auquel ce produit est reli doit tre galement connect une prise correctement mise la terre et en bon tat de marche Pour isoler le moniteur d...
Страница 3: ...urante una tormenta el ctrica El cable de alimentaci n debe estar conectado a un enchufe debidamente cableado y con toma de tierra Cualquier equipo al que se vaya a conectar este producto tambi n debe...
Страница 4: ...ing For at isolere skaermen fra str mforsyningen skal stikket tages ud af stikkontakten Stikkontakten b r vaere let tilgaengelig FARE Slik unng r du fare for elektrisk st t Ikke ta av dekslene Ikke br...
Страница 5: ...ian pit isi olla mahdollisimman l hell n ytint ja vaivattomasti k sill KIN Y fi fi fi T fi fi N AC fi fi fi fi TEHLIKE Elektrik arpmas7 7 tehlikesinden ka ynmak i in Kapaklar7 ykarmay7n7z Bu cihaz7 ka...
Страница 6: ...ENGLISH English...
Страница 7: ...eserved Notices References in this publication to IBM products programs or services do not imply that IBM intends to make these available in all countries in which IBM operates Any reference to an IBM...
Страница 8: ...r Windows 98 6 Setup Diskette for Windows 2000 7 Auto Setup 8 Auto Setup 8 Auto Setup for DOS 9 Auto Setup for Windows 3 1 Windows 95 Windows 98 Windows NT or Windows 2000 10 Manual Setup 12 Adjusting...
Страница 9: ...hin the screen area The Liquid Crystal Display is glass and can be damaged by rough handling or excessive pressure Handling Instructions Handling Instructions 1 Lift the monitor by placing both hands...
Страница 10: ...om the screen periodically and have your eyesight checked regularly Screen settings Set the screen brightness and contrast to a comfortable level You may have to adjust this as the lighting changes du...
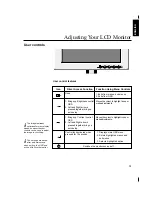
Страница 11: ...onitor 2 Switch on your monitor by pushing and releasing the power switch marked To switch off your monitor push and release the power switch again 3 Switch on your computer 4 Run AUTO SETUP by follow...
Страница 12: ...Landscape to Portrait through 90 clockwise and from Portrait to Landscape through 90 anti clockwise Be sure to turn off the power before you perform any maintenance on the monitor Clean your monitor...
Страница 13: ...GRADE DEVICE DRIVER WIZARD window by clicking on CHANGE button and then select the NEXT button If the UPGRADE DEVICE DRIVER WIZARD is open go to step 6 3 if not contine to step 4 4 Select the Display...
Страница 14: ...R and then select the NEXT button 11 Select the Display a list of the known drivers for this device so that I can choose a specific driver and then select the NEXT button 12 Insert the Setup diskette...
Страница 15: ...diskettes supplied with the monitor 2 Make sure the PC s video mode is set in the range of the supported screen resolution shown in the table on page18 You should perform AUTO SETUP for each screen mo...
Страница 16: ...ct AUTO and press the OSD Enter button This activates the AUTO SETUP procedure which will optimize the display settings with the provided dot patterns The image may be affected during this procedure a...
Страница 17: ...ow button or select AUTO and press the OSD Enter button This activates the AUTO SETUP procedure which will optimize the display settings with the provided test pattern The image may be affected during...
Страница 18: ...Press the ESC key to return to Windows You have completed the monitor setup for Windows If you use other operat ing systems perform the appropriate AUTO SETUP for those systems also see Auto Setup for...
Страница 19: ...press the OSD Enter button to access the function 5 Using an Arrow button or select MANUAL press and then press once to select COARSE Left and right arrow adjustment indicators become illuminated see...
Страница 20: ...lready optimized for many display modes however the user controls can be used to adjust the image to your liking i The settings are saved after adjustment and when exiting the OSD and will be effectiv...
Страница 21: ...to adjust Brightness Contrast and initiate Auto Setup so that they cannot be inadvertently changed Push and hold the enter button for 10 seconds the message Controls Locked appears You can unlock the...
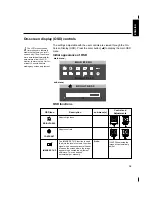
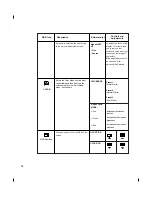
Страница 22: ...tor to warm up be On for at least 15 minutes before making any screen adjustment M A I N M E N U B R I G H T N E S S B R I G H T N E S S 7 5 OSD functions OSD Icon Description sub menu s Auto If AUTO...
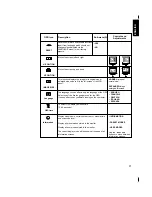
Страница 23: ...s Increases or decreases greenness Increases or decreases blueness COLORMODE USER COLOR MODE Red Green Blue To adjust the focus of the display This item allows you to remove any horizontal noise and c...
Страница 24: ...the language of the OSD Select one of the five language to use for the OSD It has no effect on any software running on the computer ENGLISH FRANCAIS DEUTSCH ITALIANO ESPANOL H POSITION V POSITION NOR...
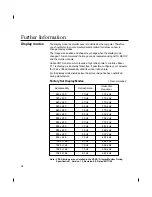
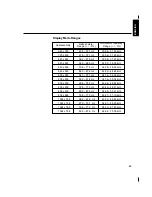
Страница 25: ...te For the display modes listed below the screen image has been optimized during manufacture Factory Set Display Modes Recommended Further Information Display modes Addressabillty Refresh Rate Horizon...
Страница 26: ...or whenever you expect to leave it unused for long periods during the day Power Management i If your computer has previously been used with a CRT monitor and is currently configured to a display mode...
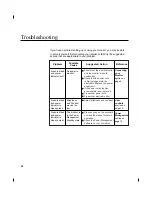
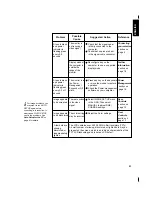
Страница 27: ...and power indicator is steady green Sreen is blank and power indicator is steady amber User controls section on page 13 Power Management section on page 19 Connecting your Monitor section on page 4 A...
Страница 28: ...nd is not an LCD defect Sreen is blank and power indicator is flashing green every 0 5 second Sreen is blank and power indicator is flashing green every 0 5 or 1 second Image appears to be smeared Ima...
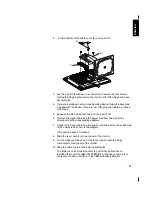
Страница 29: ...suppliers This product is equipped with mounting facilities that conform to the VESA Flat Panel Monitor Physical Mounting Interface Standard FPMPMI This product is shipped with the signal cable and th...
Страница 30: ...ignal cable and the power cord from the monitor by disconnecting the corresponding adapters 7 Connect the signal cable and the power cord and ensure the positioning of the cables is as shown in the di...
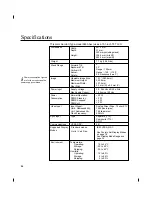
Страница 31: ...e 25 Separate TTL Composite TTL SOG 10 to 35 C 20 to 60 C 20 to 60 C 10 to 80 5 to 95 5 to 95 Stand Range Image Power Input Power Consumption Video Input Communications Sync Input VESA DDC Type 2B Sup...
Страница 32: ...8 63 kHz 640 x 480 82 5 87 6 Hz 42 00 44 60 kHz 800 x 600 54 3 57 7 Hz 34 14 36 26 kHz 800 x 600 58 2 61 8 Hz 36 76 39 04 kHz 800 x 600 69 8 74 2 Hz 46 66 49 54 kHz 800 x 600 72 8 77 3 Hz 45 49 48 31...
Страница 33: ...achine Nothing in this Statement of Warranty affects any statutory rights of consumers that cannot be waived or limited by contract If you have any questions contact IBM or your reseller The IBM Warra...
Страница 34: ...ur reseller will inform you of the available types of service for a Machine based on its country of installation IBM may repair the failing Machine or exchange it at its discretion When warranty servi...
Страница 35: ...MS AGAINST YOU FOR DAMAGES OTHER THAN THOSE UNDER THE FIRST ITEM LISTED ABOVE 2 LOSS OF OR DAMAGE TO YOUR RECORDS OR DATA OR 3 SPECIAL INCIDENTAL OR INDIRECT DAMAGES OR FOR ANY ECONOMIC CONSEQUENTIAL...
Страница 36: ...IN THAT EVENT SUCH WARRANTIES ARE LIMITED IN DURATION TO THE WARRANTY PERIOD NO WARRANTIES APPLY AFTER THAT PERIOD Items Not Covered by Warranty IBM does not warrant uninterrupted or error free operat...
Страница 37: ...the Machine s production status IBM s appropriate warranty terms apply Limitation of Liability Circumstances may arise where because of a default on IBM s part or other liability you are entitled to...
Страница 38: ...ible personal property will be limited to that caused by IBM s negligence 2 as to any other actual damage arising in any situation involving nonperformance by IBM pursuant to or in any way related to...
Страница 39: ...the first sentence of the first paragraph of this Section The warranty for an IBM Machine covers the functionality of the Machine for its normal use and the Machine s conformity to its Specifications...
Страница 40: ...MIBIA BOTSWANA LESOTHO AND SWAZILAND Limitation of Liability The following is added to this Section IBM s entire liability to you for actual damages arising in all situations involving nonperformance...
Страница 41: ...tml French Z1255697 fre html German Z1255697 ger html Greek Z1255697 gre html Hebrew Z1255697 heb html Hungarian Z1255697 hun html Italian Z1255697 ita html Japanese Z1255697 jap html Korean Z1255697...