background image

Release
handle

Serial
pass-thru
module

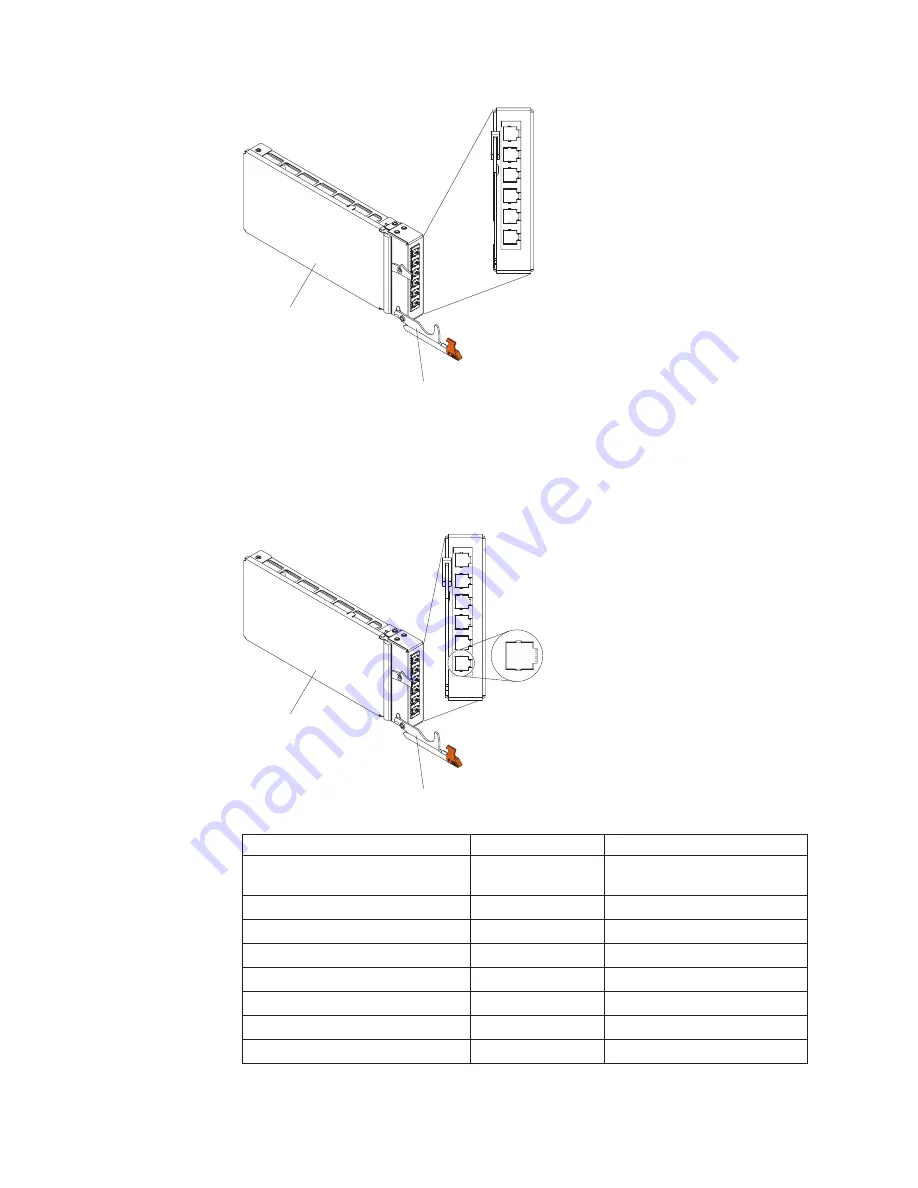
Serial pass-thru connector pinout

There are eight pins on each RJ-45 port, numbered 1 through 8, from bottom to
top.

Release
handle

Serial
pass-thru
module

1

8

Contact (pin number)

Signal name

Signal direction

1

RTS (Request to
send)

Output from blade server

2

Not used

n/a

3

RXD (Receive data)

Input to blade server

4

GND (Ground)

n/a

5

Not used

n/a

6

TXD (Transfer data) Output from blade server

7

Not used

n/a

8

CTS (Clear to send)

Input to blade server

18

BladeCenter S Type 7779/8886: Installation and User's Guide

Содержание BladeCenter S

Страница 1: ...IBM BladeCenter S Type 7779 8886 Installation and User s Guide...

Страница 2: ......

Страница 3: ...IBM BladeCenter S Type 7779 8886 Installation and User s Guide...

Страница 4: ...s and read the IBM Safety Information and the IBM Systems Environmental Notices and User Guide on the IBM Documentation CD Eighth Edition July 2013 Copyright IBM Corporation 2007 2013 US Government Us...

Страница 5: ...er optional 47 Chapter 4 Configuring the BladeCenter S system 49 Configuring I O modules 49 Configuring blade servers 50 Selecting shared BladeCenter resources 52 Appendix A Getting help and technical...

Страница 6: ...iv BladeCenter S Type 7779 8886 Installation and User s Guide...

Страница 7: ...kt Lees voordat u dit product installeert eerst de veiligheidsvoorschriften Ennen kuin asennat t m n tuotteen lue turvaohjeet kohdasta Safety Information Avant d installer ce produit lisez les consign...

Страница 8: ...technicians Inspecting for unsafe conditions Use this information to help you identify potential unsafe conditions in an IBM product that you are working on Each IBM product as it was designed and ma...

Страница 9: ...signs of fire or smoke damage 7 Check for worn frayed or pinched cables 8 Make sure that the power supply cover fasteners screws or rivets have not been removed or tampered with Guidelines for servic...

Страница 10: ...when you measure high voltages v To ensure proper grounding of components such as power supplies pumps blowers fans and motor generators do not service these components outside of their normal operati...

Страница 11: ...ion and configuration procedures v Connect and disconnect cables as described in the following table when installing moving or opening covers on this product or attached devices To Connect To Disconne...

Страница 12: ...Laser radiation when open Do not stare into the beam do not view directly with optical instruments and avoid direct exposure to the beam Class 1 Laser Product Laser Klasse 1 Laser Klass 1 Luokan 1 La...

Страница 13: ...d optional I O expansion cards to add network interfaces or storage through I O modules SAS expansion cards provide access through SAS connectivity modules or SAS RAID controller modules that are inst...

Страница 14: ...t for redundant access to the disk storage modules in the BladeCenter S chassis if both disk storage modules are installed v Systems management The advanced management module is used to communicate wi...

Страница 15: ...ectr documentation index jsp The IBM BladeCenter Documentation CD The IBM BladeCenter Documentation CD contains documentation for your BladeCenter S chassis in Portable Document Format PDF and include...

Страница 16: ...d press Ctrl F to use the Acrobat search function or press Alt F to use the xpdf search function within the document Click Help for detailed information about using the Documentation Browser Notices a...

Страница 17: ...rmware v I O module firmware v Blade server firmware v Disk storage module firmware Security features v Login password for remote connection v Secure Sockets Layer SSL security for remote management a...

Страница 18: ...sis Note For proper cooling each bay in the BladeCenter S chassis must have either a device or a filler installed As the BladeCenter S chassis can support either 3 5 inch disk drives or 2 5 inch disk...

Страница 19: ...talling SAS connectivity modules both SAS and SATA hard disk drives are supported and you can use both types of hard disk drives in each disk storage module If you are installing SAS RAID controller m...

Страница 20: ...le types in the same BladeCenter S chassis SAS connectivity module At least one SAS connectivity module must be installed If a single SAS connectivity module is installed it controls access to both di...

Страница 21: ...ave implemented the hard disk drives as a mirrored array the fault light will blink as the hard disk drive is being resynchronized This resynchronization occurs because the blade servers are attemptin...

Страница 22: ...ned on by the system administrator to aid in visually locating the BladeCenter S chassis You can turn off the location LED throught the Web interface or the IBM Director console Over temperature Lit a...

Страница 23: ...ttery backup unit bays located in the media tray when you install SAS RAID controller modules The battery backup unit in battery backup bay 1 provides backup support for the SAS RAID controller module...

Страница 24: ...h is at http publib boulder ibm com infocenter systems index jsp To access the blade server documentation from this site click Systems hardware BladeCenter information Blade servers To determine which...

Страница 25: ...r to recognize the media tray If there is no response when you press the media tray select button use the advanced management module to determine whether local control has been disabled on the blade s...

Страница 26: ...sis that support KVM It controls the following connections v A serial port for a local connection to another computer such as a notebook computer v The external video and USB connections for keyboard...

Страница 27: ...ule bay Advanced management module indicators and controls The advanced management module has several LEDs that you can use to obtain status about the advanced management module and the Ethernet conne...

Страница 28: ...te at full speed while the advanced management module is initializing Attention If you push the paper clip in all the way and hold it for approximately 10 seconds the advanced management module will b...

Страница 29: ...se these connectors to connect a mouse and keyboard or other USB devices Unlike the USB connectors on the media tray these connectors are shared by the blade servers through the BladeCenter Keyboard V...

Страница 30: ...ial pass thru module 1 8 Contact pin number Signal name Signal direction 1 RTS Request to send Output from blade server 2 Not used n a 3 RXD Receive data Input to blade server 4 GND Ground n a 5 Not u...

Страница 31: ...see the IBM ServerProven Web site at http www ibm com servers eserver serverproven compat us eserver html I O module bay 1 I O module bay 1 supports any standard Ethernet or pass thru module that conn...

Страница 32: ...o bays also support Ethernet switch modules Fibre Channel switch modules and pass thru modules optical and copper if the disk storage modules are not being used Important I O module bays 3 and 4 must...

Страница 33: ...e modules the power modules will be disabled Indicators and controls There are three LEDs on each power module AC power Lit green Power is being supplied to the power module DC power Lit green Power i...

Страница 34: ...ls Each fan module has a single LED Error Lit amber One of the fans in the fan module has failed Note If one of the fans in the fan module fails the other fan will begin operating at full speed System...

Страница 35: ...matic interfaces that you need to configure and monitor multiple instances of different types of storage related devices including either the SAS connectivity modules or the SAS RAID controller module...

Страница 36: ...24 BladeCenter S Type 7779 8886 Installation and User s Guide...

Страница 37: ...from power to install or replace any of the hot swap modules You must shut down the operating system and turn off a hot swap blade server before you remove it but you do not have to remove power from...

Страница 38: ...replaced as soon as possible Handling static sensitive devices Make sure that you read these guidelines before handing static sensitive devices About this task Attention Static electricity can damage...

Страница 39: ...ns all components that are listed on the packing list Obtaining firmware and device drivers During the installation of the BladeCenter S system you might have to update the firmware for one or more of...

Страница 40: ...ain the latest version of IBM Director go to the Support for IBM Systems Management Web site at http www ibm com systems support management Storage Configuration Manager To obtain the latest version o...

Страница 41: ...oid personal injury before lifting the unit remove all the blades power supplies and removable modules to reduce the weight 108 kg 237 lbs 2X 6X 4X 4X 43 2 kg 95 lbs Procedure 1 Remove components from...

Страница 42: ...storage modules Graphic showing the removal of a 6 disk storage module Graphic showing the removal of a 12 disk storage module 2 Remove the bezel from the front of the BladeCenter S chassis 30 BladeCe...

Страница 43: ...move components from the rear of the BladeCenter S chassis a Remove all power modules Power module 3 Power module 4 Release handle open b Remove all fan modules Chapter 2 Installing the BladeCenter S...

Страница 44: ...tall your BladeCenter S chassis only in a rack cabinet with perforated front and rear doors or in a rack that is equipped with an IBM Rear Door Heat eXchanger v Do not extend more than one device out...

Страница 45: ...re required only when the BladeCenter S chassis is shipped while it is installed in a rack cabinet An initial set of shipping brackets is provided in the rack installation kit If you need to order add...

Страница 46: ...the cage nuts For racks with round holes use the clip nuts Cage nut Clip nut 5 Before you install the rails in the rack fully extend each rail A set of rail pins and a mounting flange are on each end...

Страница 47: ...il with the applicable holes on the rack 1 Release the rail latches and finger pulls 2 on each end to allow the rail pins to pass through the rail and the mounting flange 3 Repeat steps 5 through 7 fo...

Страница 48: ...rack cabinet Rear view 10 Optionally install the shipping brackets There is a set of shipping brackets provided in the BladeCenter S chassis rack installation kit Rear view To install the upper right...

Страница 49: ...1 Insert four M6 screws in the front of the BladeCenter S chassis to secure it to the rack cabinet 12 Install the bezel on the front of the BladeCenter S chassis Bezel Installing components After you...

Страница 50: ...torage module bay Then you can install hard disk drives into the disk storage module by opening the release handle on the hard disk drive and sliding the hard disk drive into the hard disk drive bay B...

Страница 51: ...torage module into the disk storage module bay until it stops 4 Close the release handles rotate the top handle down and the bottom handle up 5 Install hard disk drives a Open the release handle on th...

Страница 52: ...a blade server into BladeCenter S chassis make sure that you have installed any optional hardware devices such as a SAS expansion card option in the blade server About this task You can find the docum...

Страница 53: ...abels that come with the BladeCenter S chassis then place the label on the BladeCenter S chassis top bezel just above the blade server Important Do not place the label on the blade server or in any wa...

Страница 54: ...the release handle rotate the handle down 3 Slide the advanced management module into the advanced management module bay until it stops 4 Close the release handle rotate the handle up Installing a po...

Страница 55: ...e release handle rotate the handle down 3 Slide the module into the power module bay until it stops 4 Close the release handle rotate the handle up Installing a fan module To install a fan module slid...

Страница 56: ...r I O modules at the IBM Systems Information Center which is at http publib boulder ibm com infocenter systems index jsp To access the I O module documentation from this site click Systems hardware Bl...

Страница 57: ...ss the Ethernet network through that I O module v If you install SAS connectivity modules you must also install a SAS expansion card option in each of the blade servers that will access the integrated...

Страница 58: ...owing LEDs are lit v The power on LED on the system LED panel v The dc power and ac power LEDs on each power module v The OK LED on the advanced management module v The OK or Power LED on each I O mod...

Страница 59: ...that the advanced management module is on a network that is reachable from the IBM Director server Note IBM Director communicates over the TCP command mode port You might have to increase the maximum...

Страница 60: ...48 BladeCenter S Type 7779 8886 Installation and User s Guide...

Страница 61: ...modules You must enable at least one external port on an Ethernet switch module in I O module bay 1 to communicate with the Ethernet controllers that are integrated in each blade server About this tas...

Страница 62: ...rom this site click Systems hardware BladeCenter information Blade servers Although there are several ways to access the blade server consider using KVM access when you perform the initial setup of a...

Страница 63: ...information about assigning the media tray to the blade server see Selecting shared BladeCenter resources on page 52 5 Insert the operating system media into the DVD drive 6 Set the DVD drive as the...

Страница 64: ...switch ownership of the media tray to a specific blade server press the CD button on that blade server The BladeCenter S Types 7779 and 8886 assigns the resource to the blade server that is requestin...

Страница 65: ...nance contract Your IBM service technician will request that you upgrade your software and firmware if the problem has a documented solution within a software upgrade v If you have installed new hardw...

Страница 66: ...rmation from the World Wide Web Up to date information about IBM products and support is available on the World Wide Web On the World Wide Web up to date information about IBM systems optional devices...

Страница 67: ...rs on the right side of the page For IBM support telephone numbers see In the U S and Canada call 1 800 IBM SERV 1 800 426 7378 In the U S and Canada hardware service and support is available 24 hours...

Страница 68: ...56 BladeCenter S Type 7779 8886 Installation and User s Guide...

Страница 69: ...s a Tier 1 CRU at your request you will be charged for the installation v Tier 2 customer replaceable unit You can install a Tier 2 CRU yourself or request IBM to install it at no additional charge un...

Страница 70: ...lowing consumable parts are available for purchase from the retail store Index Description Part number Battery backup unit 45W5002 Rear view parts listing The rear of the BladeCenter S chassis contain...

Страница 71: ...n 3 Filler I O module 4 Advanced management module 5 Serial pass thru module 6 Fan module 7 Power supply 8 Filler power supply Cable fan module to midplane Miscellaneous parts kit Kit rack Appendix B...

Страница 72: ...60 BladeCenter S Type 7779 8886 Installation and User s Guide...

Страница 73: ...IMPLIED WARRANTIES OF NON INFRINGEMENT MERCHANTABILITY OR FITNESS FOR A PARTICULAR PURPOSE Some states do not allow disclaimer of express or implied warranties in certain transactions therefore this s...

Страница 74: ...ximum When referring to processor storage real and virtual storage or channel volume KB stands for 1024 bytes MB stands for 1 048 576 bytes and GB stands for 1 073 741 824 bytes When referring to hard...

Страница 75: ...actices that maintain particulate and gas levels that are consistent with the protection of human health and safety If IBM determines that the levels of particulates or gases in your environment have...

Страница 76: ...onitor to the equipment you must use the designated monitor cable and any interference suppression devices that are supplied with the monitor Federal Communications Commission FCC statement Note This...

Страница 77: ...ws of the Member States relating to electromagnetic compatibility IBM cannot accept responsibility for any failure to satisfy the protection requirements resulting from a nonrecommended modification o...

Страница 78: ...ukt entspricht dem Gesetz ber die elektromagnetische Vertr glichkeit von Ger ten EMVG Dies ist die Umsetzung der EU Richtlinie 2004 108 EG in der Bundesrepublik Deutschland Zulassungsbescheinigung lau...

Страница 79: ...n JEITA statement Japan Electronics and Information Technology Industries Association JEITA Confirmed Harmonics Guidelines with Modifications products greater than 20 A per phase Korea Communications...

Страница 80: ...Taiwan Class A compliance statement 68 BladeCenter S Type 7779 8886 Installation and User s Guide...

Страница 81: ...vii electrical input 5 electronic emission Class A notice 64 environment 5 European Union EMC Directive conformance statement 65 expansion capabilities 1 F fan module initially installing 43 overview...

Страница 82: ...3 parts list 58 reliability system 26 removing components 29 replacement parts 57 Russia Class A electronic emission statement 67 S safety v safety statements v viii SAS connectivity module firmware 2...

Страница 83: ......

Страница 84: ...Part Number 46W8159 Printed in USA 1P P N 46W8159...

Отзывы: