background image

IBM BladeCenter Deployment Guide 

3.  Enter admin mode by entering “admin start” 

4.  Disable the target port by entering the command “

set port x state offline

” where 

x

 is the 

number of the port. For this example, we used “

4

” 

5.  Confirm the status by entering “

show port

”again. 

14


http://w3-03.ibm.com/support/techdocs/atsmastr.nsf/WebIndex/WP100564

               © 2006 IBM Version 3.0, 3/10/2006 


Figure 10 Port Status Offline 

2.4.2.2  Using SANSurfer GUI 

1.   Start the SANSurfer GUI. If the fabric has not already been discovered, click Fabric-Add Fabric 

and enter the IP address of the target QLogic switch in the window that will pop up - That should 
open SAN Browser.  

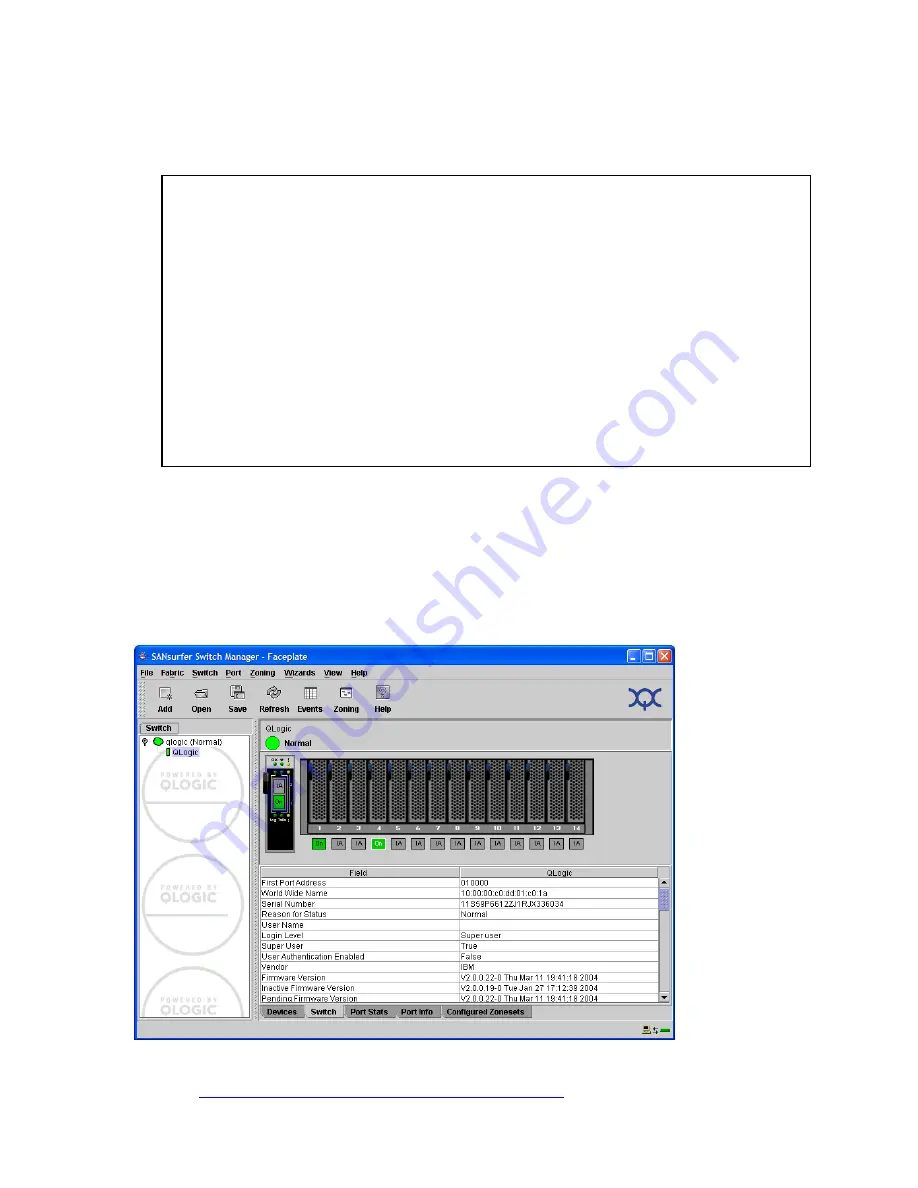
2.  Click the handle in the left pane to drop down the switch - highlight it and the faceplate will appear 

in the right pane. 


Figure 11 SANSurfer Switch Faceplate 

QLogic: USERID> admin start 

QLogic (admin): USERID> set port 4 state offline 

QLogic (admin): USERID> show port 

          Admin       Operational  Login       Config Running     Link     Link 

  Port    State       State        Status      Type   Type        State    Speed 

  ----    -----       -----------  ------      ------ -------     -----    ----- 

  Ext1:0  Online      Online       LoggedIn    GL     F           Active   1Gb/s 

  Ext2:15 Online      Offline      NotLoggedIn GL     Unknown     Inactive Auto 


  Bay1    Online      Online       LoggedIn    F      F           Active   2Gb/s 

  Bay2    Online      Offline      NotLoggedIn F      Unknown     Inactive 2Gb/s 

  Bay3    Online      Offline      NotLoggedIn F      Unknown     Inactive 2Gb/s 

  Bay4    Offline     Offline      NotLoggedIn F      Unknown     Inactive 2Gb/s 

  Bay5    Online      Offline      NotLoggedIn F      Unknown     Inactive 2Gb/s 

  Bay6    Online      Offline      NotLoggedIn F      Unknown     Inactive 2Gb/s 

The BladeCenter Deployment Guide is intended as a personal productivity tool. It is not intended to be comprehensive and is provided for 

guidance only, on an 'as is basis' without warranty of any kind. Please be aware that its contents have not been certified by IBM. 

Содержание 8832

Страница 1: ...0 3 10 2006 http w3 03 ibm com support techdocs atsmastr nsf WebIndex WP100564 The BladeCenter Deployment Guide is intended as a personal productivity tool It is not intended to be comprehensive and...

Страница 2: ...0564 The BladeCenter Deployment Guide is intended as a personal productivity tool It is not intended to be comprehensive and is provided for guidance only on an as is basis without warranty of any kin...

Страница 3: ...7 4 3 Multipath Red Hat Installation 27 4 4 Red Hat Linux AS Broadcom driver installation 29 4 5 Issues related to Red Hat AS 2 1 3 0 and blades 30 4 6 Other Linux Distributions and Blades 34 4 7 RDAC...

Страница 4: ...ort Status Online 13 Figure 11 Port Status Offline 14 Figure 12 SANSurfer Switch Faceplate 14 Figure 13 Port Properties 15 Figure 14 Disable the IDE Devices HS20 and HS40 16 Figure 15 HS20 Boot Sequen...

Страница 5: ...Figure 37 alt sysrq from Linux client 37 Figure 38 alt sysrq from PuTTY 38 Figure 39 Broadcom Setup 41 Figure 40 QLogic HBA Flash 44 Version 3 0 3 10 2006 http w3 03 ibm com support techdocs atsmastr...

Страница 6: ...information for the IBM BladeCenter products It describes the BladeCenter components explains deployment and installation considerations and provides worksheets that you can use to determine the confi...

Страница 7: ...ironment This document is intended as a personal productivity tool It is not intended to be comprehensive and is provided for guidance only on an as is basis without warranty of any kind Please be awa...

Страница 8: ...detail later in this document 2 1 Network Configuration The two switch modules provide redundant paths to each of the server blades for reaching other server blades within the same chassis or for comm...

Страница 9: ...ssword you will presented with a welcome window that displays where you are connected and for security purposes where you set the duration that your connection can be idle before being automatically d...

Страница 10: ...Blade Tasks Ensure that the media tray and KVM selections are for the target blade Figure 5 KVM and Media Ownership 10 http w3 03 ibm com support techdocs atsmastr nsf WebIndex WP100564 The BladeCente...

Страница 11: ...icking the icons on the toolbar twice should clear this state and may restore keyboard response Figure 6 Remote Control Window 7 If during a Linux installation you see the message No Video Available s...

Страница 12: ...irectors steer traffic through separate fabrics to the IBM BladeCenters which use Qlogic HBAs Host Bus Adapters Separate fabrics allow full redundancy in the storage path The IBM Blade Server boots to...

Страница 13: ...ay2 Online Offline NotLoggedIn F Unknown Inactive 2Gb s Bay3 Online Offline NotLoggedIn F Unknown Inactive 2Gb s Bay4 Online Online LoggedIn F F Active 2Gb s Bay5 Online Offline NotLoggedIn F Unknown...

Страница 14: ...ht pane Figure 11 SANSurfer Switch Faceplate QLogic USERID admin start QLogic admin USERID set port 4 state offline QLogic admin USERID show port Admin Operational Login Config Running Link Link Port...

Страница 15: ...IP full login and Enable target reset parameters control the behavior of the adapter when Windows tries to do a SCSI bus reset You must perform a target reset to make cluster failovers work Use the SC...

Страница 16: ...ing steps from within the BIOS setup program 1 Select Devices and IO ports from the main menu 2 Select IDE configuration menu Select Disable to disable the Primary and Secondary IDE controllers Note i...

Страница 17: ...ades to update in a single blade chassis the boot order changes may be made through the Management Module and applied to any or of all of blades in the chassis as a group See Figure 16 Changing boot o...

Страница 18: ...he target blade server being configured for remote boot and enter the QLogic BIOS utility using CTRL Q This must be done at a specific time during the POST Note you must click the sticky Ctrl icon on...

Страница 19: ...ote boot and enter the QLogic BIOS utility using CTRL Q as described in Section 3 2 1 Select Configuration Settings then Selectable Boot Settings then set Selectable Boot to Enabled Select primary boo...

Страница 20: ...ort techdocs atsmastr nsf WebIndex WP100564 The BladeCenter Deployment Guide is intended as a personal productivity tool It is not intended to be comprehensive and is provided for guidance only on an...

Страница 21: ...o the LUN that the server will be booting from can be tested at this point Select verify disk media Once the boot media is verified save changes and exit Figure 22 Confirm the media is accessible Vers...

Страница 22: ...standard Windows 2000 2003 install and the NICs will be generically listed in Windows 2000 Device Manager as two or more Ethernet Controllers until the necessary drivers are loaded For these NICs to b...

Страница 23: ...ay 1 and search for the MAC address on Internal port 13 Bay 13 corresponding to Eth0 device It shows the same MAC address of Eth0 For Eth1 do the same by logging into switch module bay2 bottom and sea...

Страница 24: ...required for using this kickstart process A single image can be built that works for both HS20 and HS40 blades 3 One of the differences between installing 2 1 and 3 0 on the blades is that in Version...

Страница 25: ...ia BladeCenter Remote Control otherwise you will see the No Video Available screen instead of the Linux installation dialogs You should also be able to set the correct mode setting with the vga 0x301...

Страница 26: ...recommended errata and driver updates If this includes a kernel update you will need to compile new drivers to comply with the new kernel Note When building the new kernel and driver image please add...

Страница 27: ...l prompt 1 timeout 600 label ksinstall kernel vmlinuz append ks file ks cfg text initrd initrd img lang devfs nomount ramdisk_size 7168 The kickstart config file will have some blade specific entries...

Страница 28: ...artitions have already been created in the pre script Do not include the clearpart statement and do not specify zerombr in the kickstart file either zerombr yes indicates that you would like the Red H...

Страница 29: ...However we downloaded the latest Broadcom device drivers for Linux and performed the instructions in Example 6 1 to install them The latest Broadcom device drivers were obtained from the following URL...

Страница 30: ...p rpm tmp 4397 Executing build bin sh e var tmp rpm tmp 4397 gcc DLINUX D__KERNEL__ DMODULE I lib modules 2 4 9 e 24smp build include Wall Wstrict prototypes O2 c blf c gcc DLINUX D__KERNEL__ DMODULE...

Страница 31: ...D when the floppy drive is empty NOTE alias floppy off should be added to modules conf to avoid floppy drive errors when media tray not assigned on boot Nov 5 09 44 30 spencerooni kernel hub c new USB...

Страница 32: ...is included in RHAS 2 1 Update 4 An error message of pc_key_b controller malfunction 0xA7 is seen many times when RHEL 3 is booting during a five second interval This problem exists because the IBM e...

Страница 33: ...if necessary type init 5 hanging the pointer speed settings T threshold values to 1 To change mouse acceleration and threshold values for the current session open a terminal window and type xset m 1 1...

Страница 34: ...wo approaches in order of preference revent the installer from attempting to write to this device EMC recommends masking the LUN 1 Initialize the Volume Logix database using the administrative host 2...

Страница 35: ...be available to the host server The LUNs should always be mapped using consecutive LUN numbers Although the host server can have different FC HBAs from multiple vendors or different FC HBA models fro...

Страница 36: ...etc inittab file This enables hardware 7 2345 2 Add the following line through the SOL console ttyS1 nfiguration inux we nee to enable SOL in L configuration file console ttyS1 19200n8 console tty1 T...

Страница 37: ...should bump you to a telnet prompt 3 4 Then hit the sysrq comma It should look like this Figure o use PuTTY or alternately the telnet client from the cygwin telnet application in Windows yperte en ent...

Страница 38: ...anged via the web interface under MM Control Network Protocols Telnet Protocol or via the CLI system telnetcfg telnetcfg t secs Displays and configures the telnet settings for the MM t inactivity time...

Страница 39: ...ig netdump Add line NETDUMPADDR 10 0 0 26 4 chkconfig netdump on 5 service netdump start Note there have been instances reported where there have been dependency issues between netdump and openssh Her...

Страница 40: ...NetXtreme Gigabit Ethernet device drivers Complete the following steps to install Broadcom NetXtreme Gigabit Ethernet device drivers 1 Insert the CD or diskette that contains the Broadcom NetXtreme Gi...

Страница 41: ...XXX is the code level Execute Launch exe 2 Click MANAGEMENT PROGRAMS and a window similar to the one in Figure 45 opens Figure 38 Broadcom Setup 3 Select Control Suite and BASP Click Next to continue...

Страница 42: ...is finished you will be returned to a DOS prompt Unmount the remote disk and reboot 6 2 BMC Update for the HS20 8843 and LS20 BMC firmware update for the 8843 blade can be done either by using a boota...

Страница 43: ...ting the second BIOS diskette and try to avoid having to restart the Management Module once the update process has begun If you do encounter and unrecoverable error at this point you should be able to...

Страница 44: ...s normal and does not indicate an issue 7 Remove the disk and reboot the PC After POST you should see the following with your new BIOS version QLogic Corporation QLA2200 PCI Fibre Channel Rom BIOS Ver...

Страница 45: ...initrd bin dev etc linuxrc lost found modules proc sbin tmp var ls mnt initrd modules module info modules cgz modules dep pcitable 6 Mount the drvnet img file via the loopback device mount o loop drvn...

Страница 46: ...age o vfat o cd 11 Recreate the modules archive from the first modules directory modules boot ls 2 4 9 e 40BOOT find type f grep v modules cpio cpio o H crc modules cpio 1481 blocks ls 2 4 9 e 40BOOT...

Страница 47: ...le At this point use an editor or sort script to sort the pcitable information by PCI ID 17 Add driver entries present in the drvnet img module info file to the module info file that are associated wi...

Страница 48: ...ecify the location of the supplemental driver diskette image create in step II by placing the following keyword and parameters in the Red Hat kickstart file If we are installing via FTP driverdisk sou...

Страница 49: ...eated to the post section of the kickstart file in order to facilitate execution of the script created in step 1 copy driver diskette image from the root directory of the NFS share to the root directo...

Страница 50: ...Version 1 13 1 19H Release Date 2005 02 11 2005 12 22 Revision Main App BRET73H BRET82H Table 2 Management Module BIOS Information A minimum of BRET82A is highly recommended since it contains several...

Страница 51: ...e minimum required version 1 56 fixes the EFI boot order problem referenced in Item 4 in Section 4 5 and is therefore highly recommended HS40 ISMP Minimum Req Most Current Version 1 24 1 29 Release Da...

Страница 52: ...Table 7 QLogic Firmware Information Note we are now recommending v1 43 for the QLogic BIOS Old minimum was v1 38 52 http w3 03 ibm com support techdocs atsmastr nsf WebIndex WP100564 The BladeCenter D...

Страница 53: ...l Switch Module 2 Blade Configuration Information Hostname IP Address Location Operating System SAN Configuration System Name Adapter WWID HDC Name HDC WWID HDC WWID HDC WWID HDC WWID 1 2 3 4 Version...

Страница 54: ...tch Disabling ports 13 SANSurfer 14 RDAC 35 Red Hat anaconda 32 AS 2 1 Installation 24 AS 3 0 Installation 24 AS 4 0 Installation 34 Boot Diskettes 45 Disk errors 31 Installation options 31 Partitioni...

Отзывы: