
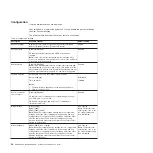

UPS initial startup
To start the UPS for the first time, complete the following steps:
1. Make sure that the internal batteries are connected. For more information, see
the IBM
Rack Installation Instructions
document.
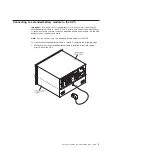
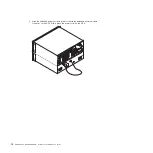
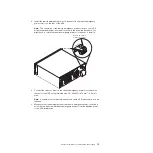
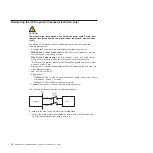
2. If an optional extended battery module is installed, make sure that the
extended battery module is connected to the UPS. For more information, see
“Connecting an extended battery module to the UPS” on page 9.
3. Make sure that all load segment circuit breakers are in the On position.
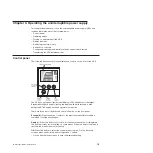
4. Turn on the main utility breaker. The UPS front panel display is illuminated.
The IBM startup screen changes to the UPS status summary screen. Standby
status is displayed on the front panel of the UPS.
5. Press the on/off button on the UPS front panel for approximately 1 second.
After the startup is complete, the status changes according to the UPS
operating mode.
6. Press the down (
) button to check for active alarms or notices. Resolve any
active alarms before you continue. For more information, see Chapter 6,
“Troubleshooting,” on page 47.
If there are no active alarms, the message
No Active Alarms
is displayed.
7. If an optional extended battery module is installed, see “Configuring the UPS
for an extended battery module” on page 29.
8. To set the date and time and to change other factory-set defaults, see
Chapter 3, “Operating the uninterruptible power supply,” on page 19.
9. If you installed an optional remote emergency power-off switch, make sure that
the function is working correctly by performing the following tests:
v
Activate the external remote emergency power-off switch. Make sure that
the status changes on the UPS are displayed.
v
Deactivate the external remote emergency power-off switch and restart the
UPS.
10. Charge the batteries. With load, the internal batteries charge to 90% capacity
in less than 8 hours. However, you must charge the batteries for 48 hours after
installation or long-term storage.
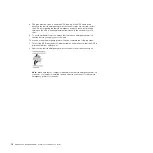
Note:
The UPS can be charged with or without load. The charging can occur
with the UPS connected to a power outlet (it automatically goes to Standby
mode) and not turned on.
11. To prevent an UPS overload condition, connect one load at a time and make
sure that each protected device starts up completely before you connect the
next load.
Notes:
1. At initial startup, the UPS sets system frequency according to input line
frequency (input frequency auto sensing is enabled by default). After initial
startup, auto sensing is disabled until you manually enable it by using the output
frequency setting. For information about setting the output frequency, see
“Configuration” on page 24.
2. At initial startup, input voltage auto sensing is enabled by default. After the
subsequent startup, auto sensing is disabled until you manually enable it by
using the output voltage setting. For information about setting the output
voltage, see “Configuration” on page 24.
3. Battery start is automatically enabled after one power cycle.
4. The Site Wiring Fault is disabled by default.
Chapter 2. Installing the uninterruptible power supply
17
Содержание 6000 VA LCD 4U
Страница 1: ...6000 VA LCD 4U Rack UPS 6000 VA UPS 3U Extended Battery Module Installation and Maintenance Guide...
Страница 2: ......
Страница 3: ...6000 VA LCD 4U Rack UPS 6000 VA UPS 3U Extended Battery Module Installation and Maintenance Guide...
Страница 14: ...xii 6000 VA UPS and 6000 VA EBM Installation and Maintenance Guide...
Страница 32: ...18 6000 VA UPS and 6000 VA EBM Installation and Maintenance Guide...
Страница 60: ...46 6000 VA UPS and 6000 VA EBM Installation and Maintenance Guide...
Страница 70: ...56 6000 VA UPS and 6000 VA EBM Installation and Maintenance Guide...
Страница 74: ...60 6000 VA UPS and 6000 VA EBM Installation and Maintenance Guide...
Страница 82: ...68 6000 VA UPS and 6000 VA EBM Installation and Maintenance Guide...
Страница 86: ...72 6000 VA UPS and 6000 VA EBM Installation and Maintenance Guide...
Страница 87: ......
Страница 88: ...Part Number 81Y1032 Printed in USA 1P P N 81Y1032...


