background image

© Copyright Lotronic - 2012 

1. Speaker 

8. Sustain/ Vibrato 

15. Timbre 

22. Fingered 

Chord 

2. ON/OFF switch 

9. Demo One 

16. Rhythm 

23. Key light 

3. Master volume 

10. Demo All 

17. Number 

buttons 

24. Percussions 

4. Accom Volume 

11. LED display 

18. Start/Stop 

25. 

Chord 

keyboard 

5. Tempo 

12. PROG 

19. Sync 


6. One key 

13. Record 

20. Fill-in  


7. Follow 

14. Play 

21. Single 


Preparation 


Insertion of batteries


The player will not operate on battery power when the AC/DC adaptor is connected. 

Remove the cover of the battery compartment on the underside of the keyboard  and 

insert six pieces of 1.5V "D" size batteries (not included) into the battery compartment 

following the indications (+/-) inside the compartment. Replace the cover. 

Note : When the voltage of the batteries drops down and the instrument cannot perform 

naturally, the batteries should be replaced in time. If the instrument is left unused for a 

long time, the batteries should be taken out to avoid causing damage. 

Do not mix up new and old or different types of batteries together. Keep batteries out of 

children's reach. Please observe the local regulations regarding the disposal of exhausted 

batteries.  


Using AC/DC Power Supply Adaptor 

The AC/DC power supply adaptor must be the one designated for the instrument. Before 

connecting the AC/DC adaptor to the wall outlet, ensure that all other connections have 

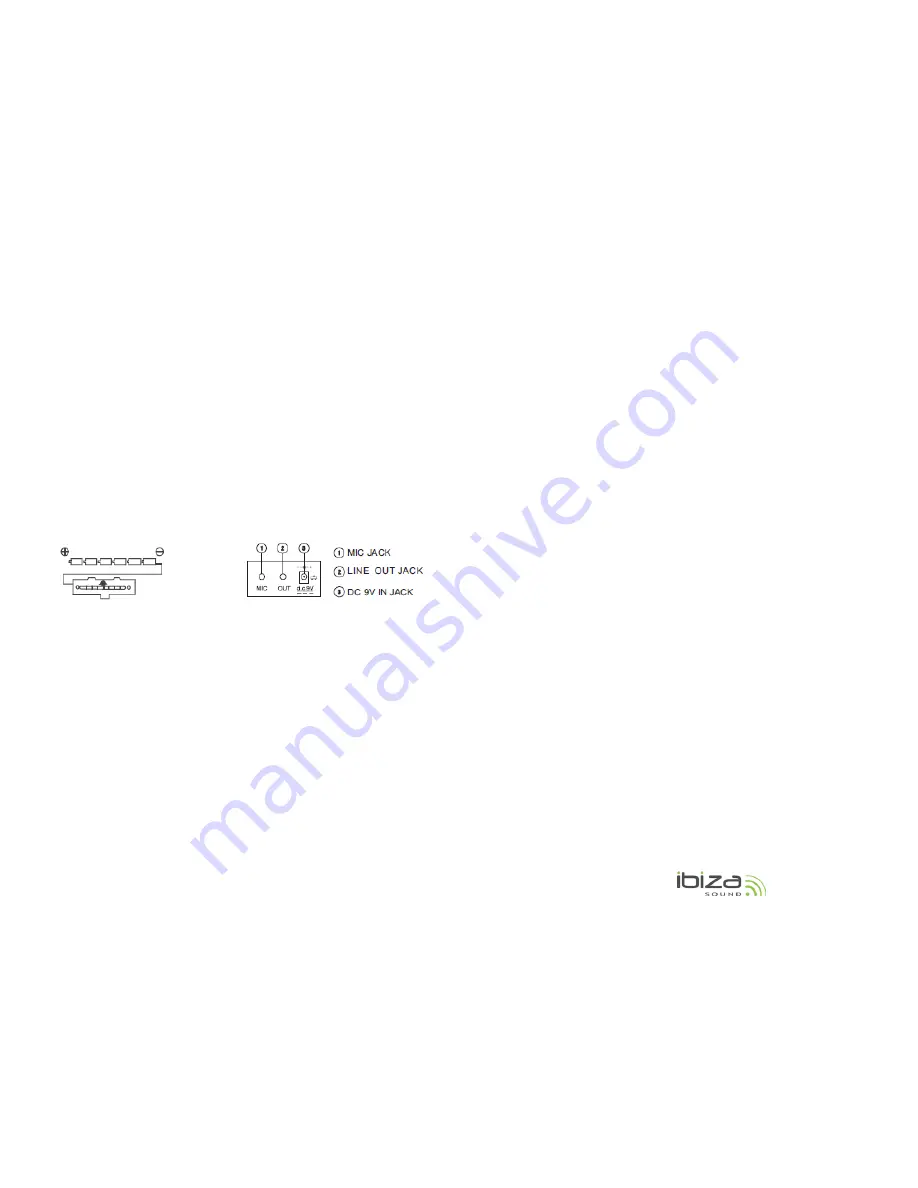
been made. Insert the small round plug firmly into the "DC  9V IN" jack on rear of 

instrument and then insert the other end into an available AC wall outlet (Please notice 

the input voltage should be the same as that of the power network). 


Using MIC 

Insert the supplied microphone into the MIC jack, then you can sing along with  the 

music. 


Connecting headphones or external keyboard amplifier 

Plug in the headphones (not included) with a stereo mini-jack 3.5mm plug to the "LINE 

OUT" jack for private listening. 

You can also use this feature to output the instrument's audio signal to keyboard 

amplifier. Connect the "LINE OUT" jack to the "LINE IN" or "AUX IN' jack on the keyboard 

amplifier with a LINE OUT cable (not included). 

Notes

 : 

A. When headphones or amplifier is connected, the main speakers will be automatically 

turned off. 

B. Be sure that the instrument is set at a low volume level before connecting. 

C. Increase the volume gradually for comfortable listening. 

D. Headphones, a keyboard amplifier, or stereo equipment can be connected to  this 

terminal. When another apparatus is connected to this terminal, the speaker system is 

automatically switched off, and sound is heard only through the connected device. 

E. Always refer to the instruction manual of the amplifier for complete connection and 

usage details. 


Affix the music stand on keyboard 


II.


Basic Method of Performance 

Press the [POWER] switch with the LED display showing the present tempo at 120. In this 

state, any operation on the instrument works. 


Key Light 

There is a key light function in the instrument. The corresponding white keys will shine 

when there is a  keystroke  on the white key during the performance, the  teaching 

function, and the playing of the demo songs. The function is on when the instrument is 

power on, and it can be started or quit by pressing the [Key Light] button. 


Volume Adjustment 

Press the [MASTER VOL +/-] to increase or decrease the master volume to an appropriate 

level. The volume value is shown on the display. Press both buttons at the same time to 

reset to the preset level. The [ACCOM +/-] button works in the same way as the [MASTER 

VOL +/-] does. Press ACCOM +/- to increase or decrease the accompanied volume. 


Demonstration Songs 

There are 16 demonstration songs stored in memory. The [DEMO ONE] is in charge of 

playing the present demonstration song repeatedly, while the [DEMO ALL] button is in 

charge of playing all the demo songs successively. In the state of  the [DEMO ONE] or 

[DEMO ALL], pressing either of the buttons for the second time  can stop the present 

song , and the third time can get into the next song. 

The 16 demo songs can be used with the backlit learning white key function. 


Содержание 15-5001

Страница 1: ...leave the volume working in maximum or in uncomfortable stage for long time Keep the instrument away from the heat which may damage the components Stop any liquid or other particles from getting into...

Страница 2: ...ument s audio signal to keyboard amplifier Connect the LINE OUT jack to the LINE IN or AUX IN jack on the keyboard amplifier with a LINE OUT cable not included Notes A When headphones or amplifier is...

Страница 3: ...the FILL IN button and a variation pattern can be inserted during the rhythm performance By pressing the FILL IN button firmly the present piece of variation can be repeated When the RHYTHM button is...

Страница 4: ...ressing the Start Stop button will end playback and clear the recording VII Key Light and Intelligent Teaching Function Record and play back with backlit learning white keys Press the Key Light button...

Страница 5: ...dant une dur e prolong e Tenir l abri de la chaleur Emp cher toute p n tration de poussi res de liquides ou autres particules dans l instrument Elles peuvent provoquer une corrosion et des courts circ...

Страница 6: ...ette fiche pour brancher le signal audio de l instrument sur un amplificateur Branchez la fiche LINE OUT sur la fiche LINE IN ou AUX IN de l amplificateur Notes A Lorsqu un casque ou un amplificateur...

Страница 7: ...e temps Insertion En mode Rythme appuyez sur la touche FILL IN Un interm de est ins r automatiquement En appuyant fermement sur la touche FILL IN le morceau est r p t Lorsque le rythme n est pas activ...

Страница 8: ...t effacer l enregistrement VII Fonction d Apprentissage Intelligent et Eclairage des touches Enregistrement et lecture avec clairage des touches blanches Appuyez sur la touche KEY LIGHT pour activer l...

Страница 9: ...altet sein Nicht ber einen l ngeren Zeitraum bei hoher Lautst rke benutzen Vor Hitze sch tzen Keinen Staub Fl ssigkeiten oder andere Fremdk rper ins Geh use dringen lassen Sie k nnen Rost und Kurzschl...

Страница 10: ...Buchse des Keyboardverst rkers an Hinweise A Wenn ein Kopfh rer oder Verst rker angeschlossen ist sind die eingebauten Lautsprecher automatisch abgeschaltet B Die Lautst rke des Instruments ganz herun...

Страница 11: ...hleift Durch kr ftigeres Dr cken der FILL IN Taste wird das Intermezzo wiederholt Wenn die Rhythmus Funktion nicht aktiviert ist startet eine Variation beim Dr cken der FILL IN Taste und ein St ck Rhy...

Страница 12: ...ie Aufnahme zu VI Tastenbeleuchtung und Intelligente Lernfunktion Aufnahme und Abspielen mit Aufleuchten der wei en Tasten Die KEY LIGHT Taste dr cken um diese Funktion zu aktivieren Auf die RECORD Ta...

Страница 13: ...Vermijd het indringen van stof vocht of andere delen in het instrument Zij kunnen immers corrosie of kortsluiting veroorzaken Schakel het toestel uit en koppel het af alvorens te reinigen Nooit het t...

Страница 14: ...n aanslaat zullen deze tijdens de oefenfunctie en des demo liedjes oplichten De functie is actief wanneer het instrument wordt ingeschakeld Druk de KEY LIGHT toets om de functie te deactiveren Regelin...

Страница 15: ...volume te verhogen of te verlagen Druk gelijktijdig op beide toetsen om terug te keren naar het vooraf ingestelde volume van 15 IV Automatische basakkoorden Door de automatische basakkoordfunctie word...

Страница 16: ...Opname en afspelen met oplichting van de witte toetsen Druk de KEY LIGHT toets om de verlichtingsfunctie te activeren Druk op de RECORD toets om de noten op te nemen Daarna de PLAY toets drukken om d...

Страница 17: ...das imediatamente Se o instrumento n o for utilizado por um longo per odo de tempo as pilhas devem ser retiradas de modo a evitar danos N o misture pilhas de tipos diferentes novas e antigas Mantenha...

Страница 18: ...o guardados no sintetizador Pressione o bot o PERCUSSIONS e a reprodu o de percuss o pode ser iniciada nestas teclas IV Ritmo Auto Selec o de Ritmo O sistema providencia 100 tipos de ritmo que variam...

Страница 19: ...ot o Start Stop vai terminar a reprodu o e limpar a grava o VII Fun o de Ilumina o de Teclado e Ensino Inteligente Gravar e reproduzir com teclas brancas iluminadas Pressione o bot o Key Light para ac...

Страница 20: ...ectronice sau poate provoca scurt circuit Deconectati instrumentul inainte de curatare Nu conectati sau deconectati unitatea cu mainile ude Curatati tastatura cu o bucata de panza uscata si moale fara...

Страница 21: ...icator cu tastatura sau un alt echipament stereo Atunci cand un alt aparat este conectat la acest terminal sistemul de difuzoare este automat oprit iar sunetul se aude numai prin dispozitivul conectat...

Страница 22: ...tonului FILL IN piesa de variatie poate fi repetata Atunci cand butonul RHYTHM nu este folosit folosirea butonului FILL IN poate porni un fragment al variatiei de ritm Apoi un fragment al ritmului va...

Страница 23: ...ea si redarea cu tastele albe de invatare cu iluminare din spate Apasati tasta Tasta Iluminare pentru a activa functia de iluminare Apasati tasta Record pentru a inregistra notele a se vedea sectiunea...

Отзывы: